 USA + International
 OWC Canda
 OWC Europe
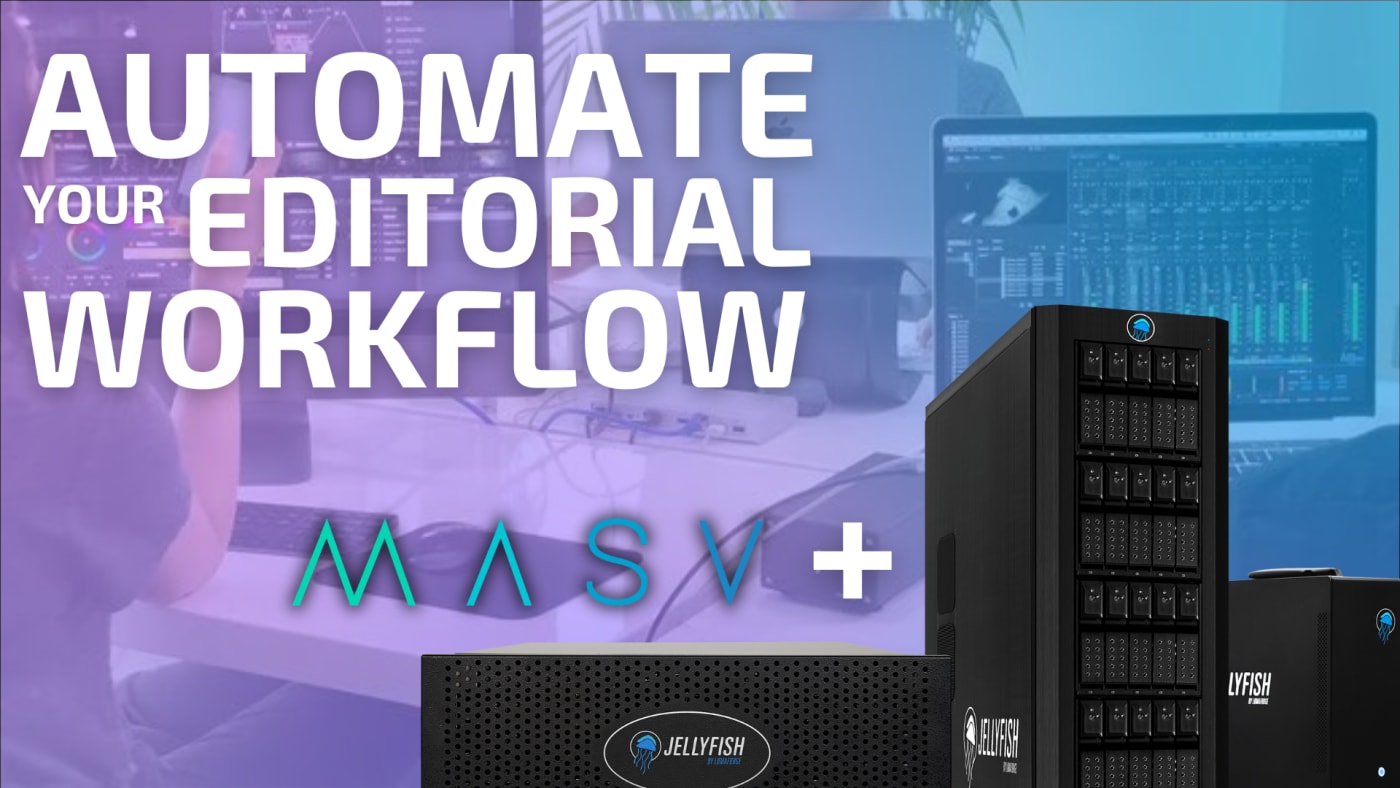
How to Automate Your Video Editorial Workflow With Automatic Backups and Sharing Between Post-Production Roles
Combining MASV with a powerful network attached storage solution like OWC Jellyfish allows you to automate backups and file transfers between every member of your post-production team, saving everyone a lot of time.
Wayne Grayson • Jun 06, 2024
Oftentimes in video production, the real, time-consuming work begins after the cameras have stopped rolling. With the footage in the can, it’s now time to backup, edit, and share everything you’ve captured with all of the members of your post-production team.
Depending on the team, this can get pretty complicated very quickly. But there is a workflow out there that automated your asset backups and transfers, leaving you to focus what you’re actually there to do: be creative and make the magic happen.
When you combine the awesome capability of a cloud-based large file transfer solution like MASV with the versatility of a network attached (NAS) storage solution geared toward video professionals like the OWC Jellyfish, backing up and transferring assets—even as you work on those assets—can be as easy as a single upload and ticking a few boxes.
Simply put, this is the fastest way to make all of your footage available to everyone on your team and ensure that it’s all safely backed up according to the 3-2-1 rule. Here’s how.
Step 1: Offloading and Backup
When it comes to remote ingest, it’s always a best practice to follow the 3-2-1 Backup Rule. This rule calls for at least three copies of your footage, backed up in at least two different physical locations, one of which is in the cloud. This ensures that you have redundant copies of your footage to safeguard against drive failures or even catastrophic events like a fire, flood, etc.
Many post-production teams prefer to have their cloud copy in an S3 bucket or a Wasabi bucket, while also having that footage backed up to a long-term archival drive like a USB hard drive RAID or LTO tape. This is where the magic of MASV first comes in.
MASV is purpose-built for transferring large files like high-resolution video, enabling you to upload and download footage at much higher speeds than typical cloud storage. Plus, because MASV is cloud-based and engineered to be used from the browser, anywhere you can access the internet, you can upload to MASV. In fact, MASV can achieve speeds up to 5Gbps transfers in the browser, and if you download the MASV desktop app, you can achieve speeds up to10Gbps, which translates to being nearly as fast as having a USB-C drive physically connected to your device.
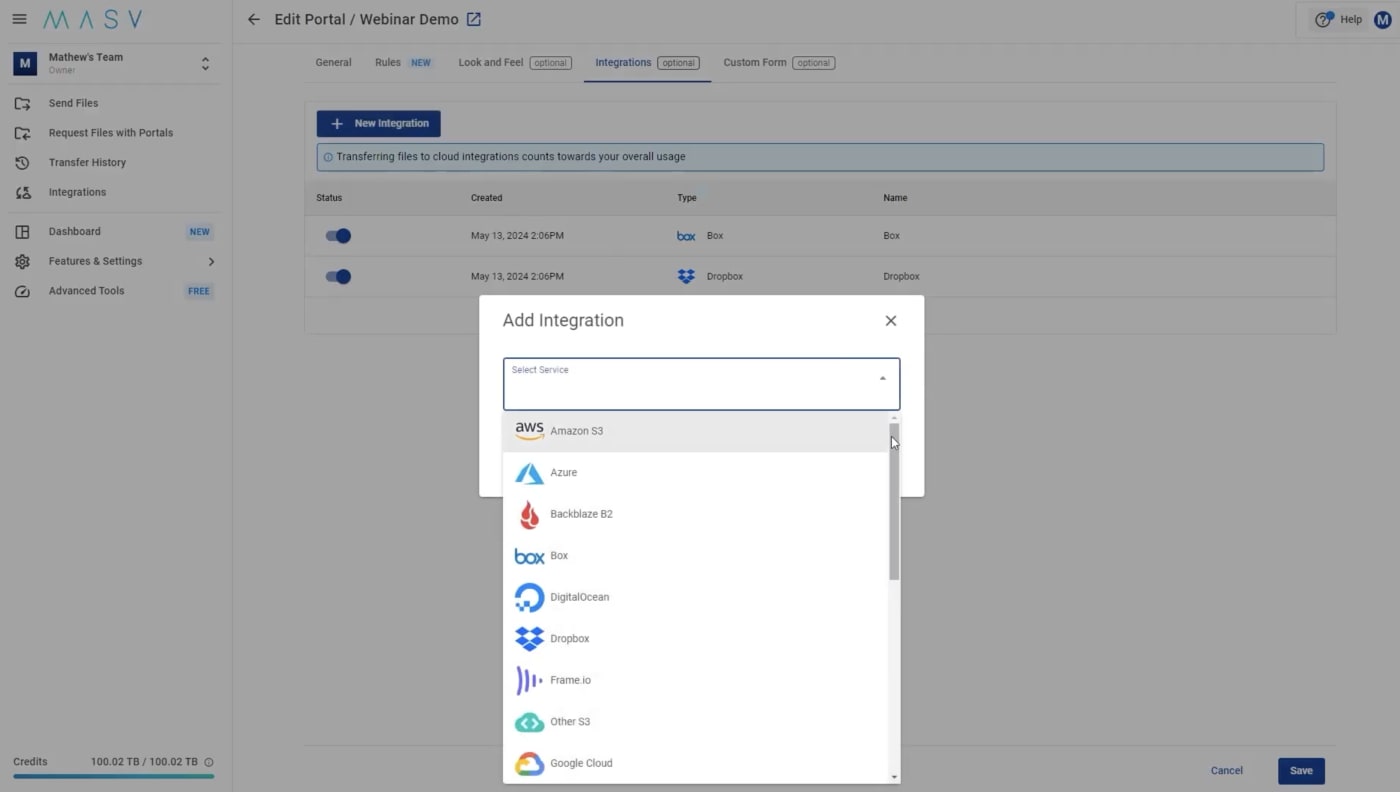
But MASV isn’t just fast, it also has a variety of cloud integrations that work alongside dashboards called MASV Portals. The true power of MASV when it comes to post-production workflows is that you can perform a single upload into MASV and MASV will automatically copy that upload into an integrated cloud storage drive.
But that’s not all. MASV can also automatically generate a download link for those files to anyone who needs a local download—and even automate those downloads to make those files automatically available onto a drive or shared storage solution like OWC Jellyfish.
So, just to recap: using MASV you can upload your footage once, and MASV will automatically back that footage up to the cloud, host that footage for manual download, and automatically download that footage onto a drive or shared solution storage that you direct it to.
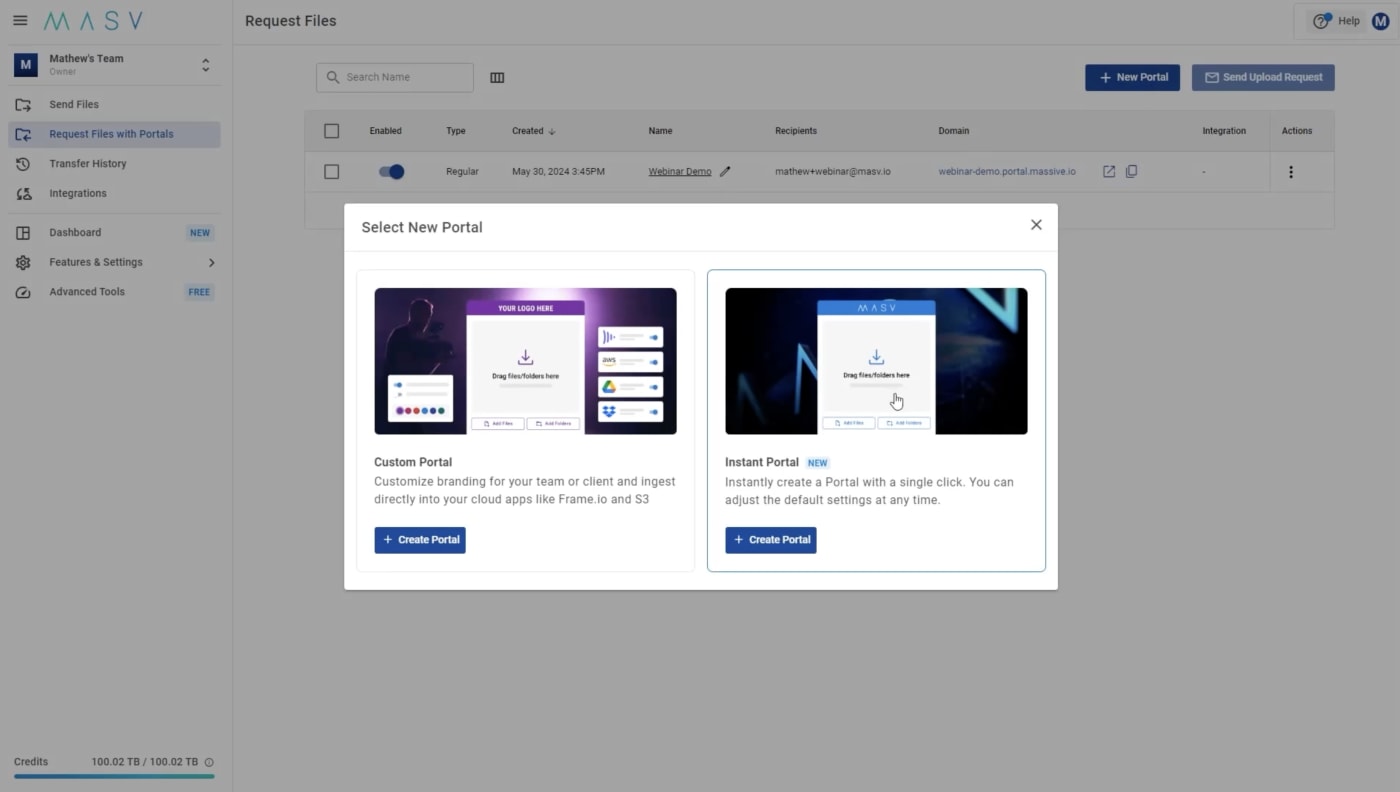
MASV Portal Setup
MASV Portals are extremely easy to set up and MASV gives you two options to do so:
- Instant Portal: MASV provides you a link to a non-branded portal.
- Customized Portal: Full customization of your portal with your own company logo, a background image and even custom messaging. You can also add a custom metadata form. This comes in handy if you need to capture certain information from the field to receive that submission data.
With your portal setup, you can now direct it to copy files uploaded to the portal into a pre-configured cloud integration like S3 or Frame.io. You can also set it up to use the MASV desktop app to trigger automatic downloads of files uploaded to the Portal directly onto a local shared storage solution like the OWC Jellyfish.
And once a file is uploaded to a MASV portal, MASV gives you 10 free days of storage of that file in the Portal, making it available for copying to cloud storage or person-to-person transfers at any point within that period.
Automating MASV Portal Downloads
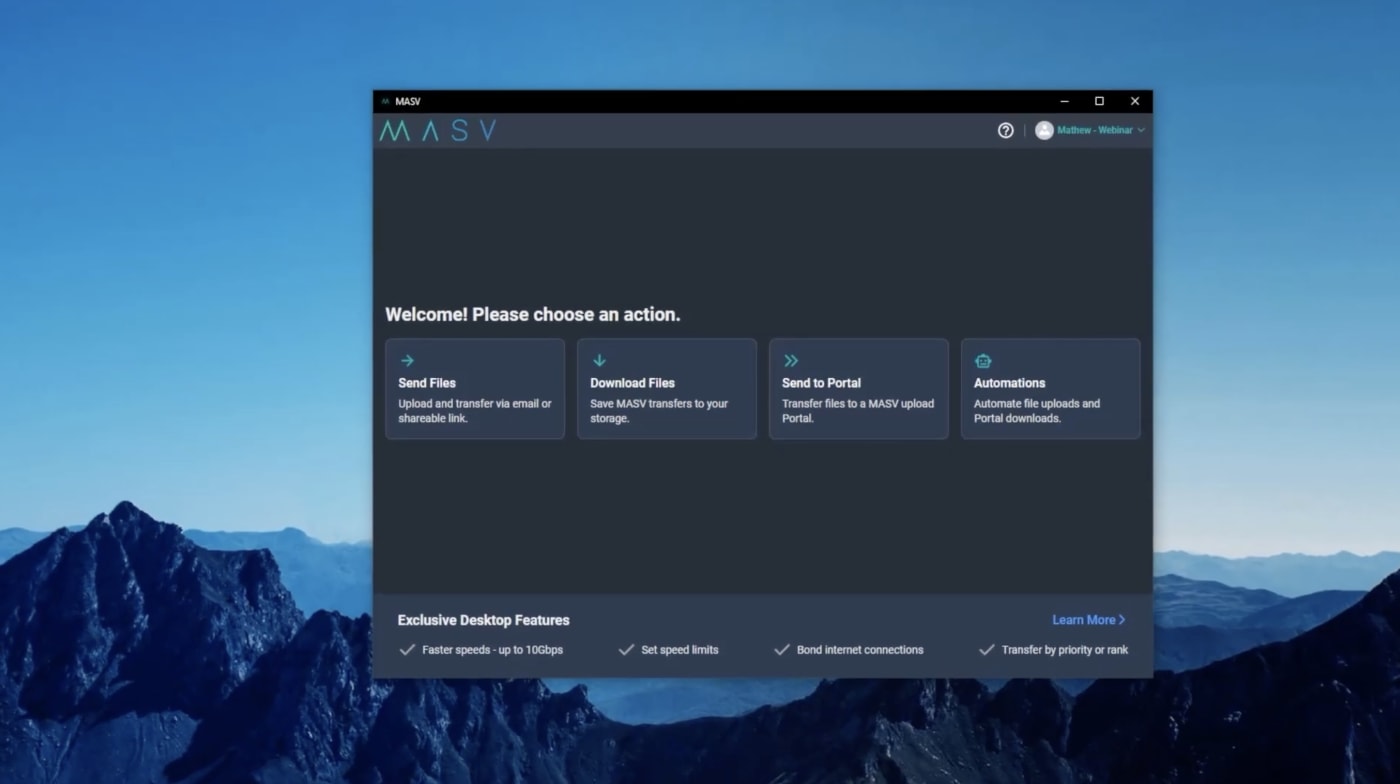
Typically, when a file is uploaded to a Portal, at the moment the upload completes, MASV will send out an email to any selected recipients to let them know they can now download the file. But if you want to o automate your MASV Portal downloads, you’ll need the MASV desktop app, which can be setup with the download automation.
With the download automation enabled, the moment the file is finished uploading, MASV will grab that file and download it to your selected destination. MASV also offers a transfer agent, which is essentially a headless version of the desktop app. As long as the desktop app or transfer agent is running on your host machine, it will start the download. The desktop app and transfer agent are available for Mac, Windows, and Linux machines.
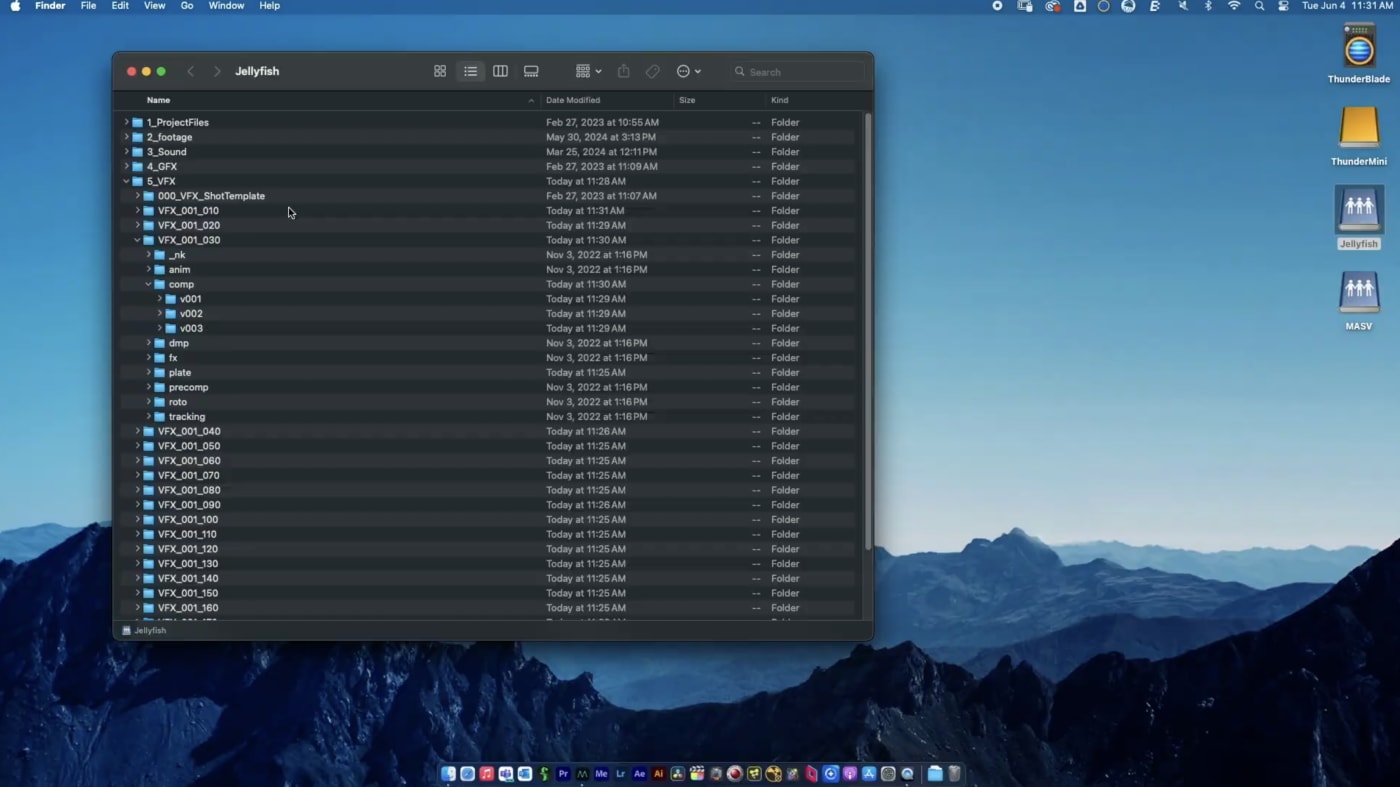
Step 2: Ingest to Shared Storage
As we’ve established, MASV features incredibly powerful download automation that allows you to upload assets once and have them copied, transferred, and even downloaded into multiple places automatically. But how do we setup our shared storage to allow for this? Here’s how it’s done on the OWC Jellyfish.
Connecting a MASV Portal to Shared Storage
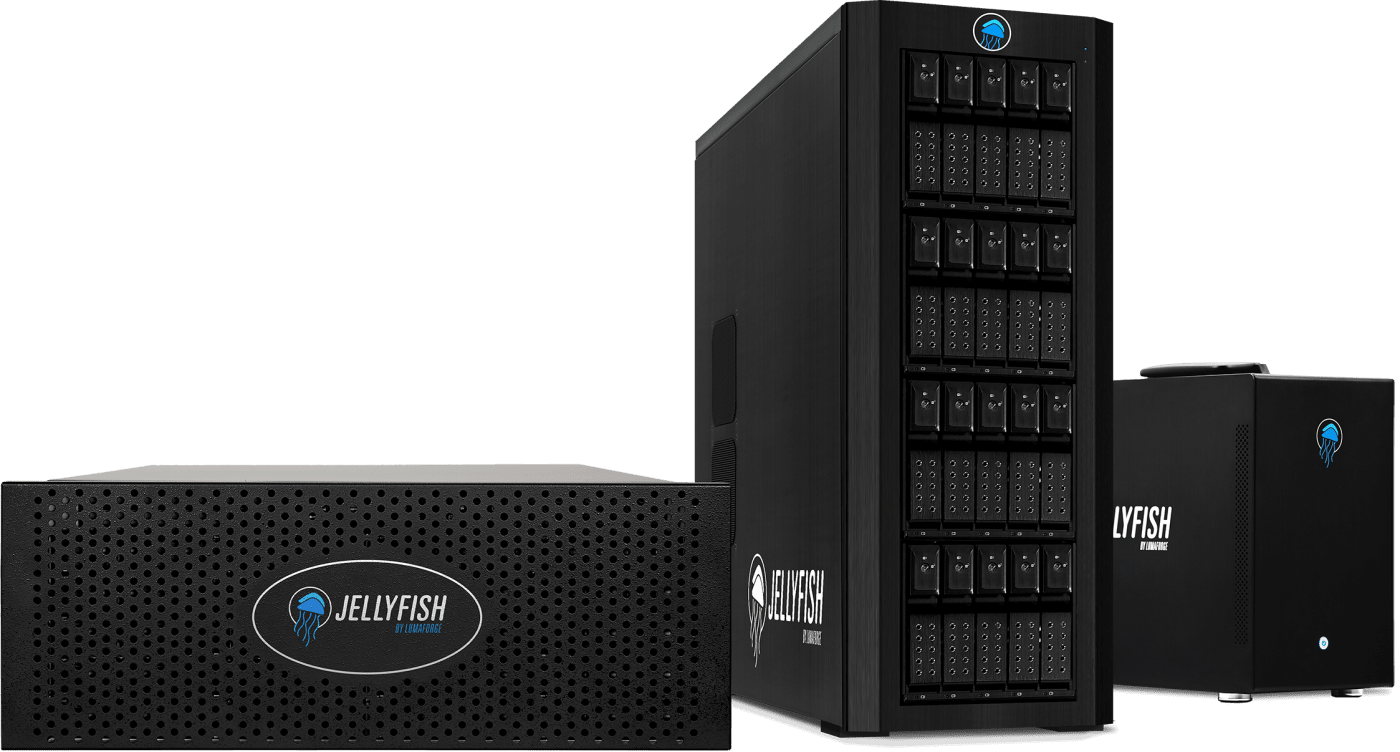
One of the standout features of the OWC Jellyfish is that it is a shared storage solution that is built for video professionals, meaning that it doesn’t require an IT professional to setup. It’s very easy.
Jellyfish has always been known as a direct connect NAS, and that is made possible thanks to the inclusion of 10Gb Ethernet ports. This is a huge help for editors and others on a post-production team who are transferring media back and forth from Jellyfish because it can take advantage of that full 10-gig speed.
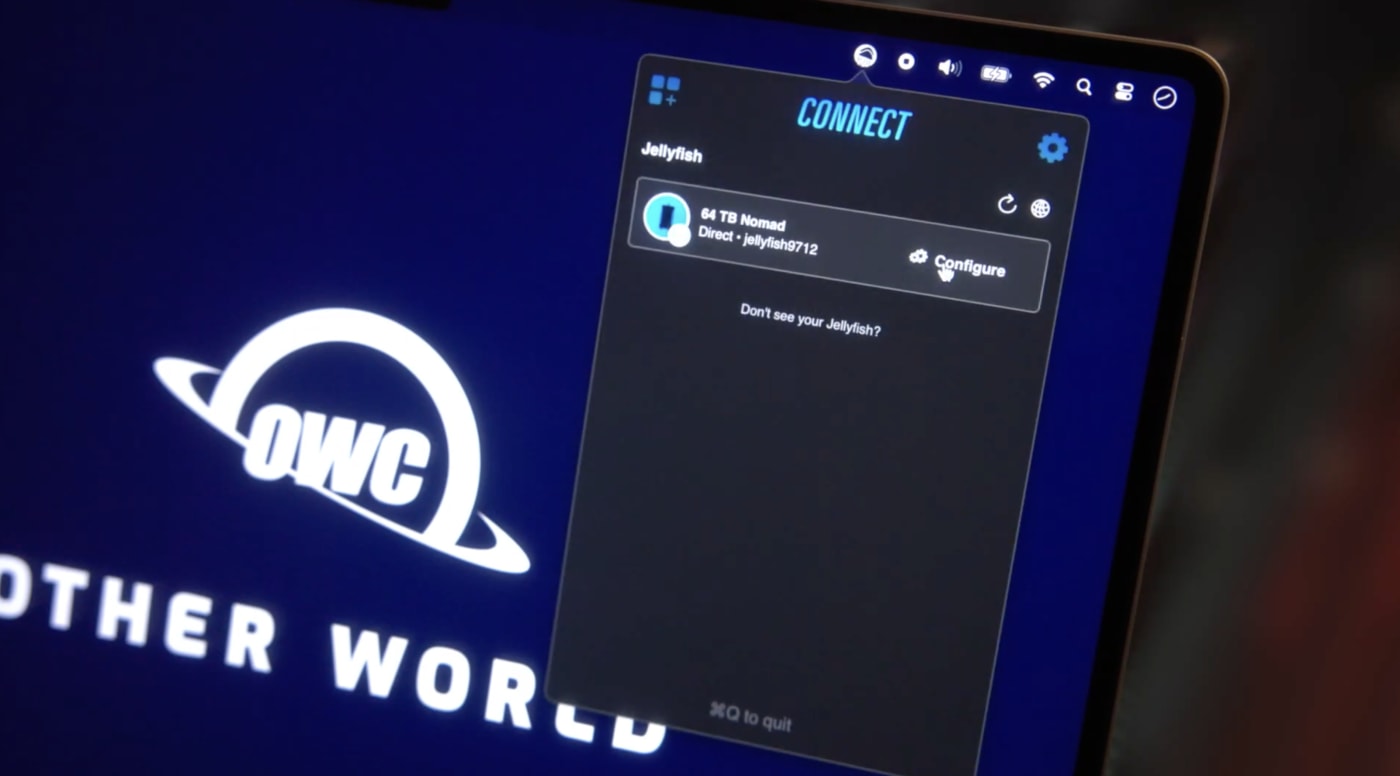
And every Jellyfish ships with Jellyfish Connect, a lightweight desktop app that automates the setup process for you. Anyone who's ever set up a NAS before knows that it can be a bit of a headache, especially if you don't know what you're doing. Jellyfish Connect is meant to simplify that. So taking your 10 gigabit connection, either plugging it directly into your workstation, into the Jellyfish or going through a network switch, Connect will automatically discover the Jellyfish and then configure that port and IP address.
Once that's done, you can have multiple users connect to a single Jellyfish by logging in as a user, at which point they can start mounting shares. These mounted shares show up just like an external hard drive would on your desktop and you can start moving media there. In this case, once we have that MASV Portal set up, we can actually use Jellyfish Connect to automatically connect to the Jellyfish and download those assets directly
to the Jellyfish so the team can start working.
Jellyfish performance
Jellyfish is built on ZFS and that uses a three-tiered caching system to deliver the performance that editors expect when they're working. Jellyfish is able to offer collaborative workflows for apps like Avid Media Composer, DaVinci Resolve and Adobe Premiere. And when it comes to media production, collaboration is really the name of the game. The more quickly that people can access and preview and tag their footage, the faster they can actually start creating. So all the files are in one place where everybody has access to them.
Step 3: Getting to work: Seamless, Full-Resolution Collaborative Editing
Once the download from your MASV Portal to your Jellyfish has finished, those uploaded assets are now available to multiple editors to start performing multiple jobs with via the Jellyfish, including tagging and backing up files.
Jellyfish comes with a light media asset manager called Kyno for Jellyfish, and that'll allow users to tag their media, add metadata, and then they can actually ingest that metadata to their non-linear editor (NLE) of choice, whether that be Avid Media Composer, DaVinci Resolve, Adobe Premiere, or even Final Cut.
And then while all that footage is being ingested, it can also be backed up to an LTO or another archival storage format.
Taking collaboration to the next level with Adobe Premiere Productions
Another benefit of Jellyfish is that it works very well with Adobe Premiere Productions, a form of collaborative editing that allows multiple editors to work inside the same project, access the same footage, and pass timelines back and forth seamlessly. We all know that Adobe Premiere can get a little bloated sometimes when you have large project sizes. The beauty of projects in Adobe Premiere Productions is that they are able to be broken up into smaller chunks and perform a lot better, especially if you have a large team.
This means that everyone can be working at full resolution, they can get to their final product sooner, and nobody's having to explain away why it looks like this or zooming in or doing sort of post-production fixes and explaining to a client, for example, why something isn't at finished product status yet.
Step 4: Sharing with colorists via MASV Watch Folder Automation
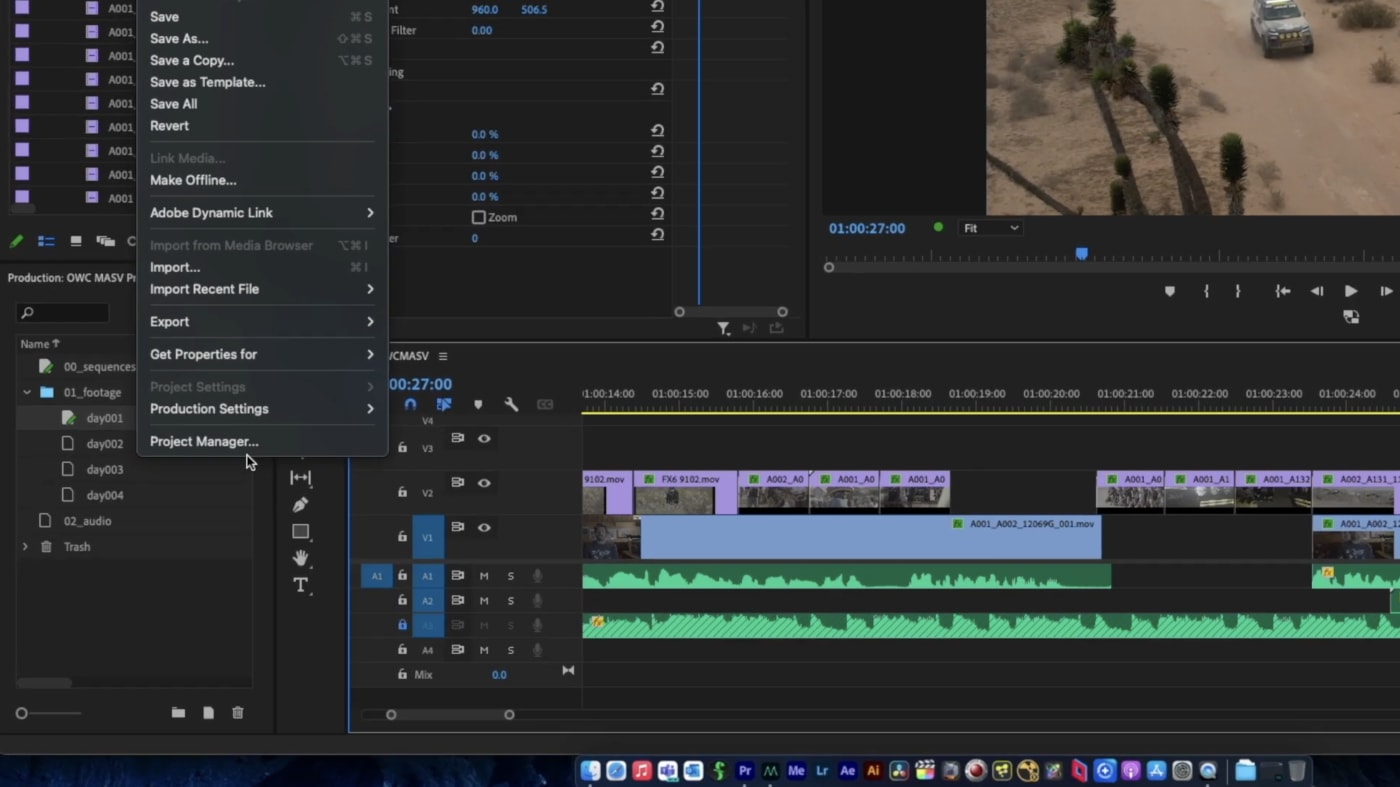
So since we're working inside of Adobe Premiere, a tool we really like to use is called Project Manager. This makes it really easy to select only the footage that you've used inside your timeline, and copy that footage to another folder entirely to send that off to another team member.
This is where MASV’s watch folder automations come into play. With Project Manager, Premiere will only copy the assets used in the timeline to wherever you specify, which is important because obviously you don't want to be copying superfluous footage that is not being used in the timeline.
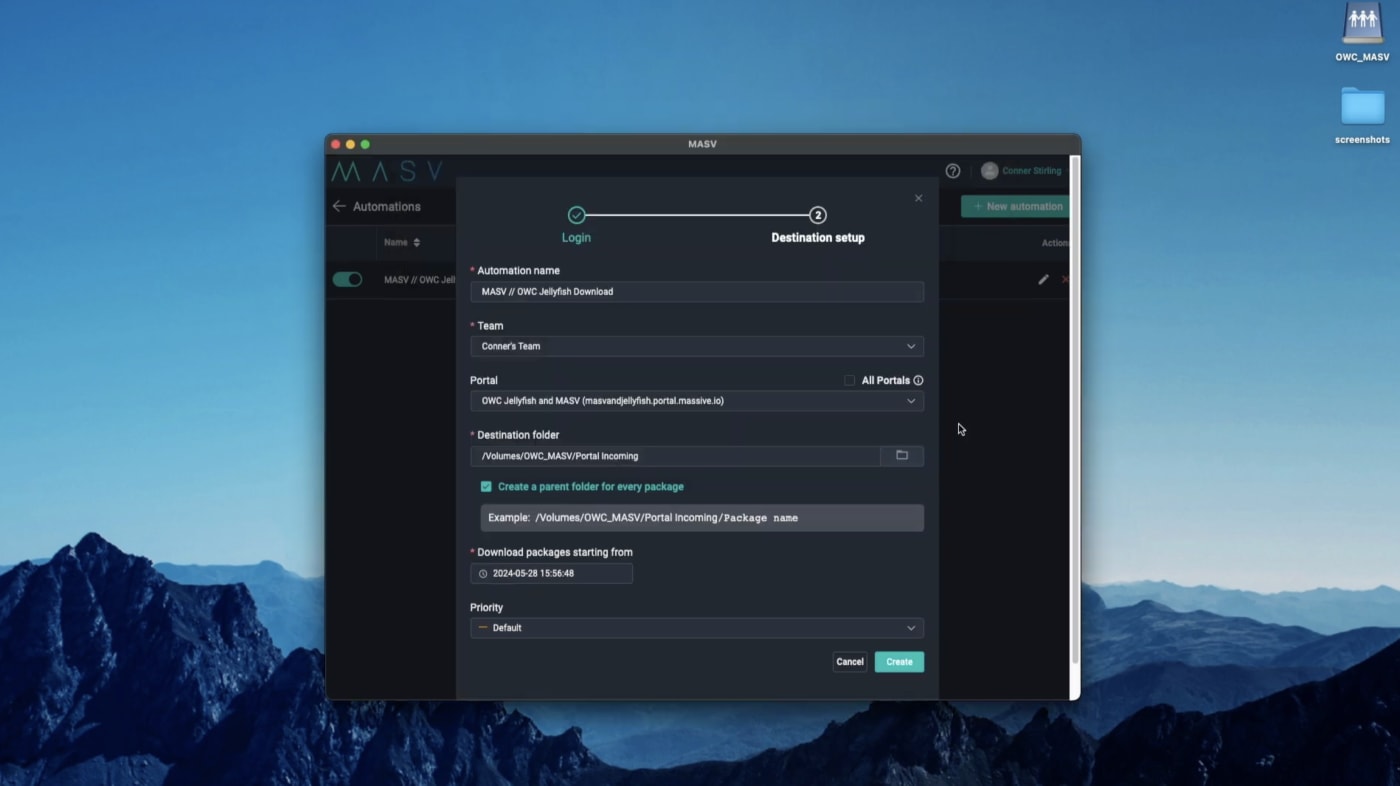
You can setup MASV to “watch” specific folders, including those on a shared storage solution like Jellyfish. As long as Project Management copies its files into the specific watch folder MASV is listening on, MASV will wait until those files complete, and then once ready, start uploading those files.
You can specify as part of the automation whether those files go to a specific recipient or into a specific MASV Portal. Once the watch folder has grabbed the files and completed the upload to the entire recipients list or to the MASV Portal, depending on how the watch folder was configured, the files can either remain in the specified folder, or delete those files to save on disk space.
The important thing here is to make sure these are copies of your original assets and not the originals themselves. Whoever is setting up the automation needs to ensure that they're not deleting the originals and that these are actually copies from that Premiere Project Management process.
In the meantime, while this is happening, MASV is still waiting in the background for the next batch of files to come into that watch folder to be sent once again.
Receiving MASV watch folder files
Massive has a few ways to notify users that files uploaded via watch folder are ready for download. If a recipient was specified as part of that delivery, they will receive an email from MASV with a unique download link, which they can then follow either in the browser or using the desktop application.
MASV also has the ability to set up notifications directly using Slack or Microsoft Teams. So that way, if there's a group channel that your team is listening on, you can see those notifications in real time. Alternatively, instead of relying on those notifications, as long as a desktop application is running a download automation, you can set watch folder files to automatically be downloaded to a specified location.
This means that in our current spot in the post-production workflow, once clips have been edited, in the timeline, the assets in the timeline have been automatically uploaded via a MASV watch folder, and then automatically downloaded onto shared storage that the colorist can access in full resolution.
Step 5: Sharing large project files with Visual Effects
At some point along the way during the color process, the director, producer, or the client is able to see the finished product. But let's say the client decides they want more smoke or they want to see an alien invasion or a sky replacement if we're being a little bit more realistic. Here’s how we can go about moving the timeline files back to a different group of people, specifically, VFX artists.
Visual effects is where things can get really tricky. Everything up to this point has been pretty straightforward, but it's important when you're dealing with VFX as an editor that you keep things organized. That means creating labels for shots and having dedicated folder structures that make sense for everyone to tackle the work together. And with a Jellyfish the performance is there for when you need to render image sequences for VFX artists because they frequently request image sequences.
It's also important to make sure in this scenario that the plates or original shots go to the colorist as well as the visual effects artists. The colorist is there to make sure there's no color shifts and everything stays the same so they can compare the plate to the actual version of the shot and make sure that the elements that don't need to shift haven't shifted.
This part of the process really benefits from having the ability to access the full quality and full resolution files and it's important that you have a shared storage solution that can support that bandwidth for playback of those files. The Jellyfish absolutely delivers here.
Efficient large file transfer and maintaining folder structure with MASV
But MASV also makes the process of transferring these large files more efficient. Because of the types of files and their file sizes that are being used in post-production, transferring files in the traditional way—in sequential order—isn't as efficient.
So, when MASV transfers files, it breaks up the files into smaller pieces and does parallel uploads of those smaller pieces. This allows MASV to take more advantage of the available bandwidth and provide better performance for those file transfers.
MASV also preserves the folder structure exactly as how files were
uploaded into MASV. So if you have a root folder, which has, say, 10,000 to 100,000 files, and it's a 10-level deep folder structure, MASV will ensure that when that packet gets downloaded, it's an exact match.
This even applies to outlier situations such as folders named with emojis or even empty folders. Some camera systems or applications create empty folders in their folder structures. Again, MASV will preserve that folder structure from upload to download.
Step 6: Final product and upload
So with our project finished, how do we get everything finished and back into one place? MASV recently added the ability for users to set some restrictions on uploads. That includes things like file extension types, but also the size of the package. This is useful for those projects that are just looking to receive final deliverables. They could be MOV, MP4, MXF file formats, but they don't want PDFs or JPEGs or anything else that is not really required for their project to upload as well.
So now within each Portal, MASV has added a rule section which allows you to customize the file extension, but also things like naming of the package name. This allows you to specify a certain regex expression, which enforces the user who has to set that on upload. This lets the post-production team stay organized on what packages they're receiving and keeps things nice and tidy within that workflow for a particular user.
Receiving materials for final delivery on Jellyfish
Once the MASV Portal has delivered uploaded final product assets to a Jellyfish, Jellyfish can compile the project back together back in Premiere or another piece of software and hit the render button. And with those rendered final assets, anybody who's connected to the Jellyfish can have access to those so they can put them where they belong, whether that's a producer uploading a feature film or something that needs to go to the web onto various platforms, or an assistant editor who needs to pull down those final assets and back them up to LTO or to a backup solution like an on-premise solution or to the cloud.
Jellyfish also has native cloud integration that allows you to back things up to AWS, Wasabi, Backblaze, and Azure.
Conclusion
With your final files shared, exported, and published, all that’s left now is to get ready for your next project. Hopefully at this point you can see just how powerful implementing MASV’s file transfer automations with fast, easy-to-configure shared storage like OWC Jellyfish can be.
Combining MASV’s fast automated transfers and downloads and the access to full resolution project files to your entire team through Jellyfish makes moving files between team members, devices, storage, and archival locations as easy as a single upload.
Other topics you might like
The New Portkeys LH7C is a Rugged, Bright, Yet Affordable On-Camera Monitor
Updated on Jun 16, 2026
Grab Great Audio From Anywhere with This New DPA 4097 CORE+ Micro Shotgun Microphone
Updated on May 29, 2026

The Thunderbolt 5 NVMe RAID Enclosure Built to Match and Grow With Any Workflow [Video]
Updated on May 20, 2026
Canon’s New EOS R6V Adapts the R6 III Into a Video-First Body Aimed at Creators
Updated on May 13, 2026