 USA + International
 OWC Canda
 OWC Europe
How to Organize Your Project Files and Folders for Faster Editing in Premiere Pro
Looking to speed up editing in Premiere Pro? Properly organizing your files structure and folders can help you become more efficient. Here’s how.
Josh Edwards • Aug 09, 2022
Today we’re taking a look at how to organize your folders and files in Premiere Pro. While it’s tempting to just drag and dump everything into the edit, if you do that it can get pretty messy very quickly. What happens then is that disorganization and confusing mess in your project window starts to slow you right down. When you can’t dig out a certain file or piece of footage straight away, it starts to feel like you’re running in mud.
So, when you’re working on an edit you want to try and keep things neat and organized—it’ll help you to edit more efficiently and quickly.
You can do this in whatever way suits you personally. In the tutorial video above, I’ve shown you how I like to do mine. I basically reflect my folder structure outside of Premiere Pro which is something along the lines of this:
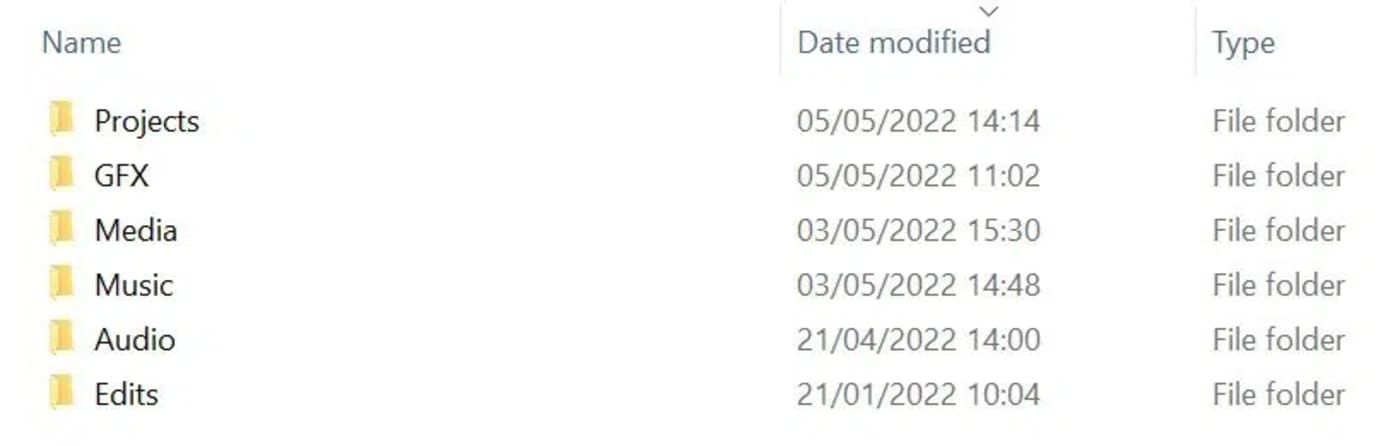
Project Files: This is where all my project files for Premiere Pro and other Adobe software I may use during the project (like After Effects) are kept. That includes the auto-save files.
Media > camera folders > footage: In these folders, I’m able to store the footage from my various different cameras in a neat and orderly fashion.
Audio: If I’ve conducted an interview with audio equipment or am recording audio as a voiceover for the project, I’ll store the files here.
Music: Any tracks I use in the project go here.
GFX/Assets: Any graphics and associated assets (often done using After Effects) are kept here.
Edits: The final exports are always saved here.
Simple and clean enough, right? This general format is widely accepted and utilized within the industry. There are of course plenty of small variations and tweaks, but more often than not it looks something like this.
In your Premiere Pro project window, you basically want to mirror this setup with a few small tweaks. In the project window, you right click and then select “new bin”. It’s these “bins” that are your folders. Name them appropriately as such:
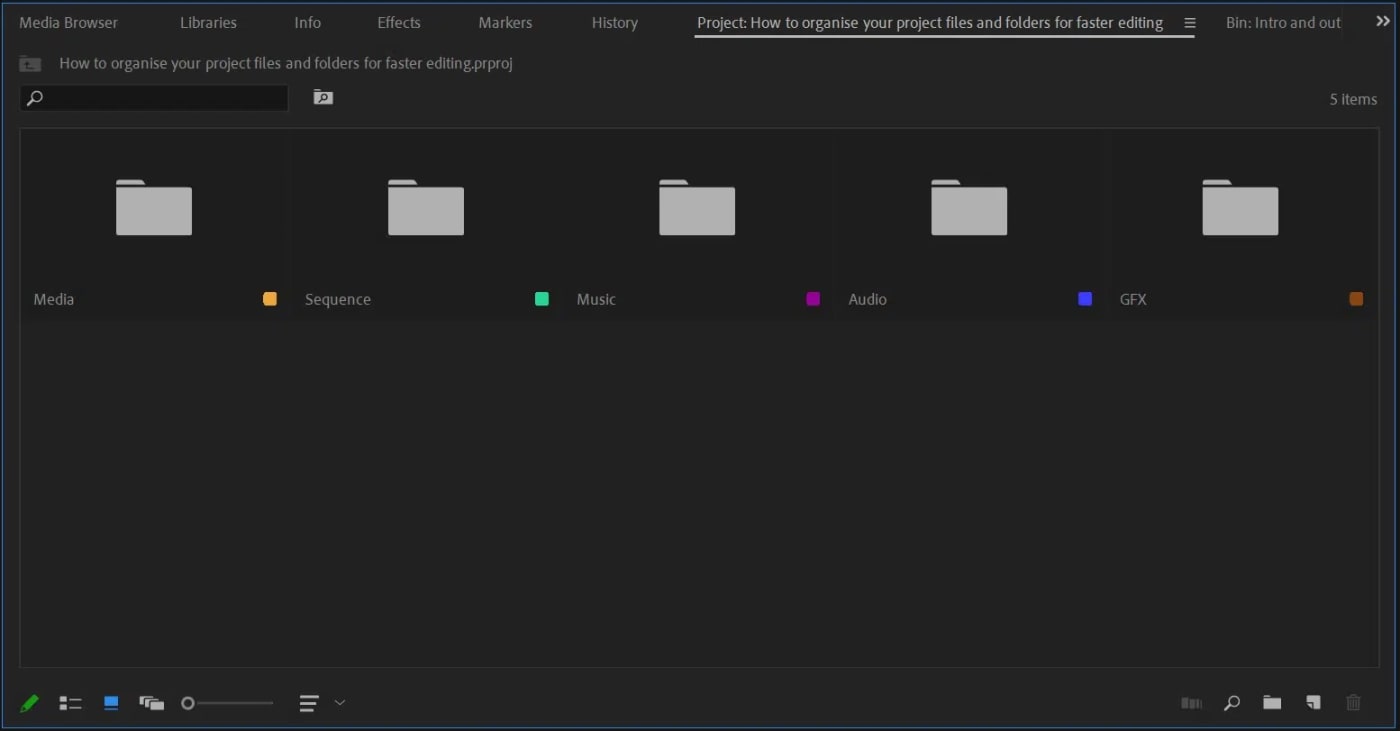
Sequences: This takes the place of the “projects” folder I referenced above. This is where you’ll keep any Premiere Pro sequences you’re working on.
Media > camera folders > footage: Nice and easy. This stays the same as above – all of your footage shot on various different cameras, stored in a neat and orderly fashion.
Audio: Again, this stays the same. This bin is for all your audio files. You may want to create further bins for “narration” or “interviews” to help differentiate.
Music: You guessed it. Here, you’ll keep any music tracks you use in the project.
GFX/Assets: You won’t always be using graphics and other assets but if you do, you can keep them in here. Again, you may want to create further bins to help streamline it even more. For example, a bin for After Effects exports, a bin for JPEG images and so on.
In conclusion, then, all you really need to do is have a simple, clean and tidy system that is easily replicable for any project. Over time, this will all become second nature and you’ll be able to navigate files and folders within Premiere Pro at lightspeed, helping you to push those edits out faster than ever before!
Other topics you might like
Sony’s New FX5 Brings New Sensor, Open Gate, VENICE-level Features to a Compact Cinema Camera
Updated on Jul 23, 2026
What is RAID? How it Works and How to Choose the Best Array for Your Needs
Updated on Jul 21, 2026

What’s the Best Stackable Mac Studio Dock With Storage?
Updated on Jul 16, 2026
How to Choose a Portable SSD: Speed, Interface, and Ruggedness Explained
Updated on Jul 10, 2026