 USA + International
 OWC Canda
 OWC Europe
How to Create a Travel YouTube Channel Part 2: Setting up Your Channel
Starting a travel channel on YouTube? Read this for everything you need to know on how to setup your travel vlog channel. Part 2 in a series.
Josh Edwards • Aug 30, 2021
Welcome to part two of our series on how to create a travel YouTube channel. In part one, we discussed how to start a travel vlog on YouTube by diving into the process of shooting and editing. We covered everything from pre-production, to shooting on location, to the editing process that comes after. Now that you hopefully have a few travel vlogs under your belt, it’s time to take a look at how to set up your travel vlog channel.
Setting up a YouTube channel
You should treat your YouTube channel as your website. This is your online portfolio where you can share your best work with the world. It’s important to remember that this isn’t just a place where people can come to watch your videos; it’s also where they can learn more about you and your brand and how to get in touch.
Below, I’ll walk you through everything from how to set up your travel vlog channel with the basics such as channel art and info, to how to upload your first videos and some tips on how to optimize them.
How to setup your travel vlog channel
First things first, let’s create the channel itself.
- When signed in to a Google account you’d like to associate with the channel, head to the channel switcher and click on the “create a channel” option.
- This will take you through the process of creating your new channel, including choosing a channel name.
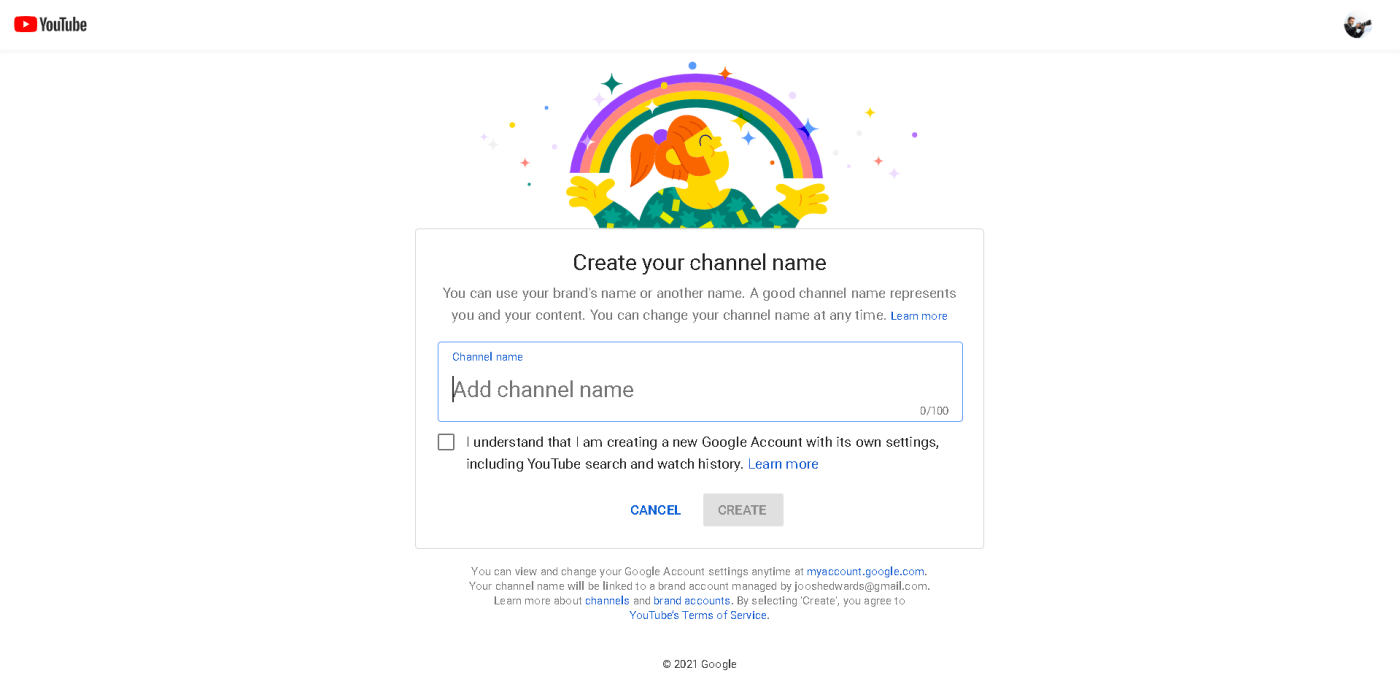
Remember – this name is something that is going to represent what you and your channel are all about, so keep it short, relevant, and catchy if possible. Failing that, you can just go with your name as I did.
Channel art
An important part of any YouTube travel channel but so often overlooked, your banner, or “channel art,” is the first thing many people will see when they land on your channel. That’s why it should be the first thing you focus on.
A good channel banner represents what your channel is all about, ensuring viewers immediately know what to expect from your videos and perhaps how often to expect them. Remember, to achieve the best results, you should play within these dimensions:
- 2560 x 1440 pixels. The safe area for mobile and web platforms (without any text or logo cropping) is 1546 x 423 pixels.
I highly recommend using an online tool such as Canva to create your banner. They offer loads of free templates and help streamline the process so that you can focus much more on the creative side of things, rather than worrying about resolutions and display ratios.
In terms of the design, there’s no wrong or right way to do it. You could look to incorporate the colour scheme and font associated with your brand. (If you don’t have one at this point, it’s a good idea to create one.) The main things you’re probably looking to include are:
- The channel name
- A short sentence summing up what this channel is about
- Your upload schedule (for example, new videos every Friday)
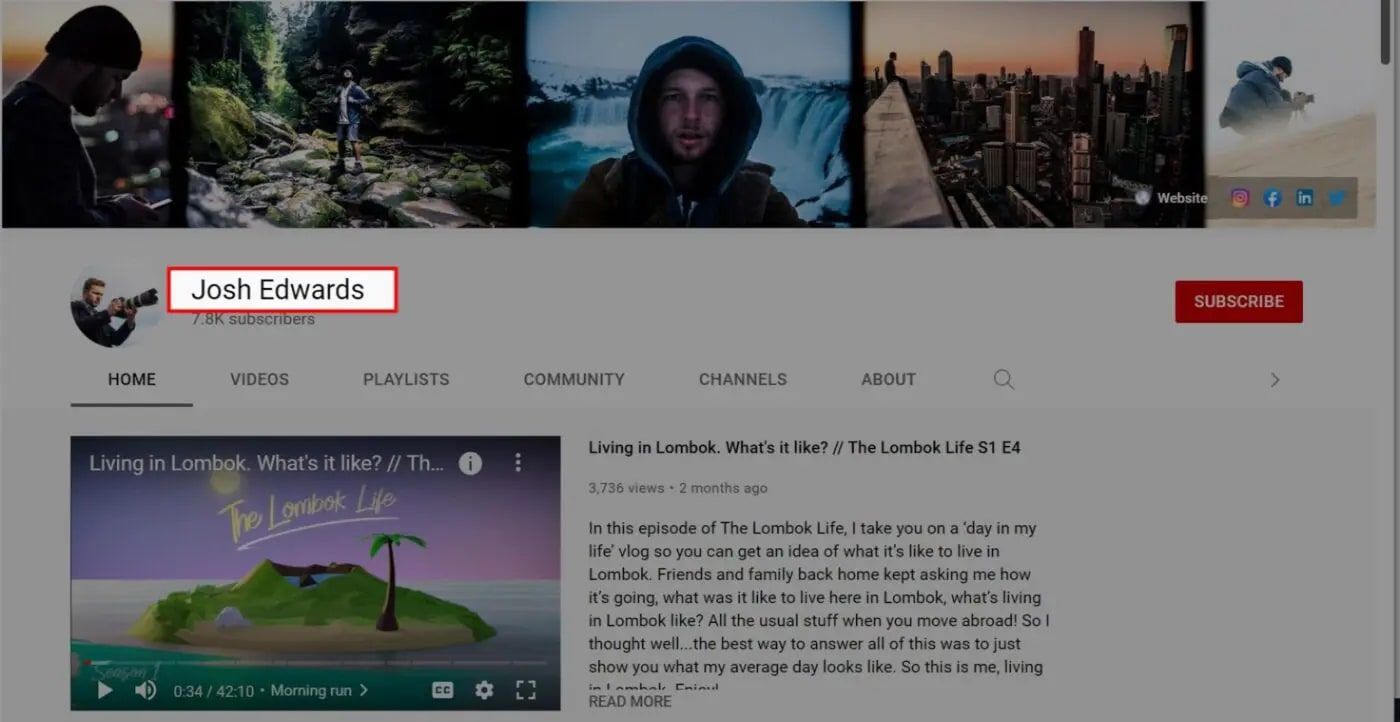
Of course, this is your channel, so feel free to experiment and do whatever you want with it. To play devil’s advocate here, my own channel banner looks like this:
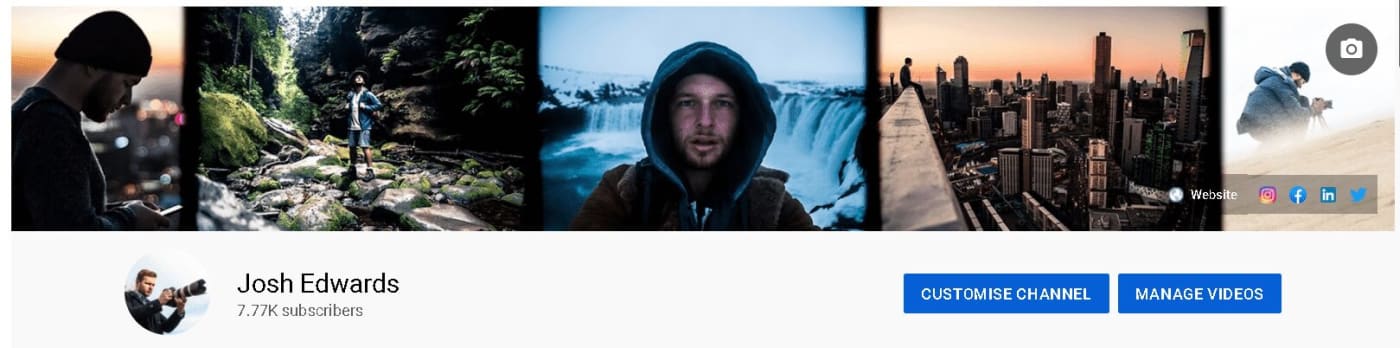
Once you’re happy with your banner design, you can go ahead and upload it. On your channel, hover over the banner image until the camera icon (“edit channel art” button) appears in the top right corner. Click this and you’ll be taken to the “branding” section of channel customisation, where you can change your banner as well as adding a profile picture and video watermark. Easy.
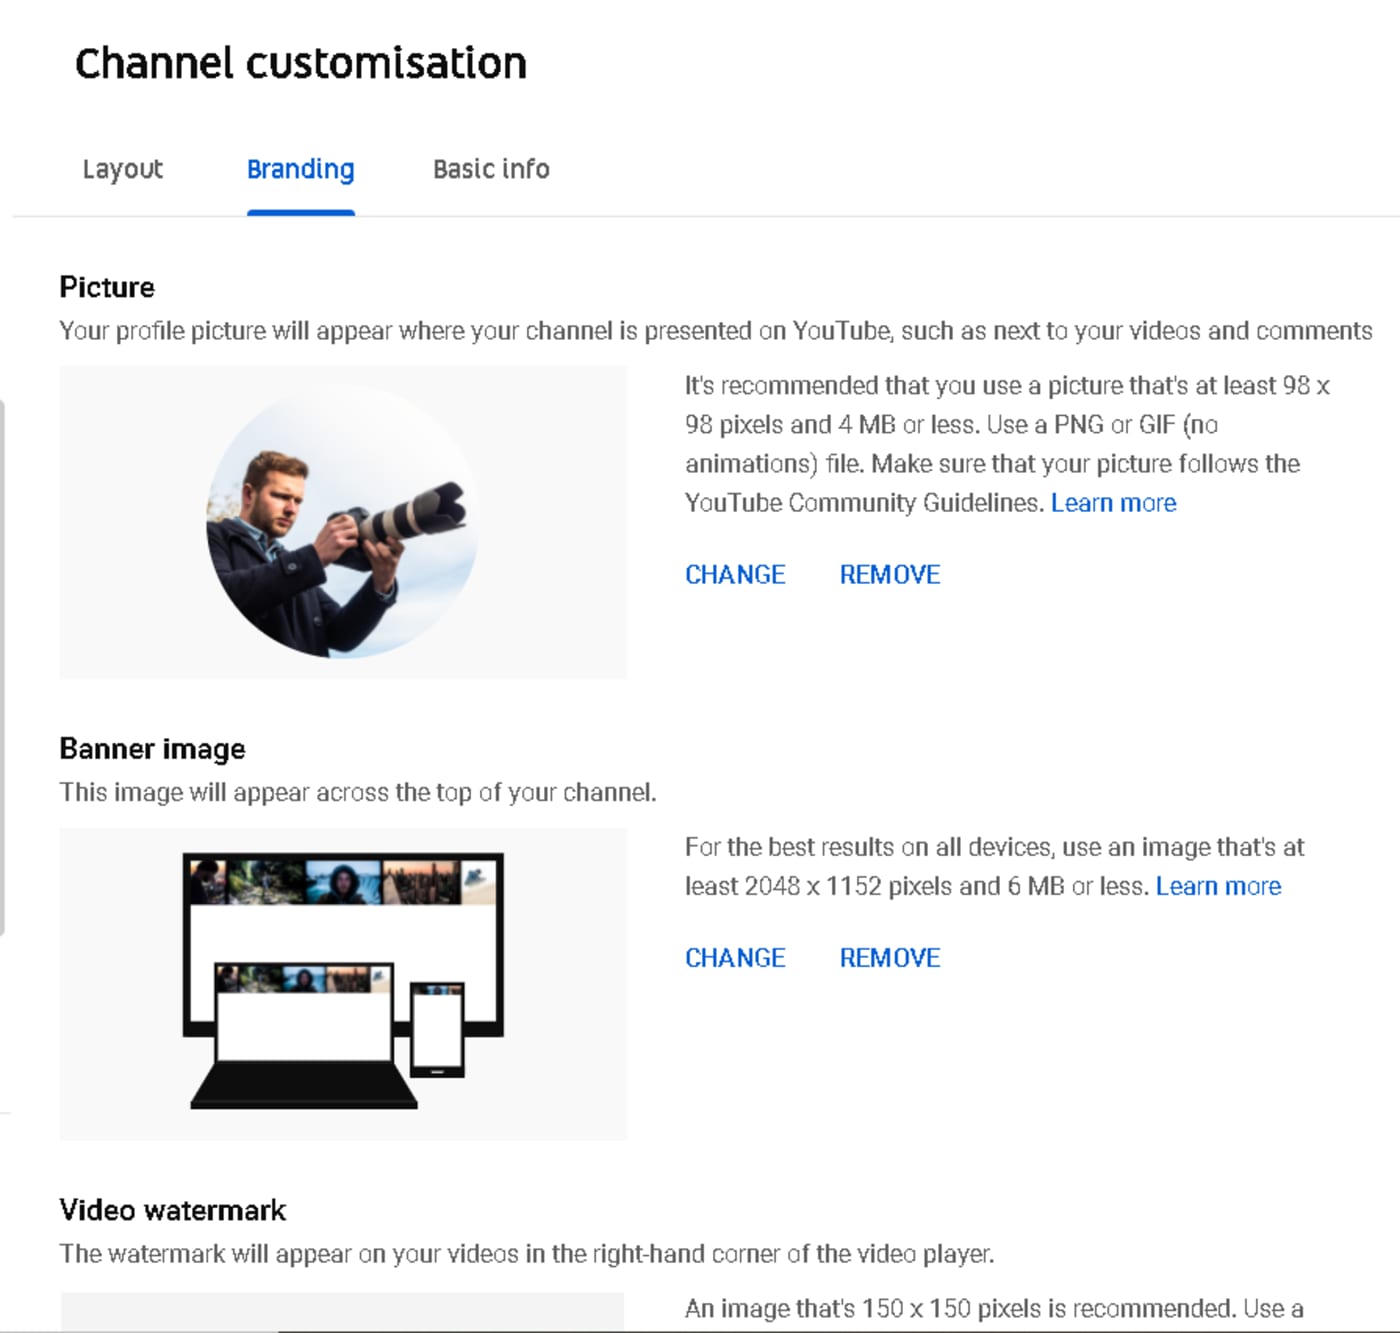
Fill in the “about” section
Another commonly overlooked job when it comes to how to set up your travel vlog channel is filling in the “about me” section. I promise we’ll upload a video soon but we’ve got to build some solid foundations first.
When navigating your channel, you’ll see a number of tabs at the top. Click the “about” tab. In the description here, you can give a brief summary of yourself and your channel. And yes, you do need to keep it brief. Just give the details of who you are, what you do on the channel, and how often you post. Show some personality and tell readers why they should be subscribing. Within this, you can include relevant keywords that will help people find you when searching YouTube.
Below the description, there’s the option to include links to such things as your contact email, your social accounts, and your website. These links will appear as icons overlaid on your channel art and are highly visible to anyone visiting the channel homepage.
Channel trailer
Ok, now we’re ready to start uploading. The first video you’ll want to upload to your new travel channel is not actually a travel vlog, but a channel trailer. This video is most likely the first video any new viewer is going to see when they visit your channel—it automatically plays whenever any non-subscriber lands on your homepage.
Basically, you should think of a channel trailer as an “elevator pitch.” This is your opportunity to convince someone in 30 to 60 seconds why they should be investing their time and energy into subscribing to your channel and watching your videos.
To create one, simply treat it like any other trailer. It should be a short video that’s no longer than two minutes in length, giving the audience an idea of who you are and what they can expect to see on your channel. You should try to highlight the following:
- What makes you and your channel unique?
- What is the personality and vibe of the channel?
- Why should you subscribe?
I like to start with a hook that really grabs people’s attention in the first few seconds (any good YouTube video should be aiming to do this). I also think it’s important to finish the video with a call to action. Ask the viewers to subscribe to your channel.
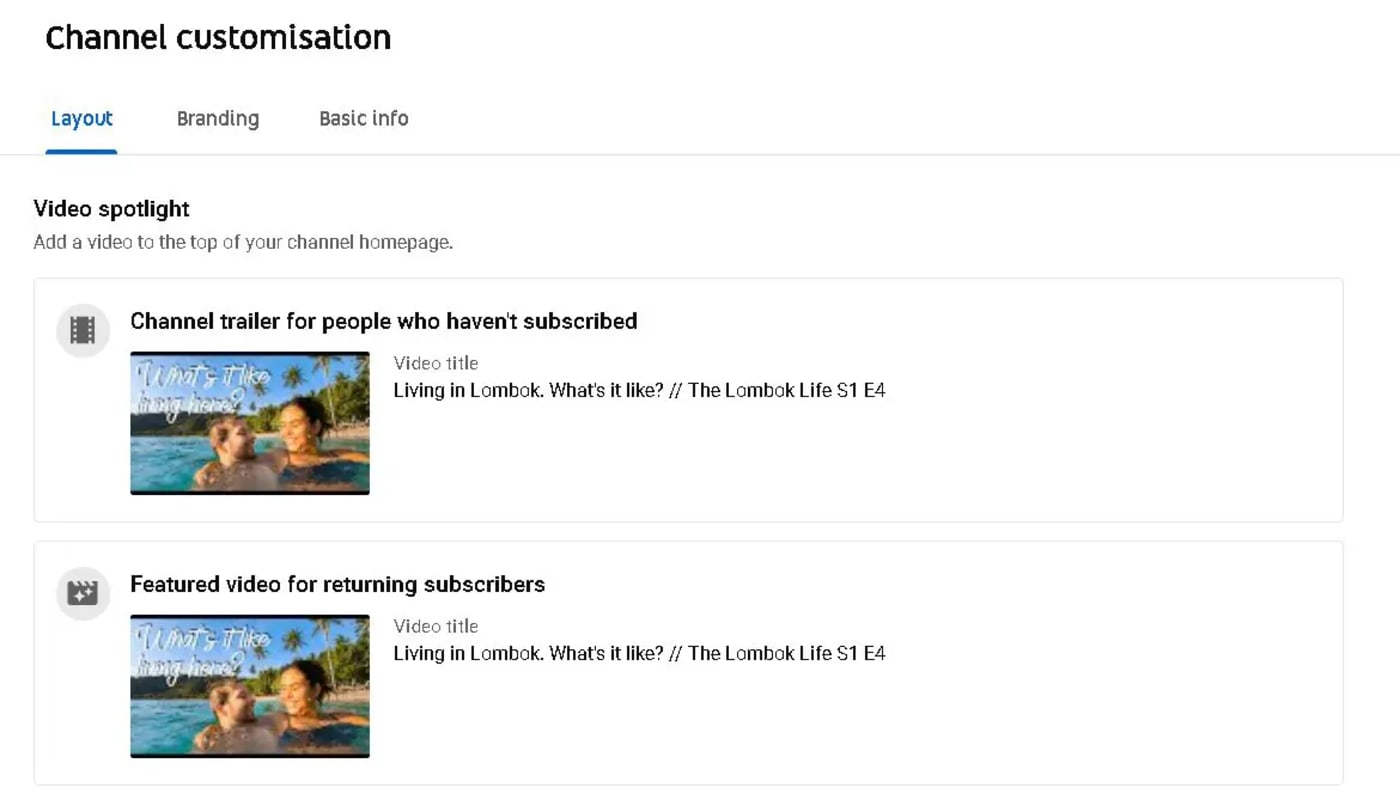
When you’re ready to upload, follow the “how to upload a video” instructions in the segment below. Then, to make this particular video your YouTube channel trailer, follow these steps:
- Click the customize channel button on your home page.
- Immediately, you’ll land on the “layout” section of channel customization.
- Here, you can select the video you want to play as the “Channel trailer for people who haven’t subscribed.”
Uploading a travel vlog
Congratulations – this is an exciting moment for you and your YouTube travel channel. To upload your first video is a major step. What I love about YouTube is how easy this is:
- Click the “upload” icon in the top right-hand corner of the YouTube interface—it’s the camera with a + symbol.
- Select “upload video” and away you go. While uploading, YouTube will walk you through the process of picking a title, writing a video description, choosing a thumbnail, adding keywords and many other settings. These are important when it comes to how to start a successful YouTube channel, so let’s dive into this in greater detail.
Optimizing your travel vlog
Something I want you to always remember—just because a video is uploaded to YouTube does not mean that this project is complete. There are still several essential factors that you should pay attention to. By studying and improving on the following, you can really help improve the chances of your videos being found and watched by new viewers. No matter how epic, funny, and entertaining your new video is, this is how to start a successful travel vlog on YouTube.
In short, YouTube uses a series of algorithms to rate your video. We could dive into a whole realm of best SEO practices on YouTube in a separate article, but for now, let’s focus on the key factors that it analyses when weighing up how, who, when, and where to show your video:
Keywords
Keywords are exactly that. They’re the key words that will help people find your content online using search engines such as Google and YouTube. A key word (or phrase) is something that’s relevant to your travel vlog. For example, when I made a travel film focusing on the impact of the pandemic on the Gili Islands in Lombok, Indonesia, I focused on “The Gilis.” “Travelling’” and “Pandemic.” I suggest checking out a tool like TubeBuddy that can really help you hone in on this.
Thumbnails
I can’t stress this enough. Thumbnails are so important. This is the first thing people will see when scrolling through their feeds and it plays a massive part in them deciding whether or not to click and watch your video. So, ensure that the thumbnail is bright, catching on the eye, and relevant to the video content. Furthermore, add a keyword or phrase as graphic text that intrigues people. Take a look at the example I used below for a recent travel film:
Titles
Alongside thumbnails, you need to have a title that’s concise, relevant, descriptive and features one or two keywords. It can be hard to get right but it will play a vital role in getting people to click and watch. Again, it’s worth utilising tools like TubeBuddy and in general just searching through YouTube to see what others making similar videos to yours are doing with their titles and keywords.
Video description
In the video description, you’ll want to add as much detail about the video as possible. Try to sum up the video and tell viewers what they’re watching. Throughout, make sure you weave in those relevant keywords and phrases. You’ll also want to provide any relevant links and resources to things referenced in the video, as well as links to your own social channels. While many don’t usually take the time to read through the video description (they’re busy watching), it helps the YouTube algorithm a lot.
I also recommend creating a “Template” for your video descriptions that pre-populates with all the basic info you’ll include with every video (website and social links, channel descriptions, etc.) Then adjust and tweak the rest as necessary.

Video tags
When selecting video tags, use very specific and targeted keywords that are relevant to your video. These tags will help in determining whether your video is going to show up as a suggested video next to others, as well as how high it can rank in search results.
Video length
We talked about this a little bit in the editing section of part one, but it’s worth mentioning again. YouTube does tend to value longer videos. At the end of the day, the longer they can keep an audience on the site, the more ads they can serve those viewers. This is their business model. So, if you can create a longer video then go for it.
But remember – it needs to be entertaining and keep them watching the whole way through. If an audience switches off one minute into a 15-minute video, that will not rank well.
Wrapping up
So, those are the basics on how to set up your travel vlog channel on YouTube. Building off the back of optimising videos, in part three, we’ll look at various ways you can distribute your videos. You can’t just rely on the YouTube algorithms alone—they’re temperamental at best
There are various methods and techniques that all play a vital role in how to start a successful travel vlog. Stay tuned.
[Header image by Christian Wiediger on Unsplash]
Other topics you might like
The New Portkeys LH7C is a Rugged, Bright, Yet Affordable On-Camera Monitor
Updated on Jun 16, 2026
Grab Great Audio From Anywhere with This New DPA 4097 CORE+ Micro Shotgun Microphone
Updated on May 29, 2026
Canon’s New EOS R6V Adapts the R6 III Into a Video-First Body Aimed at Creators
Updated on May 13, 2026