 USA + International
 OWC Canda
 OWC Europe
Getting Started With GarageBand: How to Lay Down a Sick Beat
In the latest entry to our intro to GarageBand, we cover how to quickly and easily produce drums and beats and edit recordings using Quantize and Velocity.
Arthur Ditner • Aug 22, 2022
GarageBand has long been one of the biggest perks of owning an Apple device. This fully-featured digital audio workstation (DAW) comes free with every Mac, iPhone, and iPad, giving users an intuitive, streamlined way for creating and publishing music, podcast, audiobook and other types of recordings. If you’re new to GarageBand, this is the series for you. In Getting Started With GarageBand, we’ll be covering topics that help you get the most out of this free—yet powerful—app.
Also in this series:
How to Record and Edit a Digital Piano
How to Edit a Guitar Performance
It’s easy to make a beat using GarageBand and best of all, you can get started with almost any Mac. There isn’t much you gear you need to purchase as the software is quite flexible; you can use a dedicated drum pad controller, or any MIDI controller, as well as many digital pianos.
How to create a GarageBand project for creating beats
To start, launch GarageBand. Choose: Empty Project > Software Instrument.
The library panel on the left hosts a wide range of instruments that are free to use. These include authentic sounding drum kits, as well as drum machines and synthesized beats. To see which keys you are using on your MIDI controller, select menu bar > Window > Show Keyboard, as keys are pressed the on screen display corresponds.
If you don’t have a MIDI controller or digital piano, you can use a computer keyboard to double as an instrument. To do this select menu bar > Window > Musical Typing. Now, the alphabet keys are engaged as musical notes.
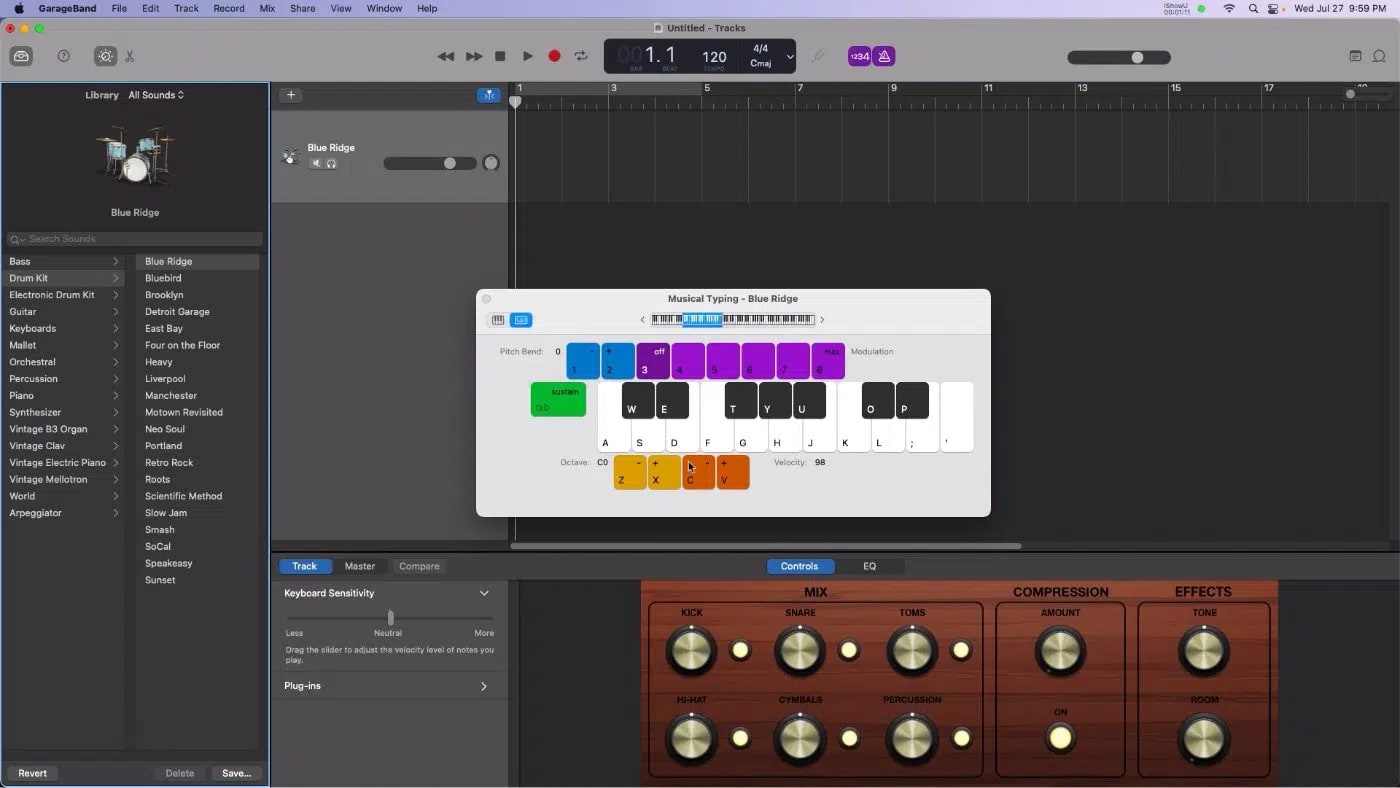
Metronome and tempo are controlled from the transport bar. When enabled, the metronome will click during recording as well as playback. I’m ready to record a few takes and patterns. I’m going to press the record button and edit up the performance later.
How to edit a drum performance in GarageBand
I have a few false starts here and I find it much easier to keep recording when I make a mistake rather than to stop and start every single time. A tip for editing is to cut down the performance by determining good chunks on this single clip and isolate them into their own regions. To do this, press the comma and period keys to move back and forth one bar at a time with the play head open up the precision editor, which is the scissors icon along the upper left when good ranges of a performance are found. Select menu bar > Edit > Split Regions at Playhead (Command T).
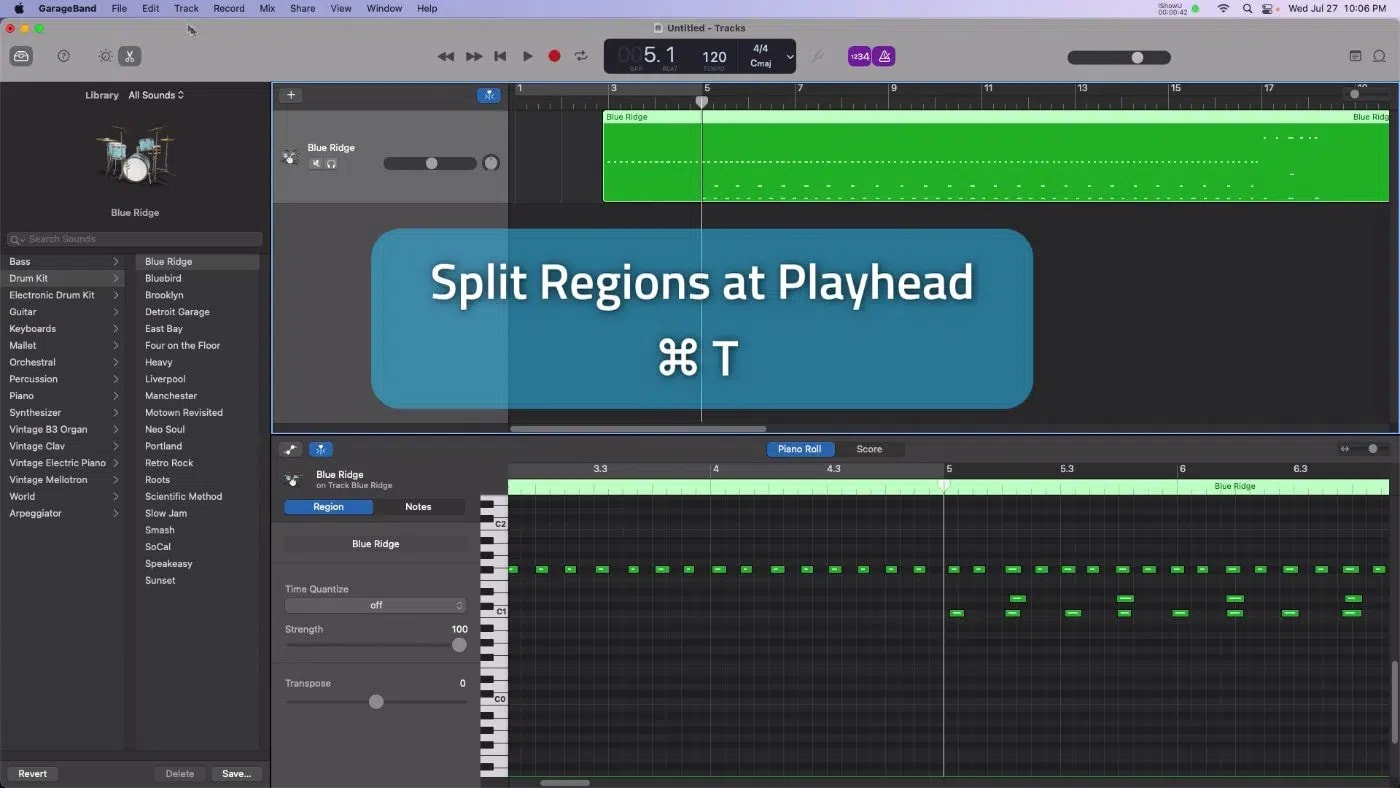
I’ve got a few different sections for a verse and a chorus. I’ll need to edit the timing as well as the quality of this performance first. The timing and the Precision Editor panel. Along the bottom, individual drum hits are displayed. This grid represents at what interval a note was recorded to edit an individual drum hit. Click and drag the note on the graph. Add a note by holding the control key on the keyboard and clicking with the mouse.
How to fix timing with Quantizing
Quantizing is a way to automatically snap misaligned notes to the grid to use this tool. Click and drag to select a range of notes to time, adjust and use the quantize panel in the Precision Editor by selecting a time interval such as one eighth or 1/16, I’ll be the first to admit that sometimes my performances are so bad that even quantities it doesn’t help so, understanding the manual tools is equally important.
How to adjust impact with Velocity
Velocity communicates how hard or soft a note was struck to see this information open up the automation panel in the upper left of the Precision Editor. Select a range of notes and the overall velocity can be adjusted with a non-linear weight. Note velocity can be adjusted on a per hit basis by clicking in adjusting the velocity graph. New ranges of velocity can be drawn by holding the control key and dragging a region to create a crescendo effect. It’s a good idea to not max out velocity. For instance, if a snare hit is meant to be loud, try aiming for 90% volume rather than 100%. It’s good to leave a little bit of overhead in the performances to not induce ear fatigue on the listener (unless that’s your intent).
Explore the Library
Since we’ve been working with virtual instruments this whole time, we can change from a drum kit to an electronic kit. Open up the library panel on the left and try a different instrument presets. This is a great way to mix up your sounds, and since we’re working with MIDI data, the tempo can be changed after the fact. For instance, I can move up from 120 BPM into the one thirties for more of a dance pace.
Other topics you might like

SSDs vs. HDDs in 2026: What the Flash Shortage Changes for Your Storage Strategy
Updated on Jun 18, 2026


Mountain Lodge Meets Music Magic: Inside Dark Horse Recording with Dave Hagen
Updated on Jun 4, 2026

Dont Miss "Personal Work" a new Photography Series from Forrest Mankins and OWC
Updated on Jun 3, 2026