 USA + International
 OWC Canda
 OWC Europe
This Thunderbolt Hub Turned My iPad Pro Into a Blazing Fast Video Editing Machine
Want to edit video on an iPad Pro? The OWC Thunderbolt Hub, iPadOS 16 and the awesome LumaFusion app combine for the ultimate editing workflow.
Wayne Grayson • Nov 17, 2022
I have to confess something. I have long had a dream: to be able to do all of my work from an iPad.
I’ve been using a Mac since I was a kid and I still love the platform. But my happiest, zen-like moments of productivity? Those have weirdly all come while working from an iPad. There’s just something about the flow and focus of iPadOS that makes me more productive. Because of this unfortunate quirk, I have given up my MacBook at least four times only to come crawling back after finding yet another level of depth to the iPad’s shortcomings in comparison to a laptop.
Can I replace my laptop with an iPad?
But with iPadOS 16 and the latest iPad Pro models, things feel different. Yes, the much-hyped Stage Manager feature is here and yes Apple has publicly struggled in making it a reality throughout the beta process. But I personally think they’re onto something here. In fact, Apple’s tablet platform has matured just enough that I think it’s possible for more people than ever before to use the iPad as your only computer.
And when you throw in the fact that the top of the iPad lineup—like the M2 iPad Pro I’m typing this from—contains a chip present not only in the company’s MacBook Air, but also MacBook Pro laptops— there’s really no reason you shouldn’t be able to get a lot done with the iPad Pro.
With all of this in mind, I decided to take the plunge. I have once again sworn off my MacBook and for the last month have been using the iPad Pro as my only computer. (I started the process with an 12.9” M1 model, but when the M2 model was released, I decided to upgrade and have been using that model for the last couple of weeks.) My day-to-day workflow includes the regular stuff—email, web browsing, Teams chats—alongside medium-to-advanced tasks like designing in Canva, and editing a lot of photos and video projects.
The Best iPad Pro Video Editing Setup
- 12.9” M2 iPad Pro (6th generation) – Note: The M1 iPad Pro will work with this setup as well as it supports Stage Manager external display
- Magic Keyboard
- OWC Thunderbolt Hub
- OWC Thunderbolt 3 mini dock (optional if you have a Thunderbolt/USB-C display or have another USB-C to HDMI dongle laying around)
- Thunderbolt SSD editing drive (such as the Envoy Pro FX or Envoy Pro Elektron)
- LG 4K monitor
- Bluetooth headphones (I used AirPods for the sheer simplicity, but any bluetooth headphones will do.)
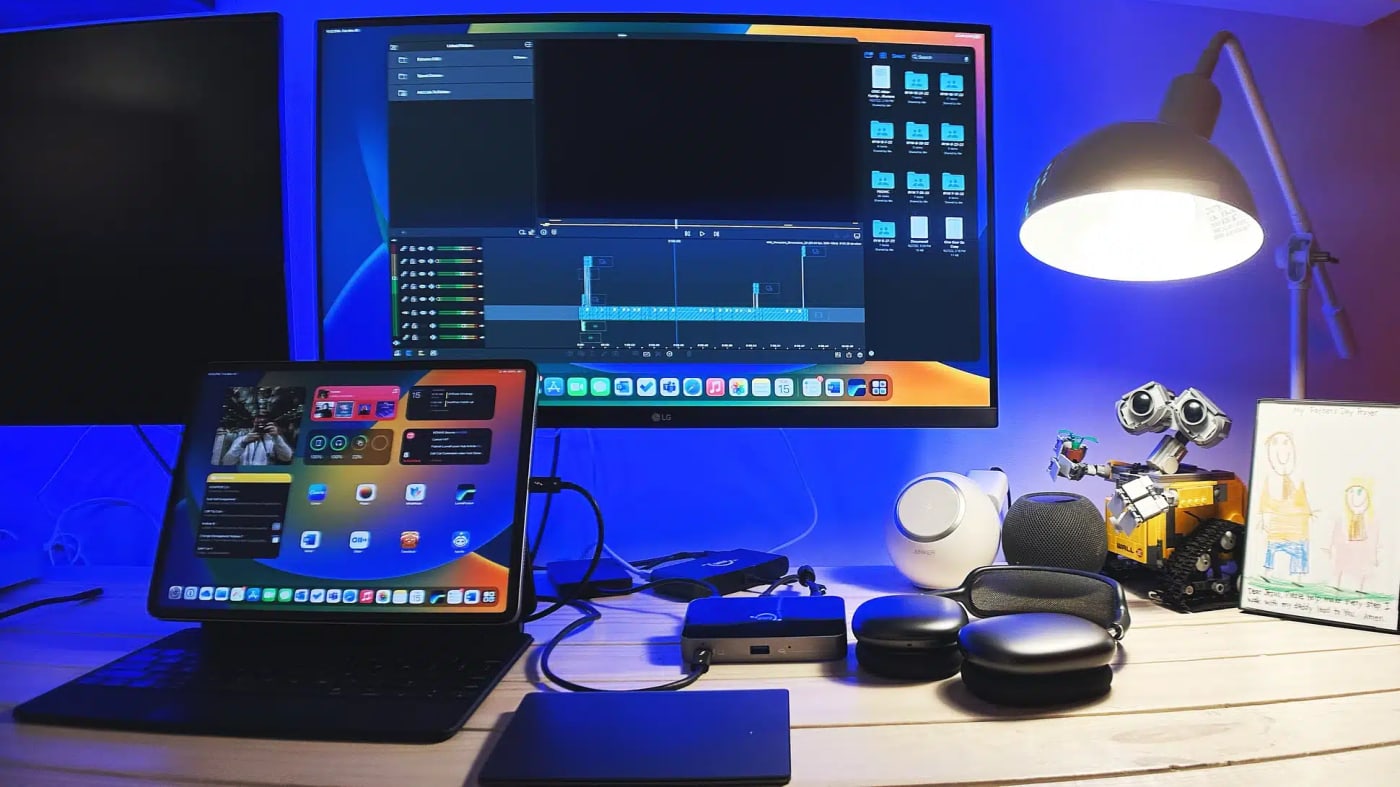
With this setup in place, here’s what I found out and how this tablet and awesome Thunderbolt hub have completely changed the way I work.
Growing pains
If you do anything other than photo, video, or audio editing, I think the iPad as a platform reached a legitimate point of maturity a long time ago. Even from its earliest models, for users who write emails, edit docs, and consume media, the iPad has been a fantastic laptop replacement.
However, for creatives with more intense workflows, the nagging issue with doing photo, video, or audio creation and editing from an iPad has always been I/O and file management. (If you’ve ever lost sight of how wonderful the Finder is on macOS, try working with photo and video files on an iPad running a version of iPadOS that doesn’t have the Files app. I did and I don’t recommend it.)
But even five years after the Files app’s introduction, things remain extremely hit or miss. In the defense of Files, I have never personally had an issue connecting external drives. The drives mount reliably and all the basic, copy, paste, move, and other functions you need out of a file manager work well.

But Files can straight up act weird when a third-party app opens it up as a file picker. And that’s if the app supports Files app integration to begin with. Sometimes the app wants to push you through the Photos app which is a pain for several reasons. But things have gotten better. A lot of photo editing apps still offer the least resistance when you import through the Photos app, but if you don’t want to, at least you don’t have to now in apps like the excellent Pixelmator Photo.
But for the longest time, your best bet for video editing on iPad was iMovie—which is fine. But people have long asked Apple for Final Cut Pro on the iPad for a reason. Even the mildest of pro workflows need more than iMovie can offer.
LumaFusion is the best video editor on iPad
Which is why there was a lot of excitement when LumaFusion hit the App Store in 2016. The app had the makings of a Final Cut lite. Plus it was—and still is—an absolute steal at $20. But LumaFusion’s launch predated the introduction of the Files app by a full year and the launch of iPadOS by three years. Thankfully, as Apple improved the iPad as a platform, LumaFusion has improved right alongside it.
Today, the app is a fully-featured professional NLE and I feel comfortable saying that if you’re willing to learn its UI, there are lots of creatives out there that could replace Final Cut Pro with LumaFusion in their workflow.
LumaFusion offers pro features such as video stabilization, color and light adjustments, LUT support, videoscopes, support for up to 6 video and audio tracks in addition to 6 additional audio tracks, a magnetic timeline, audio editing including keyframe adjustments, FCP XML export and a lot more.
But the biggest turning point for me came in 2021 when LumaFusion launched external drive editing support, allowing you to completely bypass the annoying import quirks of the iPad completely.
Finally: Windows on an iPad (app windows that is)
But there’s another recent development that has made editing on the iPad for long periods of time even better: Stage Manager and, along with it, true external display support.

Stage Manager allows you to have multiple apps open in separate windows on iPad. You can have your windows open alongside an app switcher tray (LEFT) or hide the app switcher tray and give your windows the full screen (RIGHT). The app switcher is always accessible with a swipe left from the left side of the screen.
Stage Manager launched with iPadOS 16.1 in October. However, external display support launched with iPadOS 16.2—available in beta now and releasing in December 2022—and only for iPads with an M1 chip or better. For the first time, the iPad extends a full-resolution picture to an external display complete with the new windowed Stage manager environment.
So now you can have LumaFusion open alongside other apps such as GarageBand, the Files app and any other app such as Canva that you might be sending assets from.
Some have given Stage Manager a thumbs down, but I really like it. It’s a very iPad-y version of the Mac’s Spaces/Mission Control/Exposé. But what I like in particular about the implementation of various spaces or app groupings in Stage Manager is that the app groupings follow you around. For instance, if nothing is on my external display and I click the Safari icon in the dock, the whole grouping Safari is currently open with opens on that screen.
So to recap, here in the year 2022 iPad users now have a powerful NLE in LumaFusion and proper file support and external display support in iPadOS 16. But there’s one other important ingredient to this iPad video editing setup that we haven’t addressed yet: ports.
What’s all the hub-ub, Bub?
Now, as you can see in the photo just above, I have my M2 iPad Pro docked attached to Apple’s Magic Keyboard. And one of the nice things about this keyboard is that it adds an extra USB-C port to the device. However, because this connection is made possible thanks to the Smart Connector on the back of the iPad, the port is for charging only and doesn’t support data transfer. Bummer.
Still if you didn’t have a dock, it does make life easier as it frees up the iPad’s USB-C port on the other side for connecting a drive or other Thunderbolt peripherals.
But how many of you out there are only working from one drive? My personal workflow involves no less than four drives: an SD card from my camera, my archive drive, my Thunderbolt editing drive and my transfer drive which I use for device to device transfers, specifically from my iPhone 14 Pro Max.
In other words, I need a hub.
What are the best Thunderbolt hubs for iPad Pro?
As you all know that need for a dock or hub is nothing new. Even if you have a Mac, having enough ports is not really thing. My fellow MacBook Air users feel this pain in a particularly acute way. So, I’ve tried a lot of docks. You probably have too. Most of them really suck.
And when it comes to Thunderbolt docks, they ain’t cheap. And so, if you’re like me, you’ve danced the dance of buying extremely cheap hubs off Amazon praying they don’t destroy any of the devices connected to it, and buying expensive Thunderbolt docks only to experience flaky connectivity issues or poor display support.
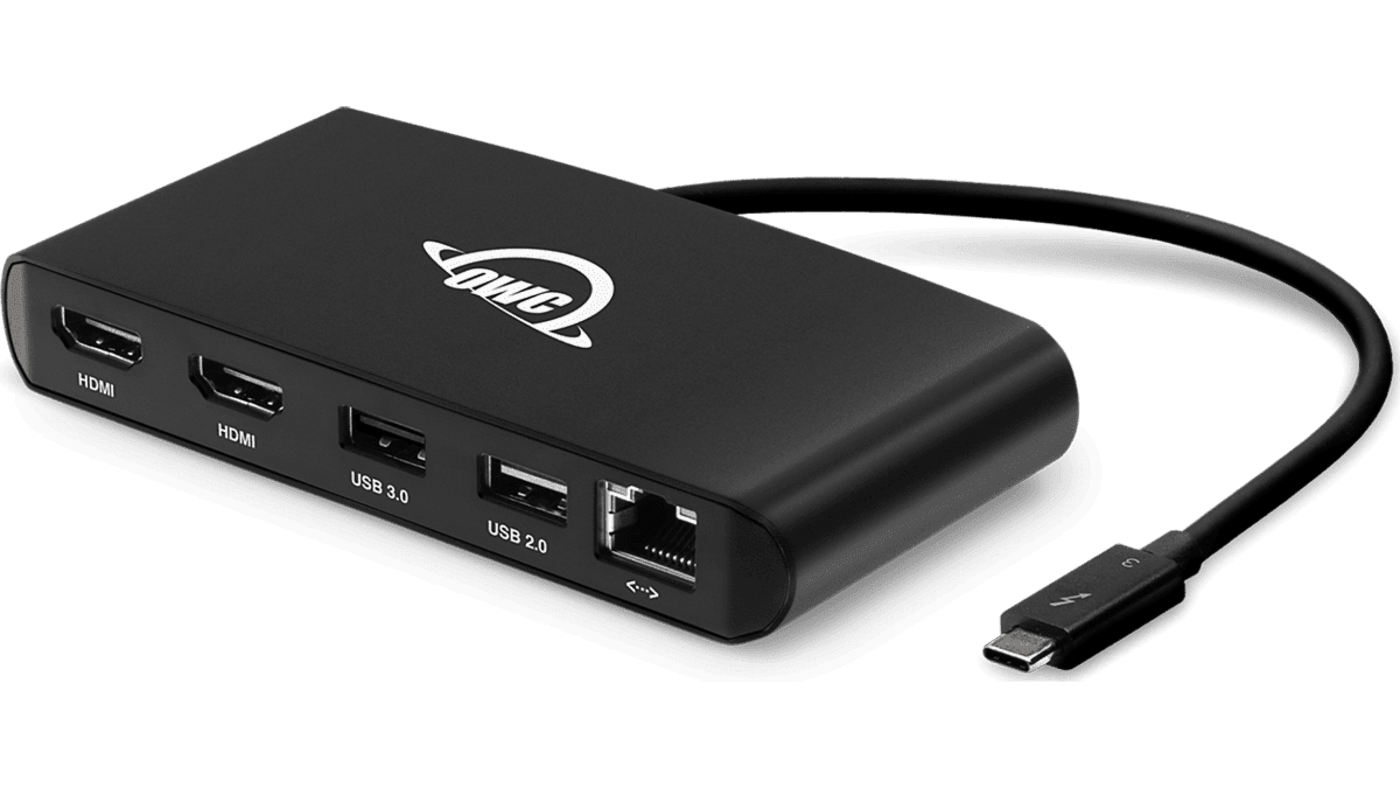
Now, obviously everybody has different needs from a hub and my first experience with an OWC hub was the Thunderbolt 3 Mini dock. This little guy is a pretty great travel companion and it allows you to connect two USB 3.0 devices, a display (there are actually two HDMI ports on the Mini dock, but iPad only supports output to one) and an Ethernet connection to the iPad Pro.
Now, if I wanted to edit on USB 3.0 drives, this would be perfect. But all of my drives are either Thunderbolt or USB-C. And while it’s technically possible to edit on some USB 3 drives if you’re working with 1080p footage, I wouldn’t recommend giving that a go. You’ll be happiest on a USB-C or better yet, a Thunderbolt drive.
But we’re going to hang on to this little guy because all of its I/O will come in handy later.
The Holy Grail of hubs
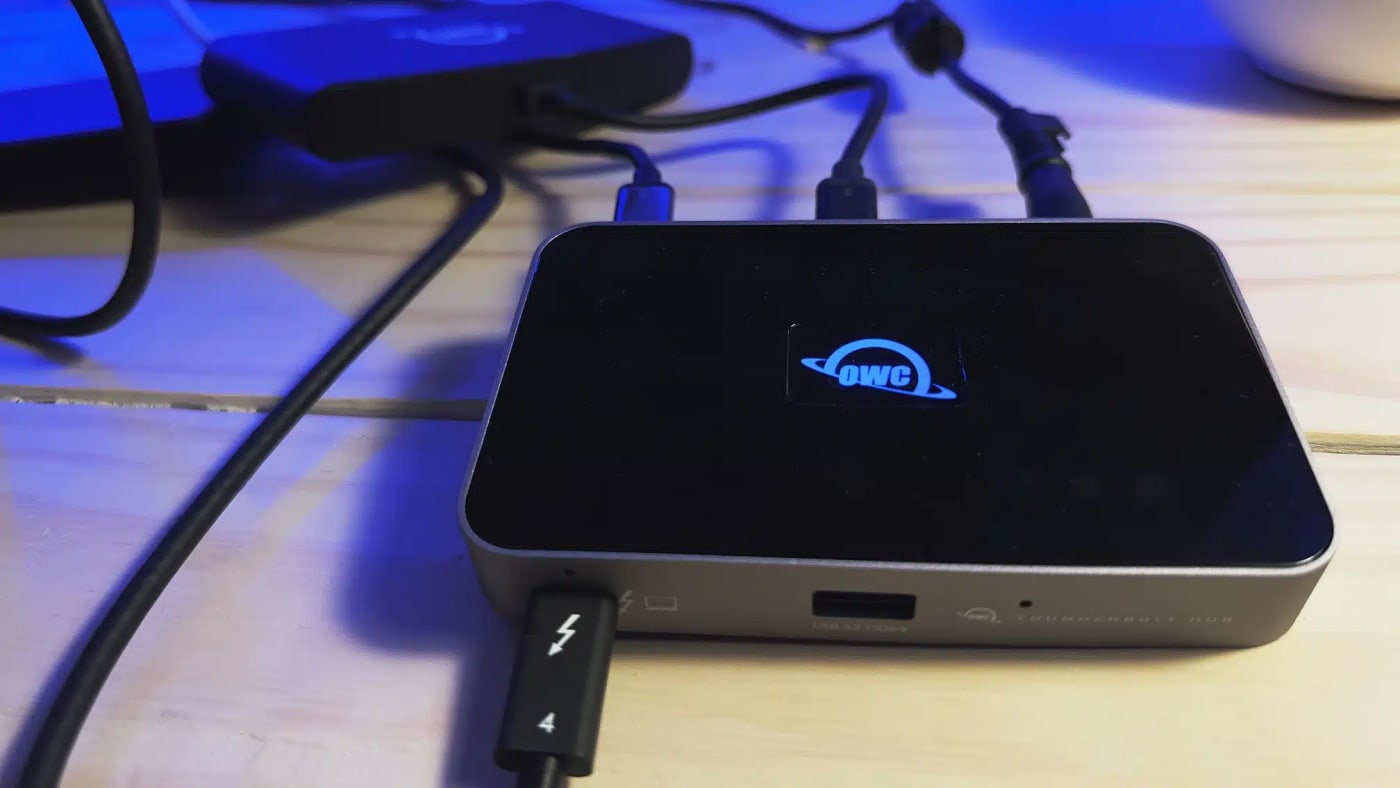
The next step up from the Mini dock is OWC’s Thunderbolt Hub. And as soon as you unpackage this thing, you can tell how well it’s made. It’s got a heft and solid feel to its construction that immediately lets you know you’ve invested in a high-quality product.
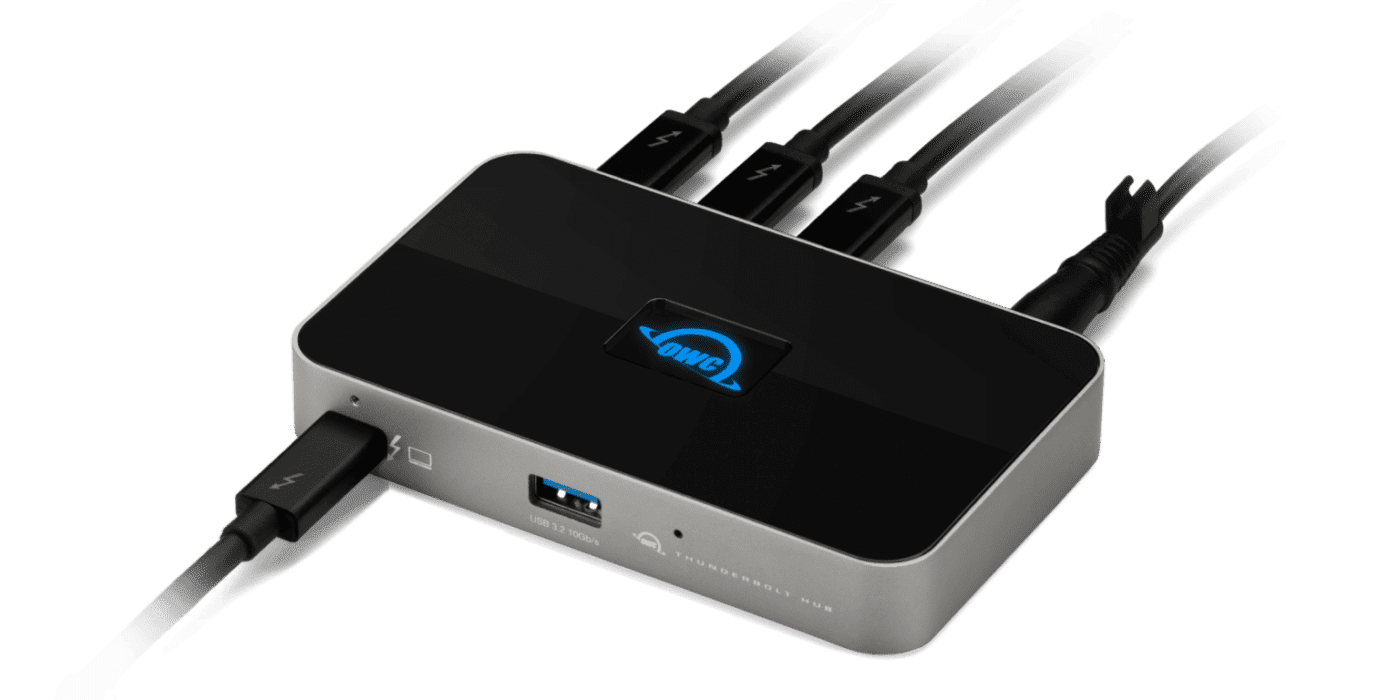
So, taking a look at this thing, what do you get? Through the provided 0.8-meter Thunderbolt cable, the Hub adds three super fast Thunderbolt ports to your iPad along with a single USB-3 port.
If you have a Thunderbolt or USB-C display, connecting that display to the iPad Pro through the hub is seamless. But let’s say you’re like me and you still have an HDMI display. This is really a make or break point for most docks because as soon as you start connecting adapters or even other hub- or dock-like adapters to another hub trouble tends to creep in.
But that’s not the case with the OWC Thunderbolt Hub because it supports up to three independent daisy chains of devices and adapters.
Remember the Mini dock I showed you? I’ve connected it to the Hub. And with that connection I’ve added display and Ethernet support to the hub along with the ability to connect two more USB 3 devices.
It just works. And I was shocked that it did. Seriously I gasped when the display lit up. It’s $159 well spent.
And let’s say you don’t have a OWC Mini dock. Let’s say you have a little USB-C SD card adapter, or a USB-C HDMI adapter. Those will work too. I’ve attached just about every dongle in my office to this thing and all of them just. work.
And the cherry on top is that because the Hub packs an included power supply, it sends along 60W of pass-through charging power to your iPad, making sure it stays topped up while you work. Plus, that same power supply passes 20W of power to any devices connected to the three Thunderbolt ports on back. (And if you need even more evidence that this is a solid investment, here is my buddy Jon’s rundown of all the other Mac-related reasons you need the Thunderbolt Hub.)
But going back to the whole reason for the hub: I want to dock my iPad Pro and edit video in LumaFusion.
Long story short, if that has been your goal but you’ve been burned too many times by the iPad’s sloppy file management, external display support, and flaky I/O.,the Hub solves all of these problems.
Editing with LumaFusion on iPadOS 16
Getting started, I connected my SD card and edit drive to the Hub and copied everything from the SD card over to the drive. After a little project asset organization, I was quickly ready to edit.
As I mentioned earlier, that’s the only moving of files I have to do, because LumaFusion supports editing on an external drive. Using LumaFusion’s Linked Library feature, you simply point the app at the folder where your footage is and … well that’s it.
There’s no import process. No Libraries. No Events. The app just sees the footage, let’s you drop it in your timeline and make non-destructive edits.
And just so you know, we spoke with the folks at LumaTouch, the developer of LumaFusion, and verified that this Linked Libraries workflow was indeed the best way to go about editing from an external drive.
How to get started with external drive editing in LumaFusion
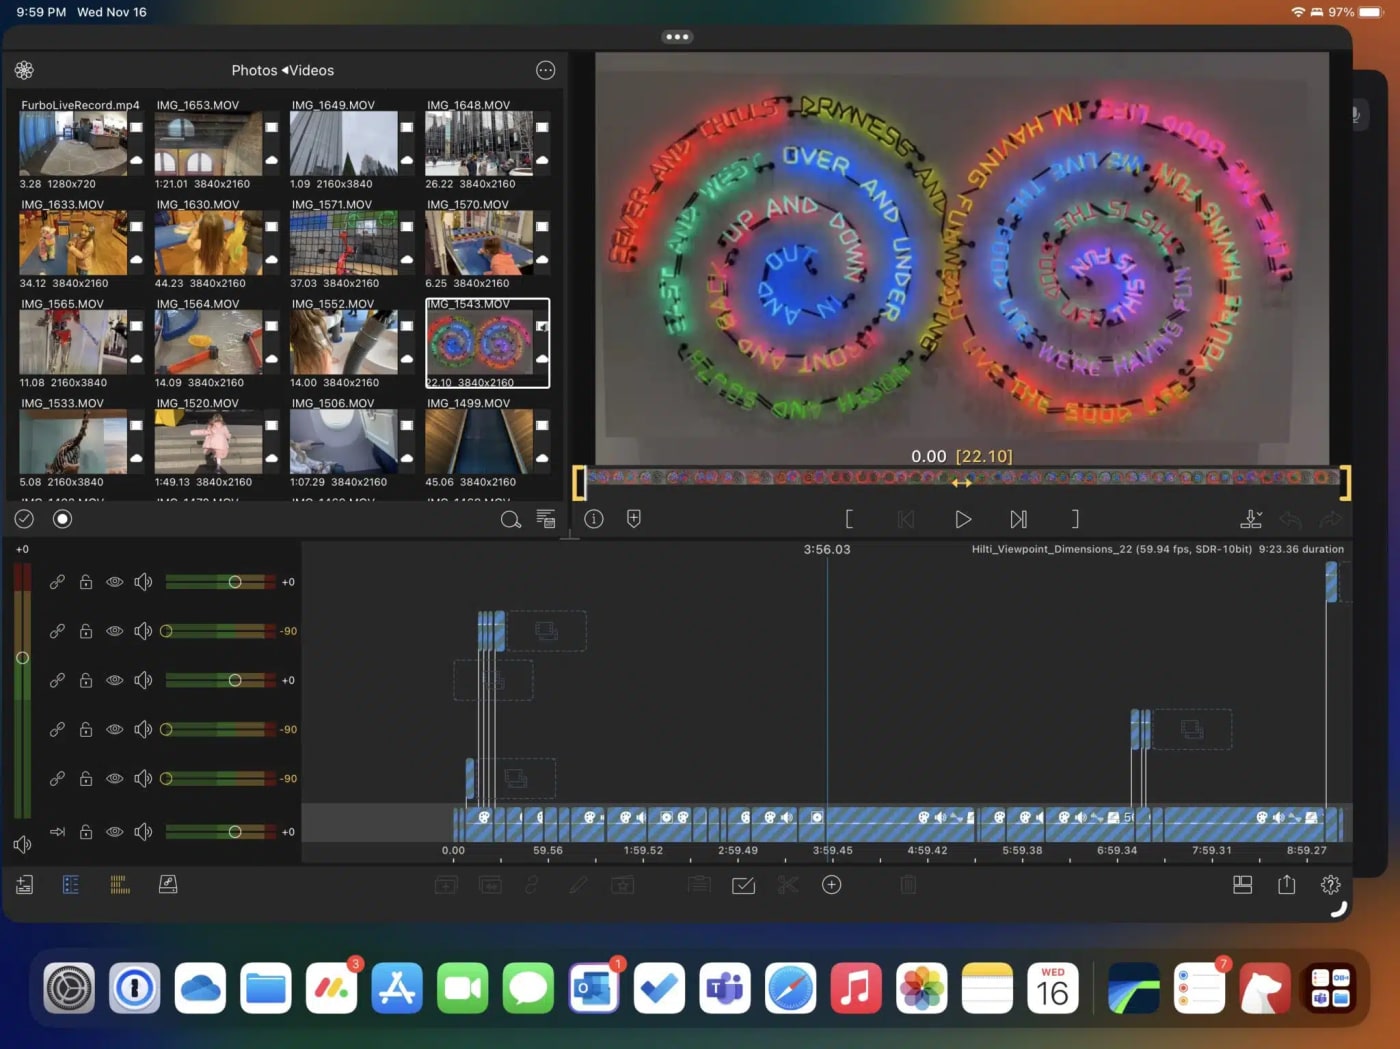
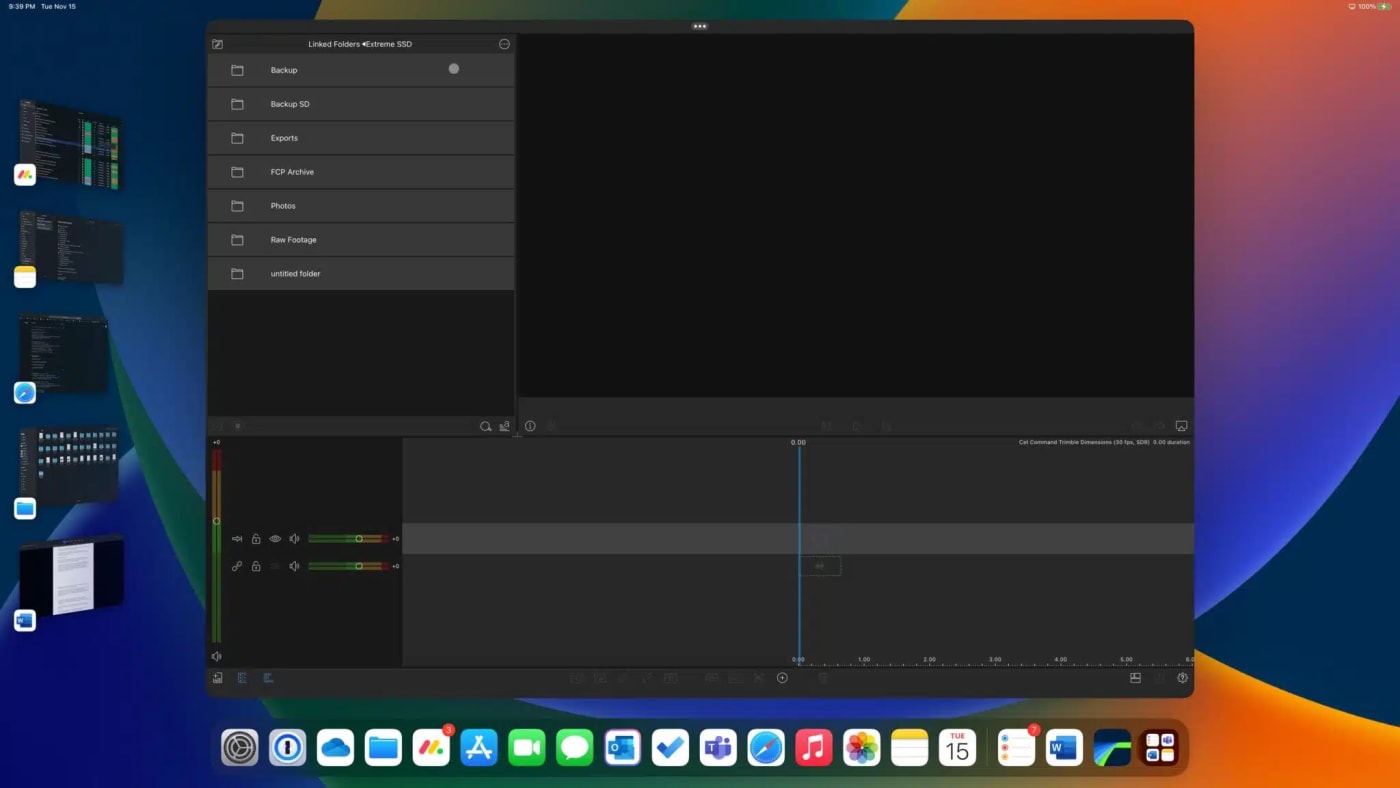
When you first open LumaFusion, you’ll immediately find yourself looking at the primary interface split into four quadrants: assets in the top left, preview pane in the top right, sound tools in the bottom left, and your timeline in the bottom right.
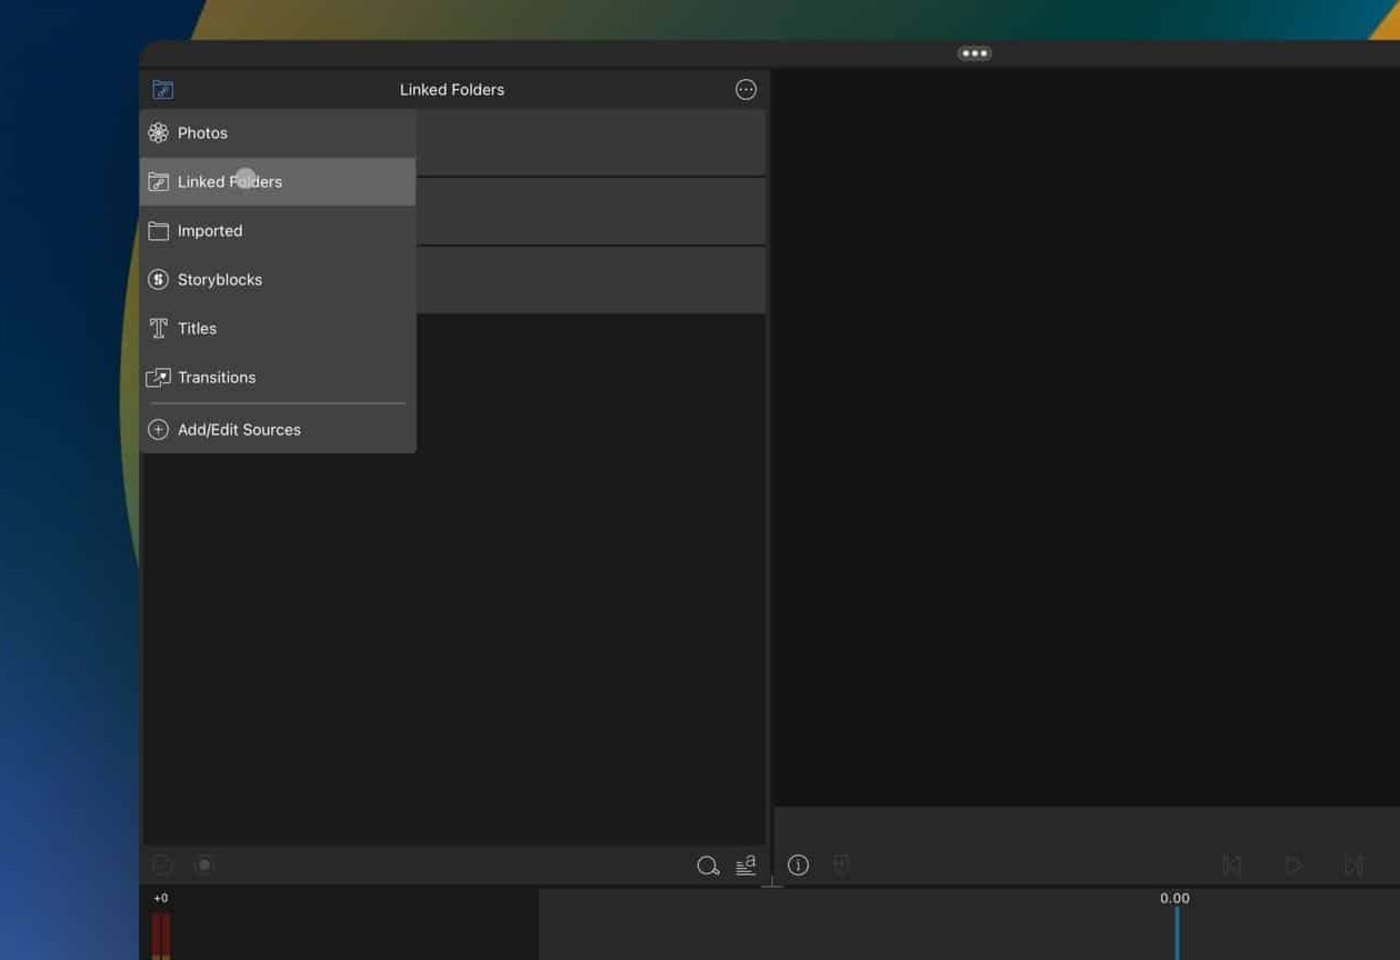
In the assets pane at the top left portion of the app, you’ll notice an icon indicating where LumaFusion is currently pulling assets from. If it’s pulling from the built-in Photos app, you’ll see a flower icon, for example. On the opposite side of the pane, you’ll see an icon comprised of a circle with three dots. If you click that you’ll be presented with options to import footage into LumaFusion. Not really want we want for this tutorial as that will copy assets from those sources into LumaFusion.
Because we want to edit on the drive, we’re going to click the icon in the top left corner of the asset pane and then click the Linked Folders option.
From here, you’ll click “Add Link to Folder.” Now just tell LumaFusion which folder you want it to pull footage from. The app allows you to point at multiple drives/folders and it remembers each one you link. That means that if you point the app at the root of a drive, it you’ll be able to connect that drive to your hub and immediately access footage from it. It’s a very efficient workflow.
Once you’ve linked your folders, LumaFusion let’s you see all sub-folders and quickly preview their contents. From there, you simply drag your footage or segments of that footage to the timeline quadrant and edit.
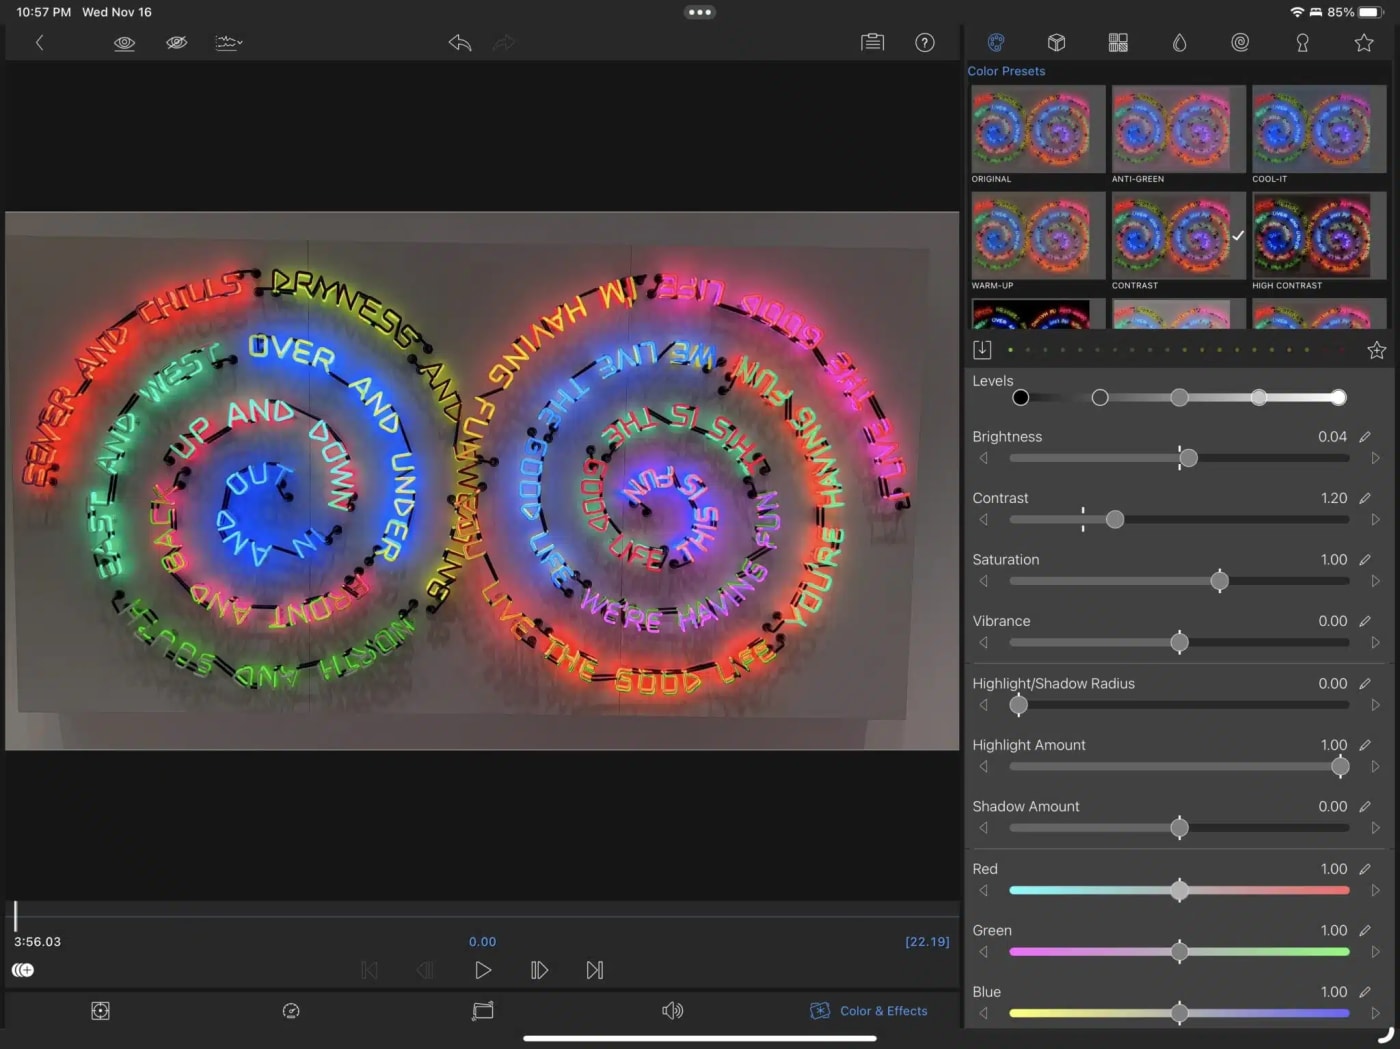
I tested editing 4K video projects with multiple cameras, uncompressed audio files, and some light S-LOG color grading, and the combination of LumaFusion, the OWC Thunderbolt Hub, and my Thunderbolt and USB-C drives just blazed through every project I threw at them.
I was surprised at how capable LumaFusion is at grading SLOG files. Resolve users won’t be impressed, but it gets the job done for simple grading tasks. Plus, if you’re a LUT user, you can import your favorite LUTs and apply them with a click/tap and then make a wealth of adjustments from there.
And all the other types of tweaks that you’d expect from a fully-featured NLE are here as well: keyframes, frame and fit, speed, stabilization, and audio dashboards. I’m particularly impressed by the stabilization and audio dashboards. On the new M2 iPad Pro, stabilization is applied to shorter clips in seconds, and I was able to salvage some pretty clipped audio in just a few minutes with the app’s simple, but effective, equalizer and limiter controls.
And once your project is done, you can either export your video to the iPad, to an external drive, or as an XML file that you can then import into Final Cut Pro if you need a bit more elbow room. And for backing up your project, you can export it as a LumaFusion Project Package. This project package can be saved anywhere you like and then imported back in to LumaFusion.
But with this setup, there are lots of mobile photographers and filmmakers out there who will be able to create great-looking projects—quickly—and all with an iPad Pro.
Now, is this setup going to work for everyone? Absolutely not. But for those who want to do everything from their iPad Pro—there are dozens of us!—it’s a pretty great experience.
Honestly, the only little snag I ran into is with regard to sound. When I connected a display through the hub, the iPad wants to push sound through the Thunderbolt connection. And there’s no apparent way to actually get sound, unless your display accepts and can output audio through either its own speakers or speakers connected to it.
So, that means you’ll be editing with Bluetooth headphones. I realize that this alone is a dealbreaker for some, but I’m flexible and was impressed with the results. I tested editing projects with AirPods, AirPods Pro, and AirPods Max and ran into zero audio lag issues even when syncing up my audio files with my video timeline. (I also tested connecting the iPad Pro to a pair of HomePods on my desk via AirPlay. I did encounter audio sync issues here occasionally.) Your mileage may vary, but for me, editing with Bluetooth wasn’t a problem.
Conclusion
I came into this test optimistic but with a fair bit of skepticism. I’ve tried and failed to do serious video and photo editing work on the iPad before. But now—for me anyway—it’s really possible to do it and more importantly to do it efficiently. Thanks to the M2 chip and the iPadOS 16 improvements like Stage Manager, there’s just a lot less friction with using the iPad Pro as your main computer.
Here’s what I did not expect: I actually really like editing video this way now.
LumaFusion absolutely flies on both the 12.9” M1 and M2 iPad Pro models. And I love how quickly I’m able to go from getting footage onto my editing drive and into my grading and timeline edits. I was describing the workflow to colleague in L.A. and he remarked that it sounded like a solid editing workflow for putting together dailies while on the set of a production. Like the editing I do for videos that publish to the web, editing dailies is a more advanced but still great example of a workflow where you need to get into and out of the timeline as quickly as possible and where pristine quality isn’t your top priority.
There’s a lot less interface to navigate through with LumaFusion and I think the minimalism has the effect of making you edit more efficiently.
But if this is something you’re interested in, I have a couple of suggestions: as I mentioned before, external display support for the 12.9” iPad Pro in iPadOS 16.2 is simply a game changer. I went into this project hoping to be able to edit on iPad, but I’ve come out on the other side discovering that I can finally do everything on an iPad Pro. It’s inspired me to write a full overview of iPadOS 16.2, Stage Manager and external display support, but that’s for another time.
For now, if you’re looking at going this route, you might want to wait for the final version of iPadOS 16.2 to release in December. Or, if you’re impatient like me, you can download the public beta. (I’ve run the 16.2 public beta on both an M1 and an M2 iPad Pro and the experience has been much smoother on the M2 model. Your mileage may vary.)
And finally, if you’re going to do pursue this workflow you really need a dock. But not just any dock. One you can depend on and know that the ports and all the devices you plug into are just going to work each and every time you sit down to get some work done. The OWC Thunderbolt Hub does just that. And at $159 it is a strong value when you consider the power pass through and build quality along side the consistent, blazing fast performance.
Other topics you might like
DaVinci Resolve for iPad is Available Now
Updated on Dec 22, 2022