 USA + International
 OWC Canda
 OWC Europe
Pro Audio: How to Improve Your Home Vocal Recordings
Learn how to avoid common issues like sibilance and microphone pops when you record vocals at home with these five simple quick and easy tips.
Josh Sularski • Oct 04, 2021

For most of music recording history, commercial recording studios were the only places you could go to access professional-quality microphones to record vocals. With technology advancements over the past couple of decades and a small investment, you can easily get started at home with a great microphone and USB recording interface to improve your home vocal recordings.
But capturing a great sound is about more than just buying a couple of pieces of gear. In this article, you’ll learn about what you can do to avoid common issues when recording vocals at home as well as a few microphone techniques to help you get the most out of the gear you already have.
Common Vocal Recording Issues
By being aware of these issues, there are simple and inexpensive things you can do to avoid having to “fix it in the mix” later on, as that is never an ideal solution. Not only will you save yourself the time you’d spend processing your audio in post, but the end result will likely sound more natural as well.
Pops and Plosives
Pops and plosives occur when bursts of air overload the mic capsule’s delicate membrane, resulting in distorted sound. They’re typically associated with “p”, “b”, and “f” sounds that are generated when recording voiceovers or vocals.
The most effective way to eliminate these unwanted audio blemishes is by using a pop filter. Pop filters are typically made from two types of material—nylon or metal mesh. Nylon filters are the most common and budget-friendly—you’ll find them in many home studios and commercial facilities alike. Metal mesh pop filters are generally a bit more expensive but may do a better job at dispersing plosive energy depending on your proximity to the microphone and microphone technique.
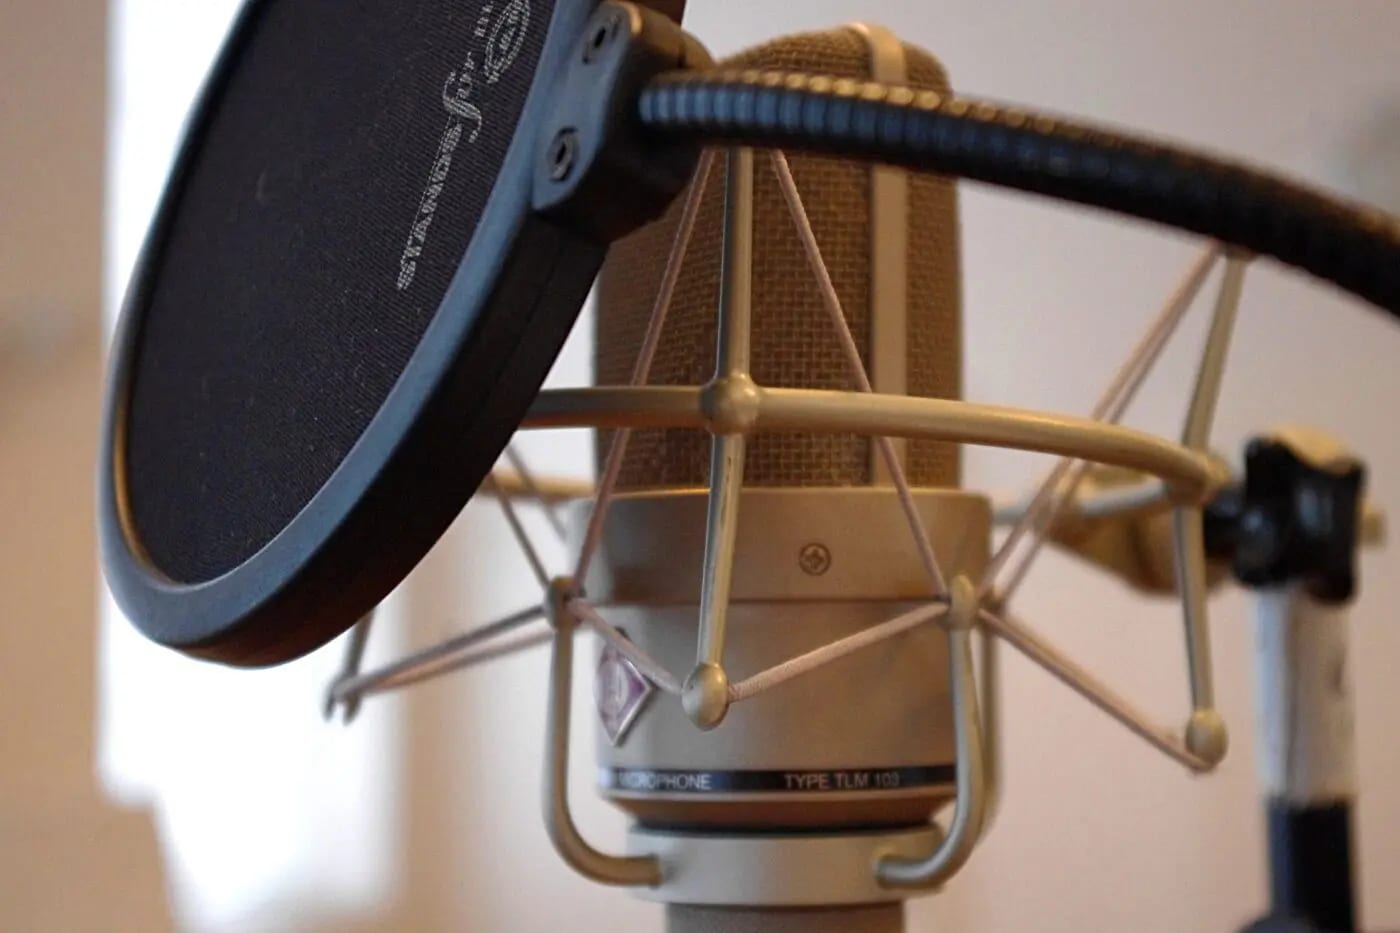
Proximity Effect
If you’ve ever gotten right on top of a microphone and noticed a strong low-frequency boost, that’s an example of real-world proximity effect. It’s inherent in just about all cardioid microphones and occurs whenever you place a source very close to a microphone that’s set to the cardioid pickup pattern. The closer you place the microphone to your source, the greater the proximity effect.

This is a graphic representation of the cardioid polar pickup pattern. As you can see, it picks up sound sources that are in front of the mic, while rejecting sounds and ambient noise behind the mic.
By contrast, a microphone in an omni pickup pattern does not produce a proximity effect.

This plot diagram shows the pickup pattern for omnidirectional microphones. Compared to the cardioid pickup pattern above, there is no rejection at all. A microphone in omni will pick up sound from all around it evenly.
Although you’ll probably want to avoid the proximity effect in most circumstances, there are times when you can use proximity to your advantage—for example, if you’re trying to beef up an instrument’s low-end or if you won’t make a source seem warmer than it would otherwise sound.
It’s generally recommended to avoid the proximity effect when recording vocals as it can affect clarity and intelligibility. If you happen to be working with an inexperienced singer, you can simply use a pop filter to your advantage and place it several inches away from the microphone, safely outside the zone of maximum proximity effect.
Distracting Sibilance
Sibilance in vocals refers to the sound of “ess” and “shh,” both of which can be distracting and, worse, trigger compressors unintentionally if not treated properly. Sibilance is generally found in the range of 5 to 10 kHz, and while it can generally be treated in post-production with a de-esser (or two), there are a couple of tricks you can do to make your recordings even cleaner.
The easiest solution is to try singing slightly off-axis to the microphone. This will lessen some of the energy produced by your voice’s natural sibilance. If you are feeling more adventurous, you can try the famous “pencil trick”.
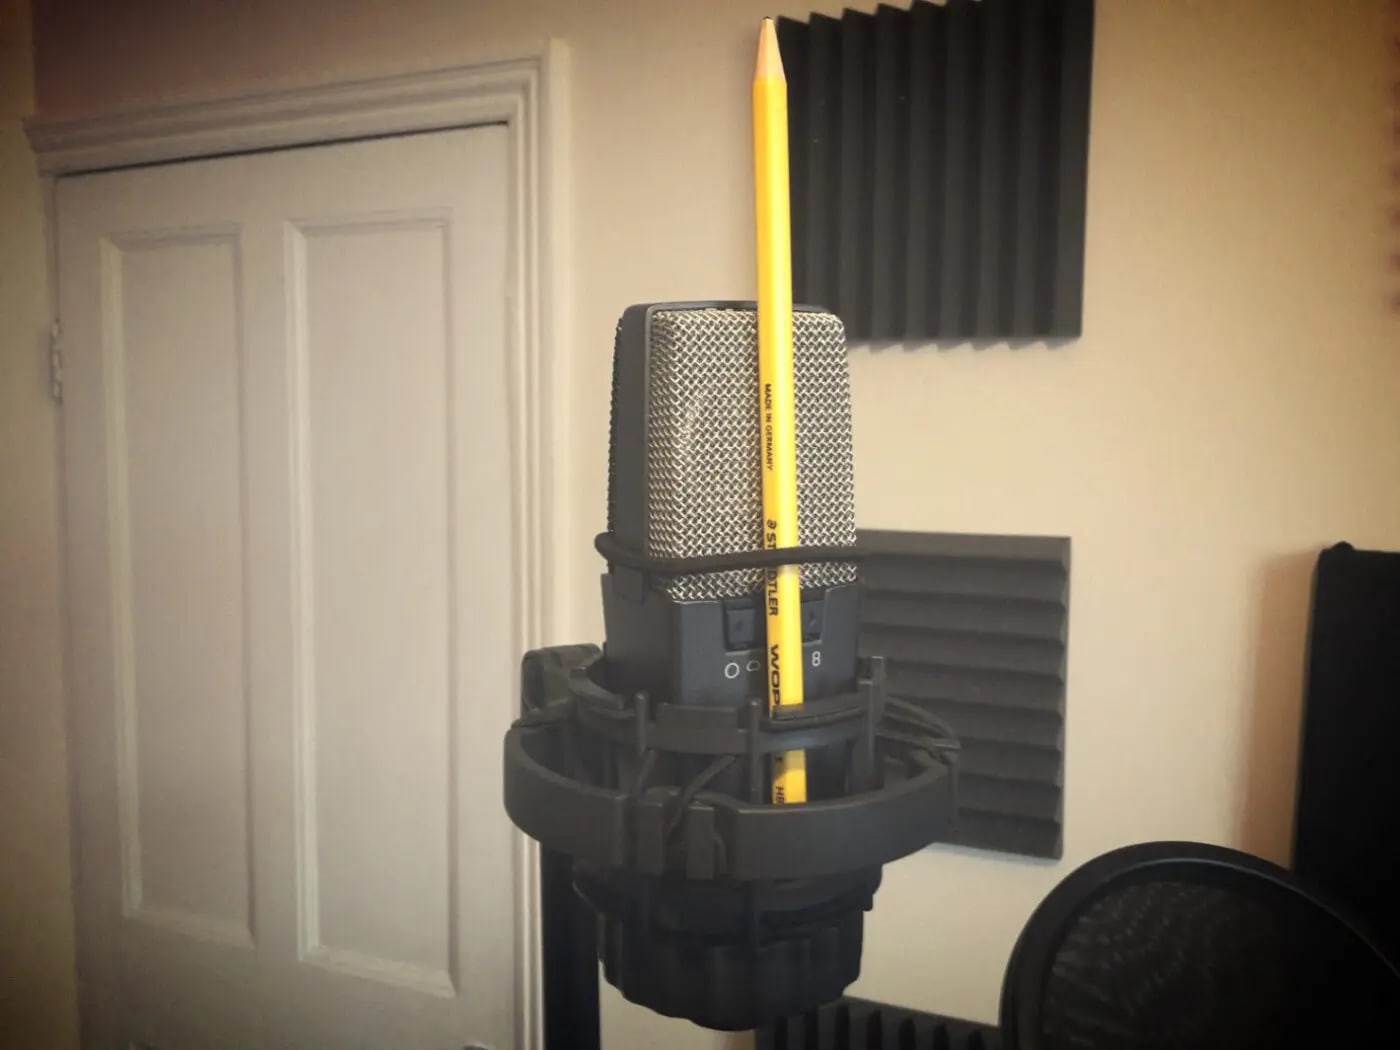
Your mileage may vary using the pencil method, but you simply attach a pencil to the microphone grill using tape or a rubber band. Doing this may help mitigate some sibilance. Your best bet, though, is to adjust how you interact with the microphone, by singing slightly off-axis, changing the height of the microphone, or backing off a little more.
Be Mindful of Your Feet
Depending on the type of flooring in your recording space, chances are that your microphone may pick up even the tiniest movement and tap of your foot. It’s very common for a vocalist to tap their foot when recording a take, and with each tap, a vibration can transfer from foot, to floor, up the mic stand, and to the microphone.
The solution here is simple—use a shock mount with your microphone. Many microphones that are moderately priced include a shock mount that will work just fine. If your microphone did not include a shock mount, you can easily find a universally compatible shock mount that should work with just about any condenser microphone.
Basic Acoustic Treatment
Acoustic treatment is usually the last thing most people consider when they record at home, but it’s something that can improve your sound the most. This is especially true if your only recording space is lively and reverberant. The good news is that you can use materials you already have around the house to greatly improve the acoustics of your space.
Try hanging some blankets around your vocal recording area. This will help reduce ambient noise that your mic might otherwise pick up. Moving blankets work very well, but any blankets will surely improve things.
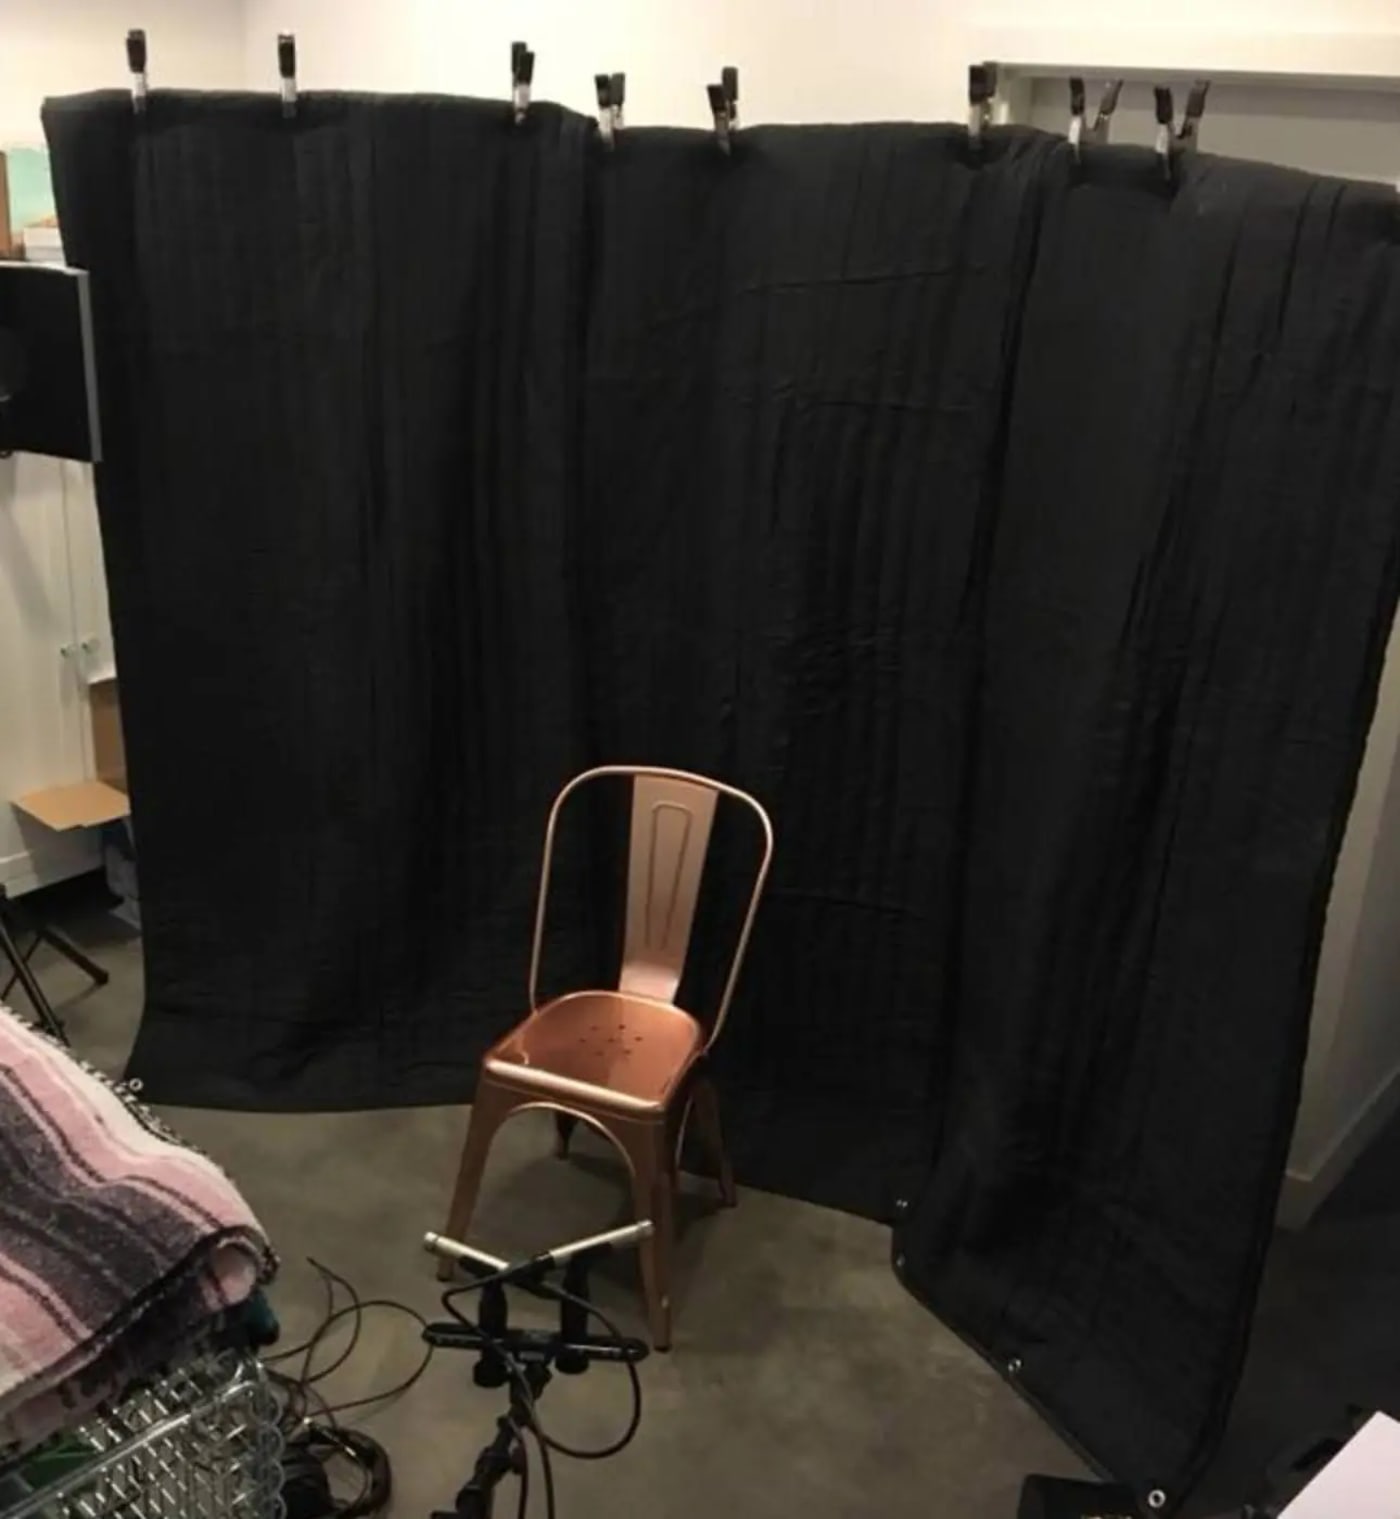
If you want to go a step further and invest in specialized gear that’s designed to provide some acoustic benefit for vocal recording in smaller spaces, look into reflection filters. Some popular brands include Primacoustic, Auralex, and SE Electronics.
Vocal Recording Recap
Let’s recap some of the ways to get the most out of your vocal microphone, whether you’re using an entry-level budget mic or own a studio classic.
- Avoid pops and plosives. Use a pop filter or try singing slightly off-axis from the microphone.
- Pay attention to proximity effect. Put several inches between you and the mic if you want to avoid the bass-enhancing effects of proximity effect when using your cardioid microphone.
- Limit sibilance by singing slightly off-axis or try using the “pencil trick.” You can also use a de-esser after you record.
- Be aware of tapping feet and how the microphone may pick that up. Use a shock mount to give the mic improved isolation from the mic stand and floor.
- Tame your room’s acoustics if it is especially lively. Use blankets from around the house and surround the recording area you’ll be using for vocals.
Keep these tips in mind and you’ll be surprised how even an inexpensive microphone can give you a great recording.
What tips have you learned over the years to improve vocal recordings?
Other topics you might like

Mountain Lodge Meets Music Magic: Inside Dark Horse Recording with Dave Hagen
Updated on Jun 4, 2026
Grab Great Audio From Anywhere with This New DPA 4097 CORE+ Micro Shotgun Microphone
Updated on May 29, 2026
Upgrade Your Live Performance Sound with the Shure SLXD24D+/N8C Dual-Channel Wireless Mic System
Updated on May 28, 2026

More Than Two Decades of Trust: How Prime Recording Relies on OWC to Protect Every Note
Updated on May 7, 2026