 USA + International
 OWC Canda
 OWC Europe
How to Color Match Shots from Different Cameras in Premiere Pro
Color Matching Premiere Pro doesn’t have to be difficult. In this tutorial, find out how to color match different cameras accurately and efficiently.
Josh Edwards • Dec 12, 2022
Color matching shots from different cameras is an essential skill to learn on Premiere Pro. Nowadays, so many video projects require us to shoot on more than one camera and naturally, due to lens, brands, color interpretation and sensors, the two pieces of footage side by side might not quite match up.
Why you need to color match shots from different cameras
While you could leave this as it is, the end result is often jarring for your viewers, taking them out of the moment and coming across as something that’s a little amateur and unprofessional. We want to see consistency throughout all the shots in the video, so that it feels like it’s one cohesive story, conveying the same emotions and mood throughout.
If a shot is bright and sunny with warm tones but then the following shot, which is supposed to be from the same location at the same time, is much darker and colder, it just doesn’t look right. You need to preserve continuity throughout.
How to color match shots from different cameras
With your footage on the timeline, you can go ahead and navigate to Window > workspaces where you’re going to select color. This will open up the color workspace.
In the Lumetri Color Panel which should be on the right-hand side, navigate to Color Wheels and Match. Here, you’ll see the Comparison View button. Go ahead and click this to open up the comparison view.
Now you have two images side by side (for comparison). On the left, we have a screen showing your whole timeline with the option to scrub through using a playhead below. On the right, we have the shot selected, according to where your playhead is placed on the main timeline. You’ll notice you can also toggle and switch to a vertical or horizontal split view too, where you can drag the split line between the two frames, but we’re keeping it side by side to begin with.
All you need to do is select the shot on the left that you would like to use as your “base” reference, then select the shot on the right that you would like to color match with the reference on the left.
In my examples, I want to match footage from my Panasonic GH5 with my DJI Mavic 2 Pro. They’re two different cameras with different sensors and color interpretation, so you can see the difference straight away. I think the drone footage is too warm in comparison.
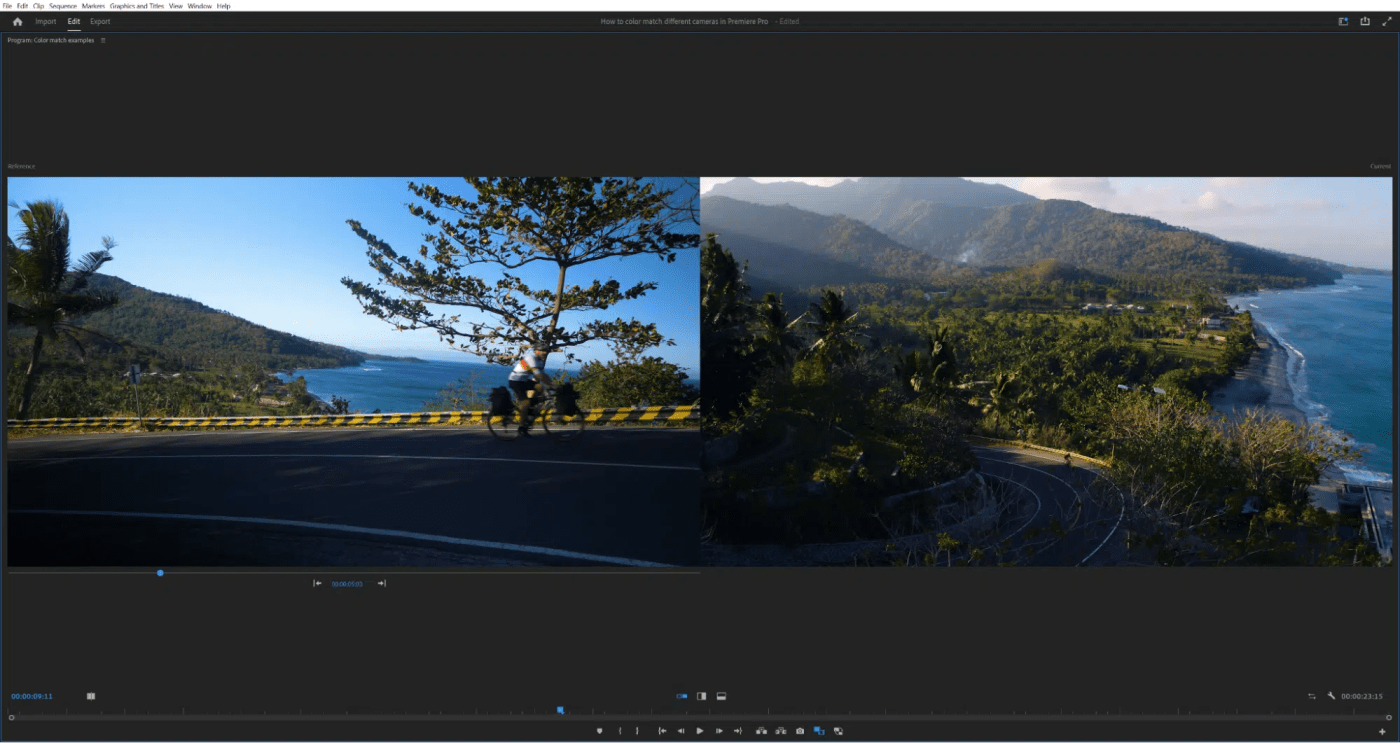
Once you have the footage lined up, go ahead and click the Apply Match button under Color Wheels and Match in the Lumetri Color Panel. Within a few moments, you’ll see that the footage on the right has been matched to the footage on the left.
In most cases, I’ve found this tool takes you pretty much all the way there, with perhaps some minor tweaks to the color wheels. In this first example I just nudged the midtones and highlights back toward the oranges and yellows because I felt the drone footage was a little too cold and blue. But in the second example, I didn’t feel the need to make any adjustments at all!
This method isn’t perfect but as you can see, it does get you very close – it’s a really useful life saver that can save you heaps of time in comparison to if you were matching from scratch. That takes a lot of time and often years of expertise with a trained eye.
Other topics you might like
The New Portkeys LH7C is a Rugged, Bright, Yet Affordable On-Camera Monitor
Updated on Jun 16, 2026
Grab Great Audio From Anywhere with This New DPA 4097 CORE+ Micro Shotgun Microphone
Updated on May 29, 2026
Canon’s New EOS R6V Adapts the R6 III Into a Video-First Body Aimed at Creators
Updated on May 13, 2026