 USA + International
 OWC Canda
 OWC Europe
Getting Started With GarageBand: How to Record and Edit a Digital Piano
Ever wonder how to record a digital piano on a Mac? Here's how to connect a keyboard with GarageBand, record and edit your performance.
Arthur Ditner • Jul 12, 2022
GarageBand has long been one of the biggest perks of owning an Apple device. This fully-featured digital audio workstation (DAW) comes free with every Mac, iPhone, and iPad, giving users an intuitive, streamlined way for creating and publishing music, podcast, audiobook and other types of recordings. If you’re new to GarageBand, this is the series for you. In Getting Started With GarageBand, we’ll be covering topics that help you get the most out of this free—yet powerful—app.
Also in this series:
Ever wonder how to connect a digital piano and capture song ideas on your Mac? With GarageBand, it’s easy to record and edit a digital piano. This accessible software has been available on the Mac for nearly twenty years and has grown to include an excellent collection of keyboards (and other instruments) perfect for any beginner looking to experiment. Check out the video, or read on below.
Required software
To get started, you’ll need to install GarageBand — which is freely available on any Mac. Sign in to the Mac App Store using your Apple ID and download the program here.
Required hardware
Most digital pianos are natively compatible with a Mac through an interface known as MIDI (musical instrument digital interface). The MIDI protocol is an open way for instruments and computers to communicate with each other and perform in synchronous.
Over the past decade, USB-based keyboards have become the most commonly found type of digital piano. These will often have a USB Type B port along the back. USB type B cables are more squarish in shape and are found on the backs of printers.
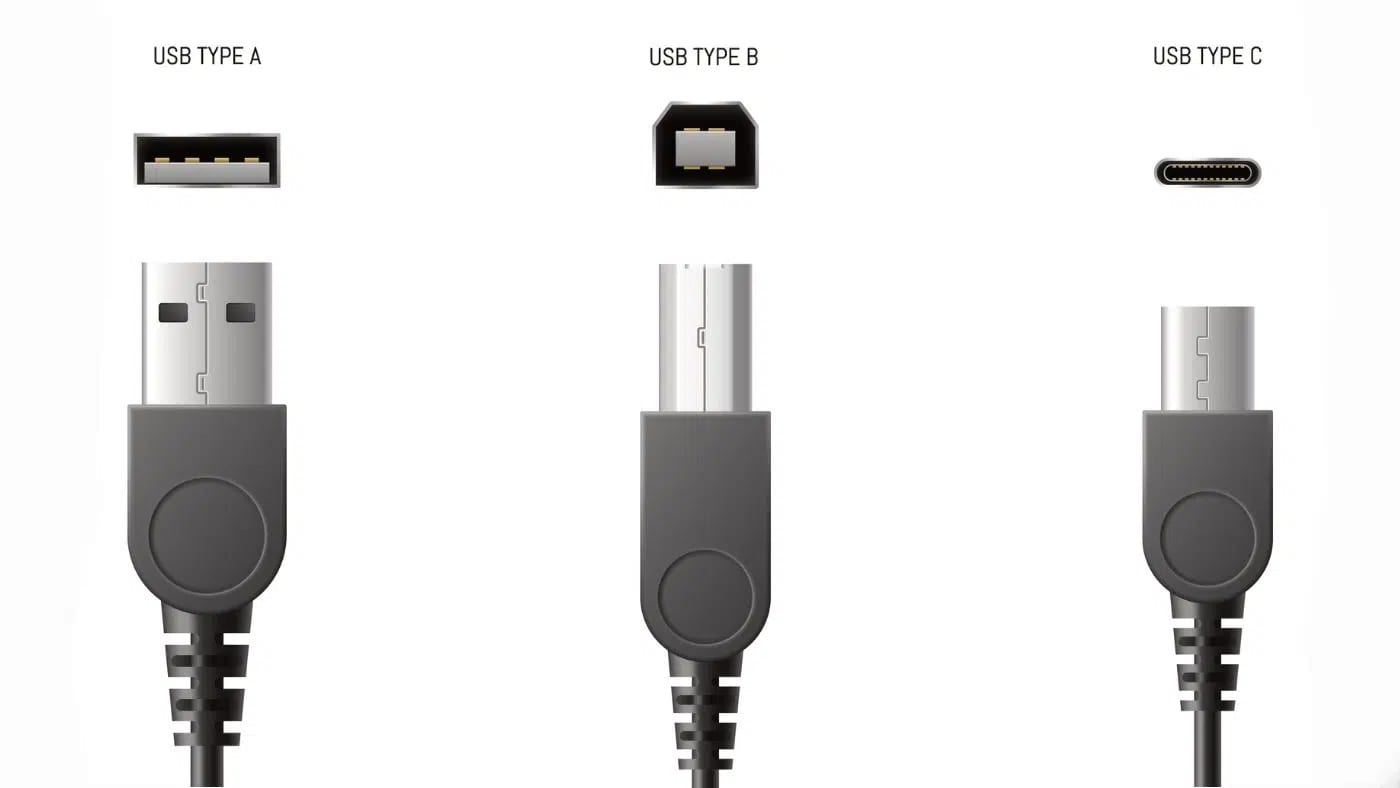
These keyboards use a cable that is USB Type B on one end, and USB Type A on the other. If you are really pressed to find a USB Type B cable, you could always borrow one from a printer or order a replacement here. Since newer Macs are only shipping with USB-C ports, you may need a dock to connect the other end of the keyboard cable.
Recording a digital piano in GarageBand
Launch GarageBand. In the Choose a Project pane, select Empty Project. This reveals the templates page. Now choose: Software Instrument. GarageBand launches and an instrument track is pre-configured and ready to record.
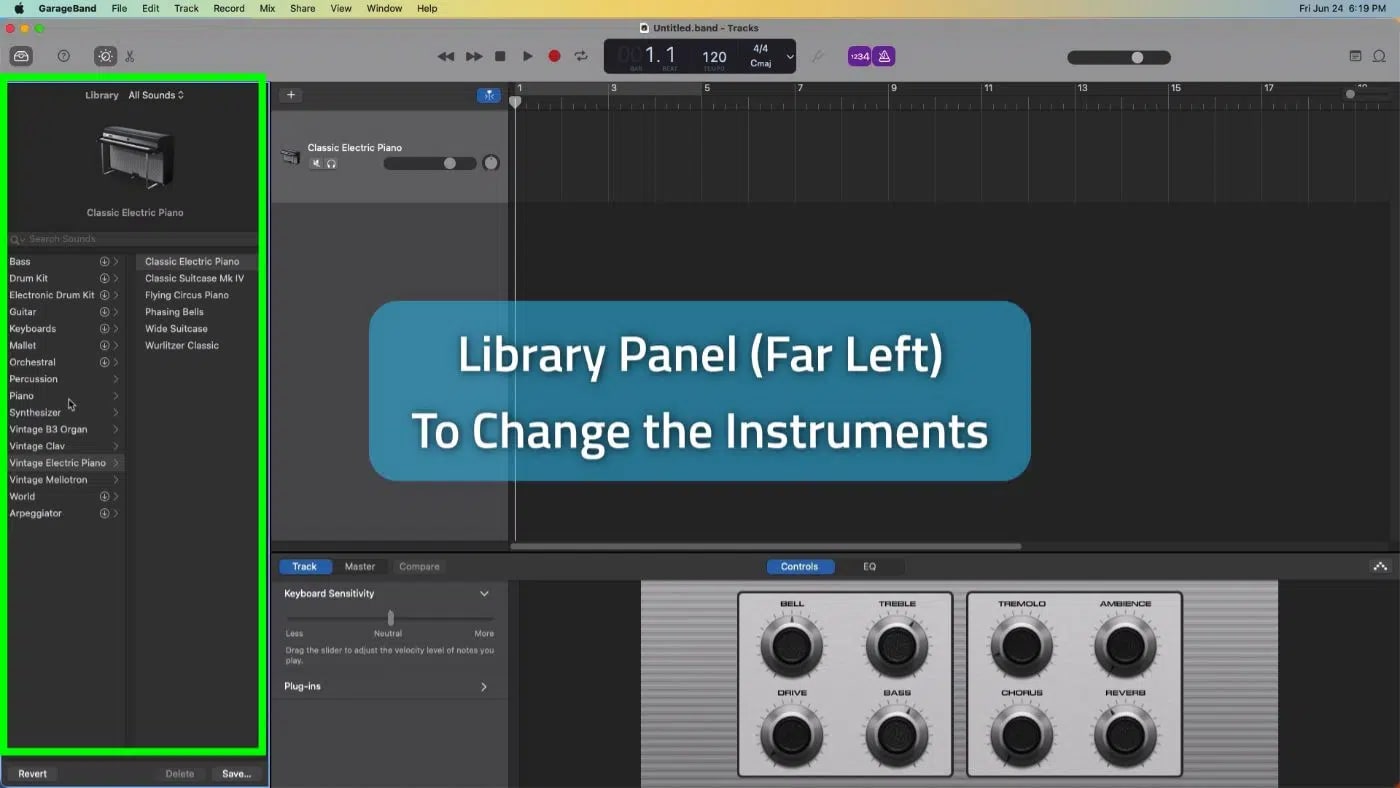
Before we start recording there are a few settings to check out. The instrument can be changed from the default epiano. Use the Library panel in the far left to browse different instruments available. The grand piano can be found under Piano > Steinway Grand Piano.
A metronome icon can be found along the top which will be useful to keep time when playing. The default tempo for a track is 120bpm, which can be changed by double clicking on the speed value and typing in a new value.

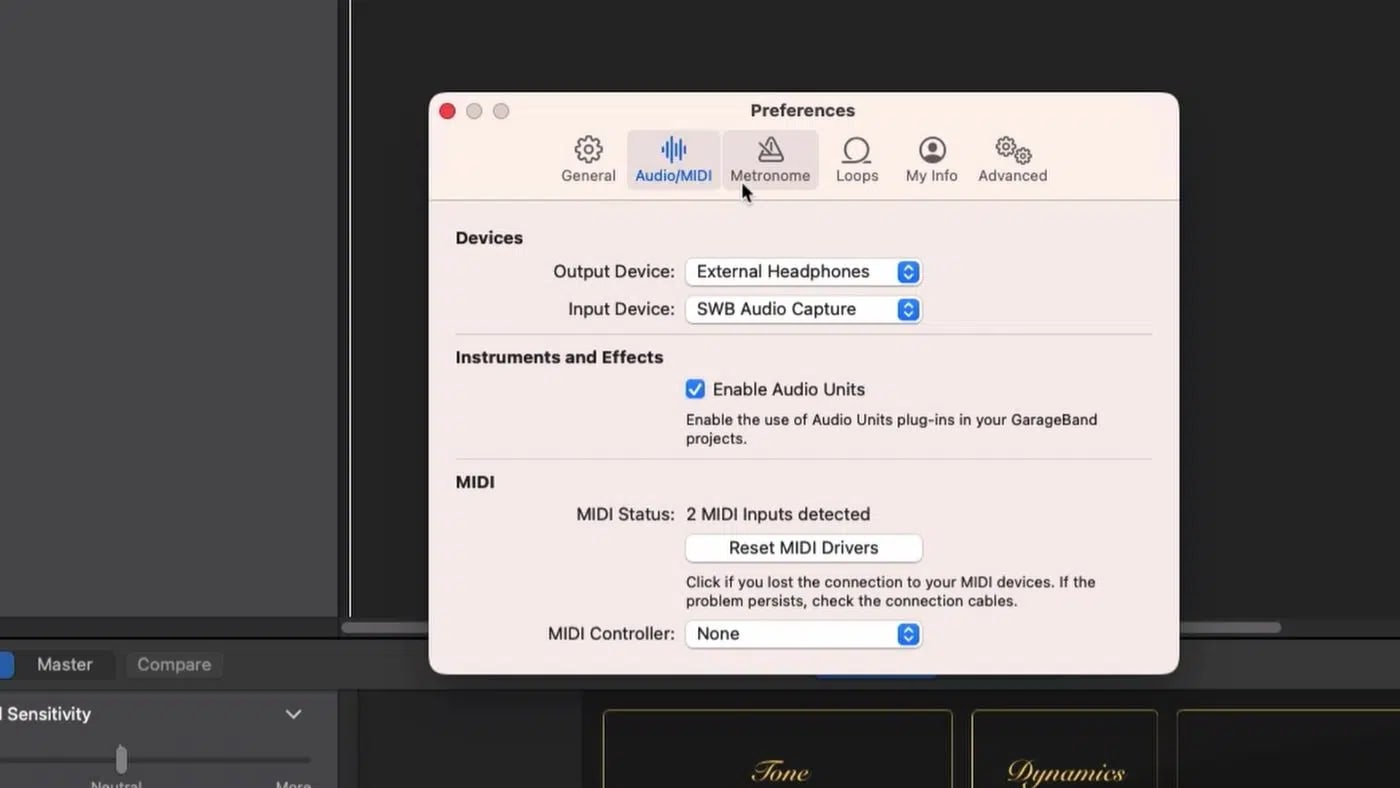
If you can’t hear any sound, or if sound is coming out the wrong speakers (out of the Mac instead of headphones, for instance), head to the menubar and click:
- GarageBand
- Preferences
- Audio/MIDI
- Output Device
This panel controls which speakers will be in use between GarageBand and the Mac.
Editing a performance with the piano roll editor
Now that a performance has been recorded, it is time to start editing. Click the scissors icon along the top to reveal the Piano Roll Editor panel. This view offers greater detail than the standard timeline, and the scale can be adjusted with this slider in the upper right of the panel. As the scale is changed, the scale on the time indicator is adjusted.
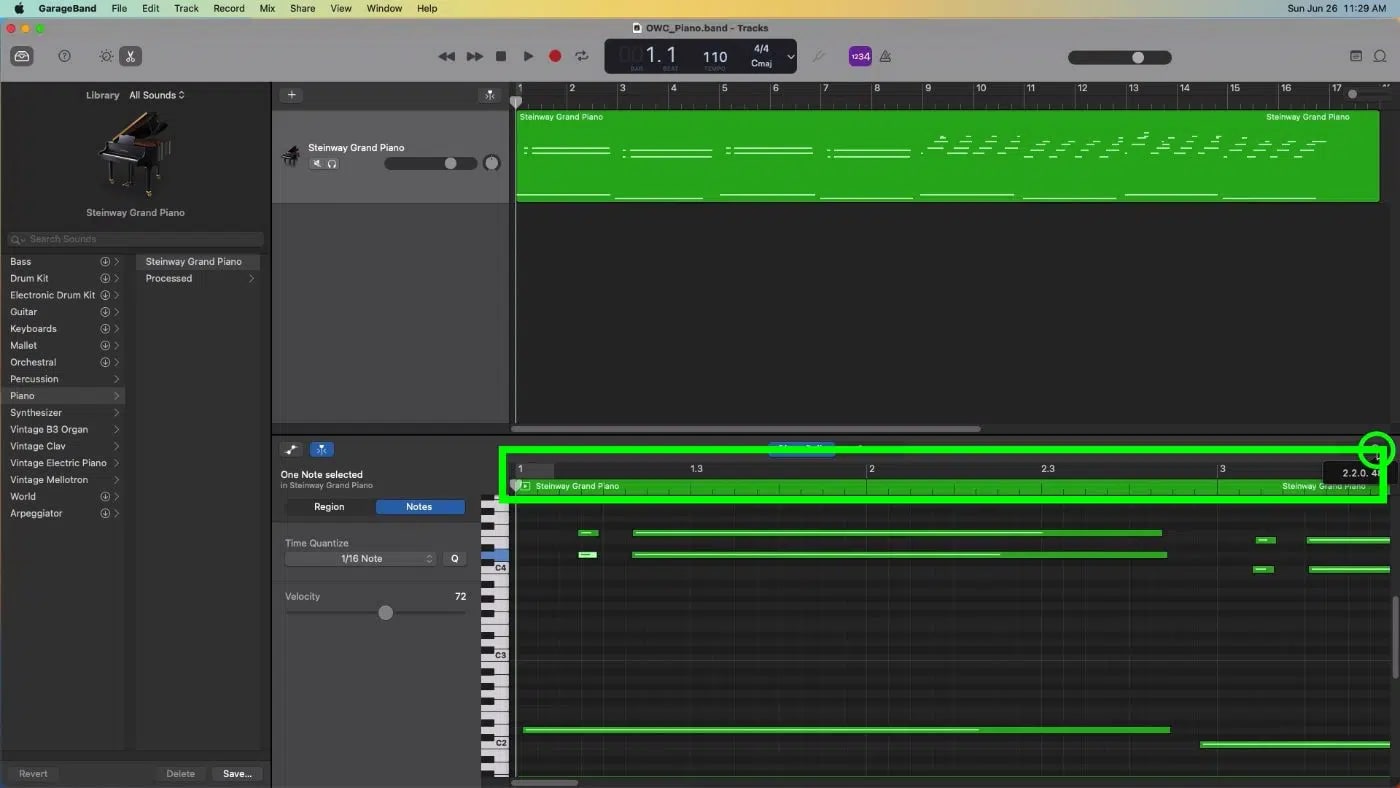
Recording music in this manner is often referred to as a virtual instrument. My performance was recorded in the software, but every single time I press “play” on the computer (which is spacebar by the way) the computer re-creates the performance. The recorded notes appear similar to a horizontal / vertical graph. The longer the note horizontally, the longer in time it is played. The higher up on the graph the note rests, the higher in pitch the note is played.
To adjust individual notes, hover your mouse to the end of any event, wait for the mouse icon to change into a trim icon and click and drag to extend or collapse the note. To delete a wrong note, click on the wrong note and press delete on the keyboard. Or, adjust a wrong note to hit the correct key by dragging the note up or down the Piano Roll.
Change the piano to a synthesizer
Since GarageBand utilizes software instruments, it is possible to change the “voice” of the performance from a piano to another instrument.
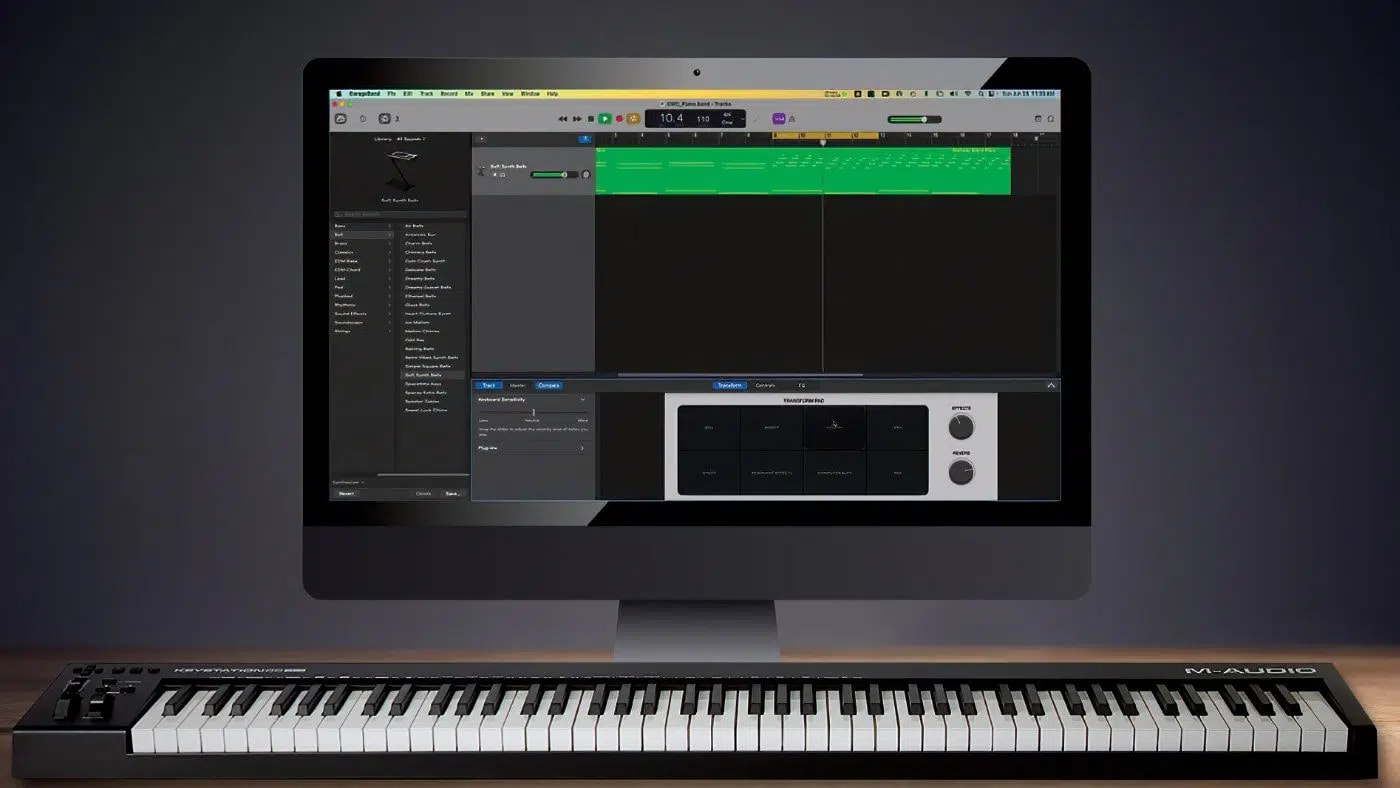
To change the instrument type, open up the library panel on the left and navigate through the instrument banks. The Electric Pianos are quite nice, as are the synthesizers. To change the piano to a sci-fi Blade Runner type sound go Synthesizer > Bell > Soft Synth Bells.
Sounds can be edited further by using the Transform presets, such as Coral or Synth. And, the attributes of the synthesizer can be edited within the Controls panel, such as adjusting the cut off and resonance.
Nearly twenty years after its first release, GarageBand remains the best entry level music composition app. Once you’ve mastered GarageBand and are interested in taking your projects to the next level, its worth noting that GarageBand songs can be upgraded to Logic Pro, to unlock more editing tools to fully flesh out your recordings.
Other topics you might like

Mountain Lodge Meets Music Magic: Inside Dark Horse Recording with Dave Hagen
Updated on Jun 4, 2026
Grab Great Audio From Anywhere with This New DPA 4097 CORE+ Micro Shotgun Microphone
Updated on May 29, 2026
Upgrade Your Live Performance Sound with the Shure SLXD24D+/N8C Dual-Channel Wireless Mic System
Updated on May 28, 2026

More Than Two Decades of Trust: How Prime Recording Relies on OWC to Protect Every Note
Updated on May 7, 2026