 USA + International
 OWC Canda
 OWC Europe
Don't Lose That Shoot! How to Make a Fast, Bootable macOS Recovery Drive
In this video we'll show you how easy it is to put a solid emergency plan in place, making sure you're prepared if the unthinkable happens: your Mac crashes on the road.
Wayne Grayson • Jul 01, 2025

Imagine this: your Mac’s startup disk encounters an issue, or a critical system file gets corrupted. Or, instead, perhaps you’re upgrading to macOS Sequoia or another version of macOS and need to do so across multiple Macs and don’t want to download the hefty installer repeatedly—especially over a slow connection. In both of these scenarios, an external boot drive is a lifesaver.
In an emergency, macOS Internet Recovery is wonderful—until your broadband is slow, captive‑portal‑locked, or nonexistent. Here’s why creating self‑contained installer on a high‑speed external SSD is a smart move:
- Offline Reinstallation: The primary benefit. If your internet is down or painfully slow, an external installer is your only way to get macOS reinstalled efficiently.
- Troubleshooting Utilities: A bootable installer also gives you access to macOS Recovery utilities, including Disk Utility (to repair or erase drives), Terminal, and options to restore from a Time Machine backup.
- Clean Installs Made Easy: For users who prefer a fresh start, a bootable installer simplifies the process of erasing your internal drive and installing a clean version of macOS Sequoia.
- Peace of Mind: Knowing you have a reliable way to restore your Mac, no matter the circumstances, is invaluable.
This guide will take you through the process of creating a bootable macOS recovery installer—a fantastic insurance policy to have in case the unthinkable happens. This guide will focus on creating a bootable installer for macOS Sequoia, but the instructions will likely also work for recent previous and future versions of the OS. If you’re planning on installing a version other than Sequoia, however, be sure to double check with Apple Support documentation to make sure the instructions work for your particular version.
Watch along as we create a bootable recovery drive, or read on below.
Meet the hardware: OWC Envoy Pro Elektron and Envoy Pro mini
When creating a recovery drive, you need storage you can count on—something fast, durable, and portable. Two of our favorite solutions here at OWC fit that bill perfectly:
The OWC Envoy Pro Elektron: This isn’t just any portable SSD. It’s a pint-sized powerhouse.
- Blazing Fast: With NVMe performance reaching up to 1011MB/s, creating the installer and reinstalling macOS will be significantly quicker than on other portable drives or USB thumb sticks.
- Built Like a Tank: It’s crushproof, dustproof, and waterproof (IP67 rated). Whether it’s being tossed around in a backpack or stored in a drawer, you can rest assured your emergency drive will be safe from harm.
- Pocket-Sized Power: Despite its rugged build, it’s incredibly compact and bus-powered via USB-C, making it easy to carry anywhere.
- Universally Compatible: Works seamlessly with Macs via its USB-C (10Gb/s) interface.

The OWC Envoy Pro mini: The ultimate in “works with everything” portability and performance.
- Ultra-Portable: Truly pocket-sized, this thumb drive-sized SSD delivers full-fledged SSD speeds up to 946MB/s. That means you can always keep a recovery drive with you—even on a keychain.
- Versatile Connectivity: Both USB-C and USB-A connectors are built into the smart, transforming design of the Envoy Pro mini, ensuring you can plug it into virtually any Mac, new or old.
- Reliable SSD Performance: Just like its larger sibling the Elektron, it uses top-tier SSD componentry for speed and longevity.
- Effortless to Carry: Slip it onto a keychain or into the smallest pocket; it’s always ready.
Both drives offer ample capacity for a macOS installer and the robust reliability OWC is known for. (You’ll need at least a drive with 32GB of capacity for comfort, though a 16GB drive is the minimum macOS requirement.)
What you need before you start
- OWC Envoy Pro Elektron or OWC Envoy Pro mini
- A working Mac to download “Install macOS Sequoia” from the App Store (it lands in /Applications)
- Your admin password
That’s it.
Step‑by‑step: Building your rescue drive
Step 1: Download your macOS Installer from the App Store.

- Open the Mac App Store on your Mac.
- Search for macOS Sequoia.
- Click “Get” or the download icon.
- The installer (e.g., “Install macOS Sequoia.app”) will download to your Applications folder. This is a large file (typically 12GB+), so ensure you have enough space and time. You’ll also be able to view the installer in Launchpad.
- Important: Once the download is complete, if the installer launches automatically, quit it (Command + Q). Do not proceed with an installation on your main drive yet. Verify the full installer (around 12-14GB) is in your /Applications folder.
Step 2: Prepare your drive
You’ll need to erase and format your OWC Envoy Pro Elektron or Envoy Pro mini specifically for the macOS installer.
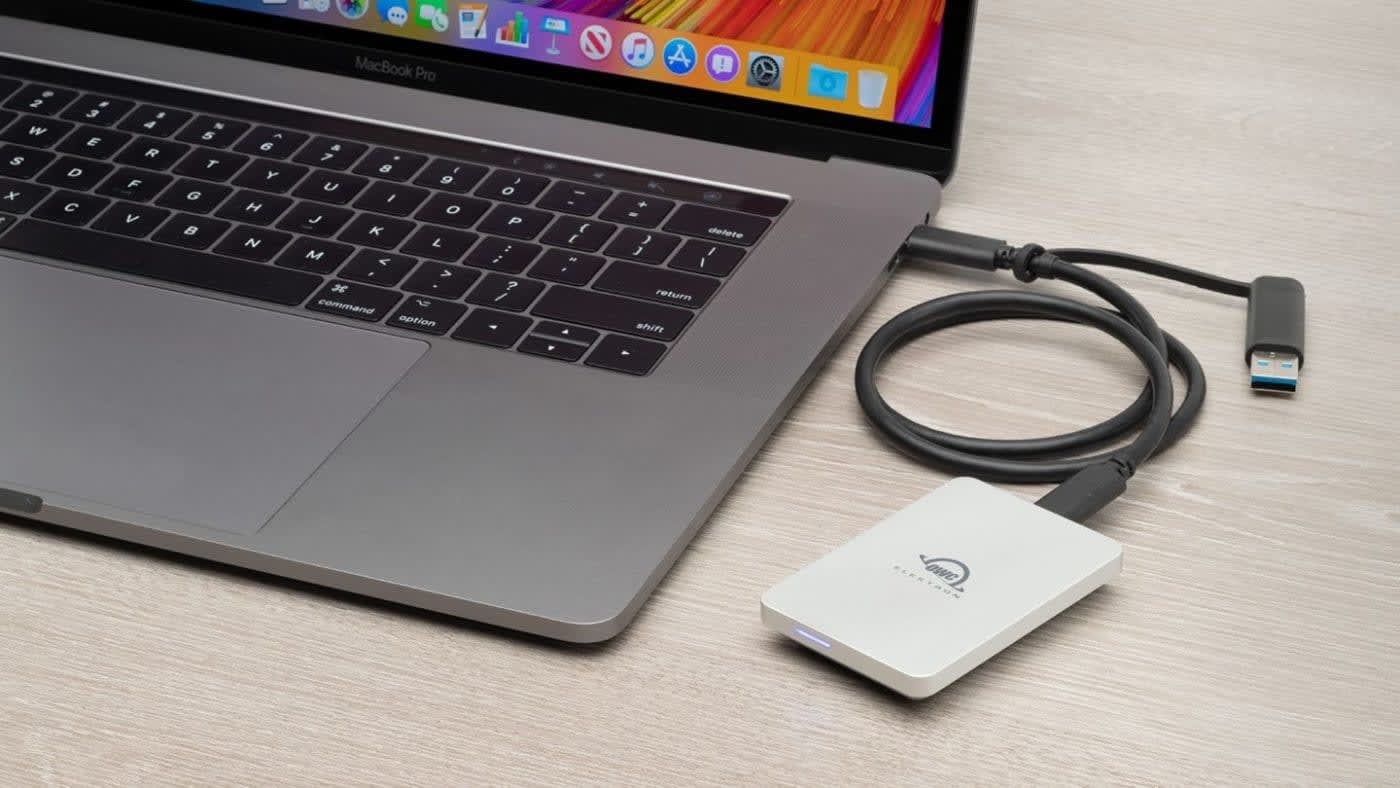
- Connect your OWC Envoy Pro Elektron or Envoy Pro mini to your Mac.
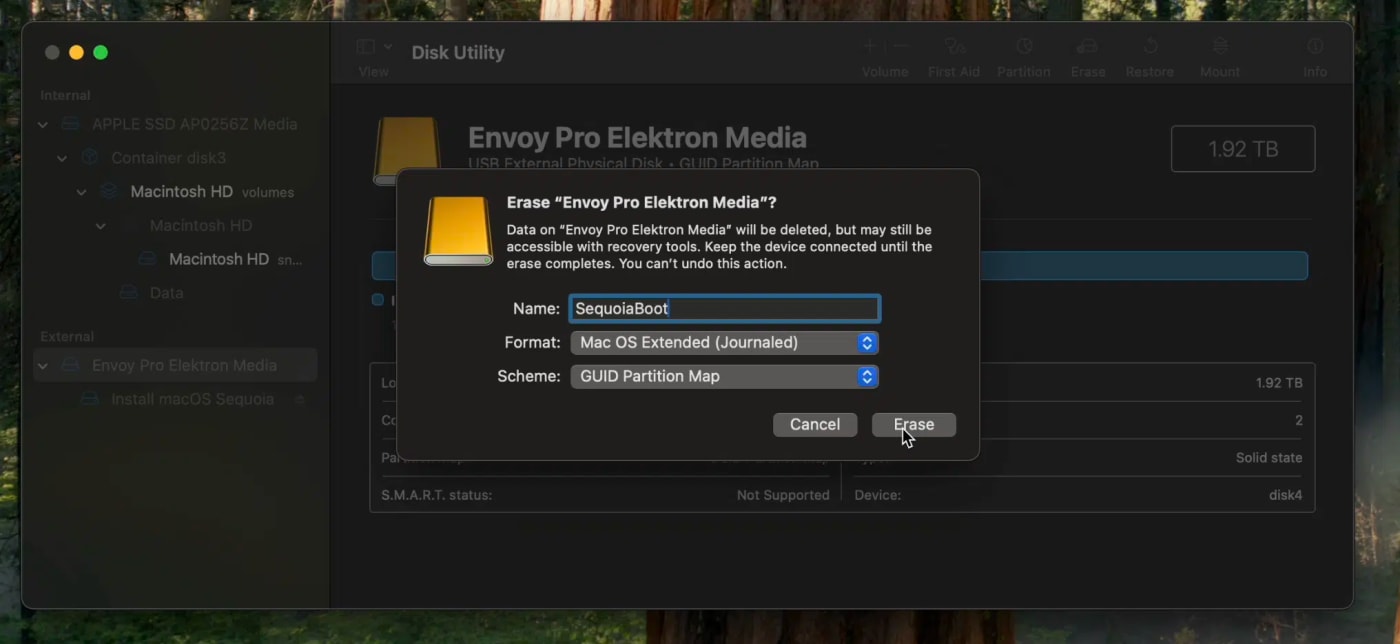
- Open Disk Utility (Finder > Applications > Utilities).
- In the Disk Utility sidebar, click “View” and select “Show All Devices”.
- Select the top-level OWC drive (not the volume underneath it) in the sidebar.
- Click the “Erase” button in the toolbar.
- Set the following options:
- Name: Choose a simple name (e.g., “SequoiaBoot” or “OWCInstall”). Avoid spaces for simplicity with the Terminal command later.
- Format: Select Mac OS Extended (Journaled) or APFS. For modern Macs and macOS Sequoia, APFS is generally recommended. (Note: If you format as APFS and run into any issues in creating the installer in the next step, reformat the top level of the drive as Mac OS Extended (Journaled).
- Scheme: Select GUID Partition Map.
7. Click “Erase” and then “Done” when the process is complete. Quit Disk Utility.
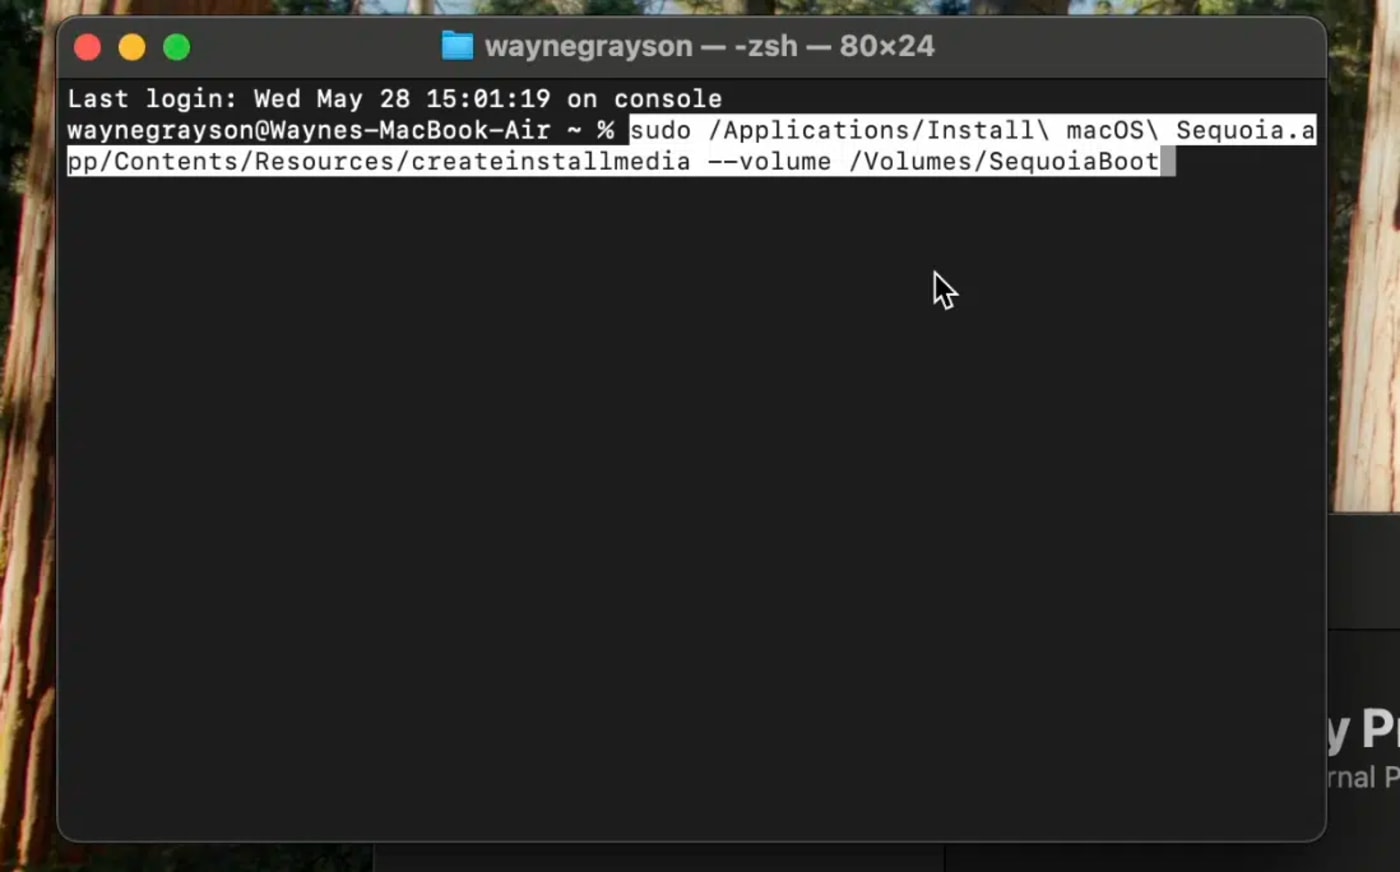
Step 3: Create the Bootable Installer via Terminal
This is where the magic happens. You’ll use a Terminal command to create the bootable drive.
1. Open Terminal (Finder > Applications > Utilities > Terminal).
2. Carefully type or paste the following command into the Terminal window.
Important: Replace MyVolume at the end of the command with the exact name you gave your OWC drive in Disk Utility (e.g., SequoiaBoot or OWCInstall).
- sudo /Applications/Install\ macOS\ Sequoia.app/Contents/Resources/createinstallmedia –volume /Volumes/MyVolume
For example: If you named your drive “SequoiaBoot”, the command would be:
- sudo /Applications/Install\ macOS\ Sequoia.app/Contents/Resources/createinstallmedia –volume /Volumes/SequoiaBoot
3. Press Return.
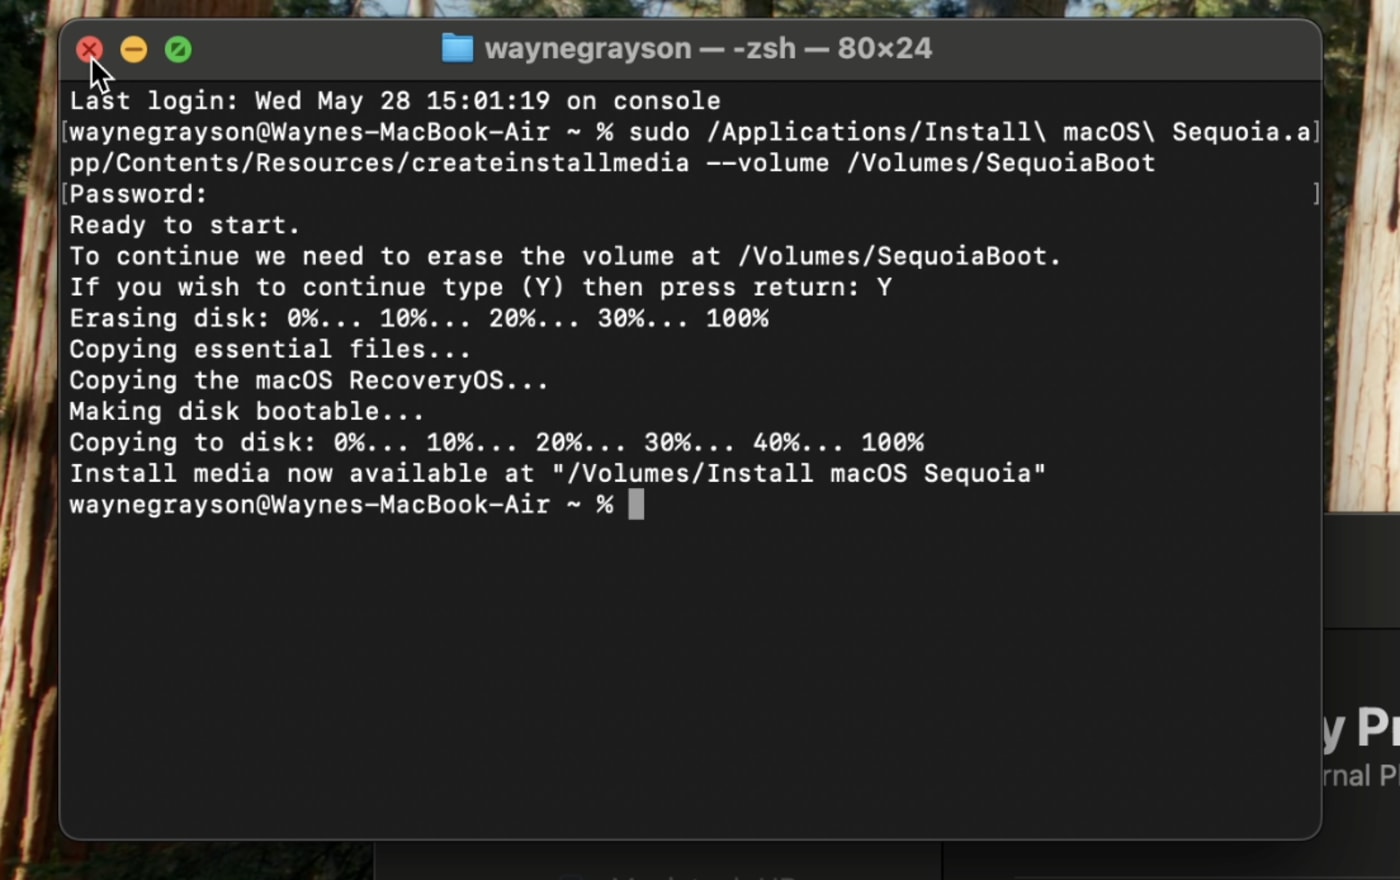
1. Terminal will prompt you for your administrator password. Type it (characters won’t appear on screen) and press Return.
2. You’ll be warned that the drive will be erased. Type Y and press Return to confirm.
3. Terminal will now create the bootable installer. This process can take some time (15-30 minutes or more, depending on the speed of your drive and Mac. On my Envoy Pro Elektron it took less than a minute.) You’ll see progress updates like “Erasing disk,” “Copying to disk,” and “Making disk bootable.”
4. Once complete, Terminal will display a message similar to “Install media now available at /Volumes/Install macOS Sequoia” (the drive name will change to reflect the installer).
5. You can now quit Terminal and eject your newly created OWC macOS Sequoia emergency boot drive.
Step 4: Booting Your Mac from the OWC Emergency Drive
If you ever need to use your emergency drive, here’s how to use it:
For Macs with Apple Silicon (M1, M2, M3, M4 series):
- Shut down your Mac.
- Connect your OWC Envoy Pro Elektron or Envoy Pro mini.
- Press and hold the power button until you see the “Loading startup options” screen.
- Select your OWC bootable installer volume (e.g., “Install macOS Sequoia”).
- Click “Continue”.
For Intel-based Macs:
- Shut down your Mac.
- Connect your OWC Envoy Pro Elektron or Envoy Pro mini.
- Turn on your Mac and immediately press and hold the Option (⌥) key.
- Keep holding the key until you see the Startup Manager, which displays available bootable drives.
- Select your OWC bootable installer volume.
- Click the arrow or press Return.
Once booted from the OWC drive, the macOS Utilities window will appear. From here, you can choose to reinstall macOS Sequoia, use Disk Utility to repair or erase drives, restore from a Time Machine backup, or access other troubleshooting tools.
Peace of Mind with OWC
By investing a little time now to create a macOS Sequoia emergency boot drive on an OWC Envoy Pro Elektron or Envoy Pro mini, you’re giving yourself a crucial safety net. The ruggedness and speed of the Elektron ensure your emergency toolkit is always ready and performs when needed. The ultra-portability and reliable SSD performance of the Envoy Pro mini mean your solution can always be with you.
Don’t wait for an emergency to wish you had one. Prepare today and work with confidence!
Ready to build your macOS emergency kit?
Explore the OWC Envoy Pro Elektron: https://eshop.macsales.com/sho...
Discover the OWC Envoy Pro mini: https://eshop.macsales.com/ite...