

OWC Jellyfish R24 Support Manual
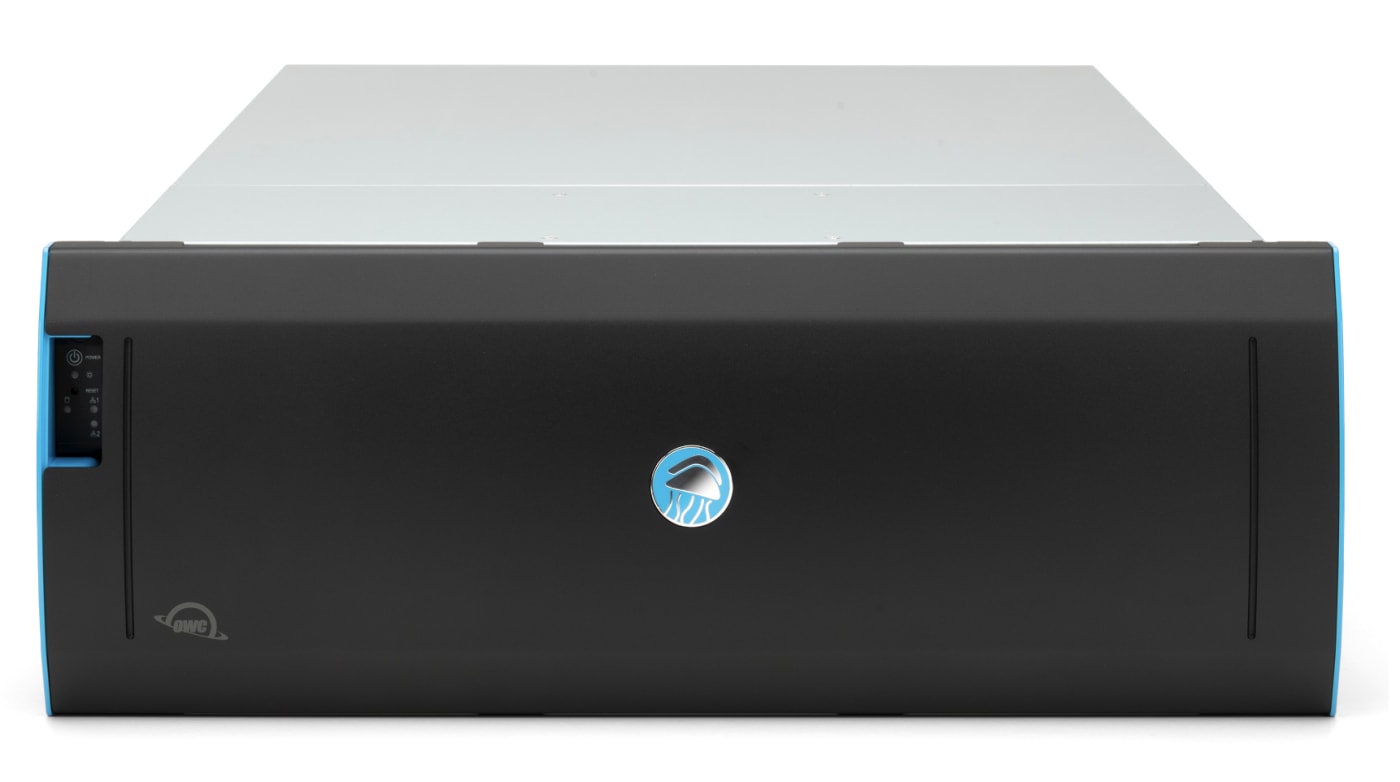
Table of Contents
- Unboxing Your OWC Jellyfish R24
- Instruction Booklet and Welcome Card
- Power Cables
- Jellyfish R24 Chassis
- Inner and Outer Rails
- Bezel
- Drives
- How to Rack Mount the System (R24)
- Preparing For Installation
- Rack Installation
- How To Install Drives
- Affixing The Bezel
- How to Connect a SAS Cable if Using an Expansion Bay
- Powering Your OWC Jellyfish On/Off
- Powering Your Jellyfish On
- Powering Down Your Jellyfish
- Ports and Cabling Overview
- Download OWC Jellyfish Connect
- Optional Setup Steps
- Connecting Your Jellyfish to the Internet
- Activating Your Integrations
- Kyno for Jellyfish
- Media Engine
- Transferring Media to Your Jellyfish
- Cabling for Non-Admin Users
- OWC Jellyfish and Adapters
- Additional Resources
Unboxing Your OWC Jellyfish R24
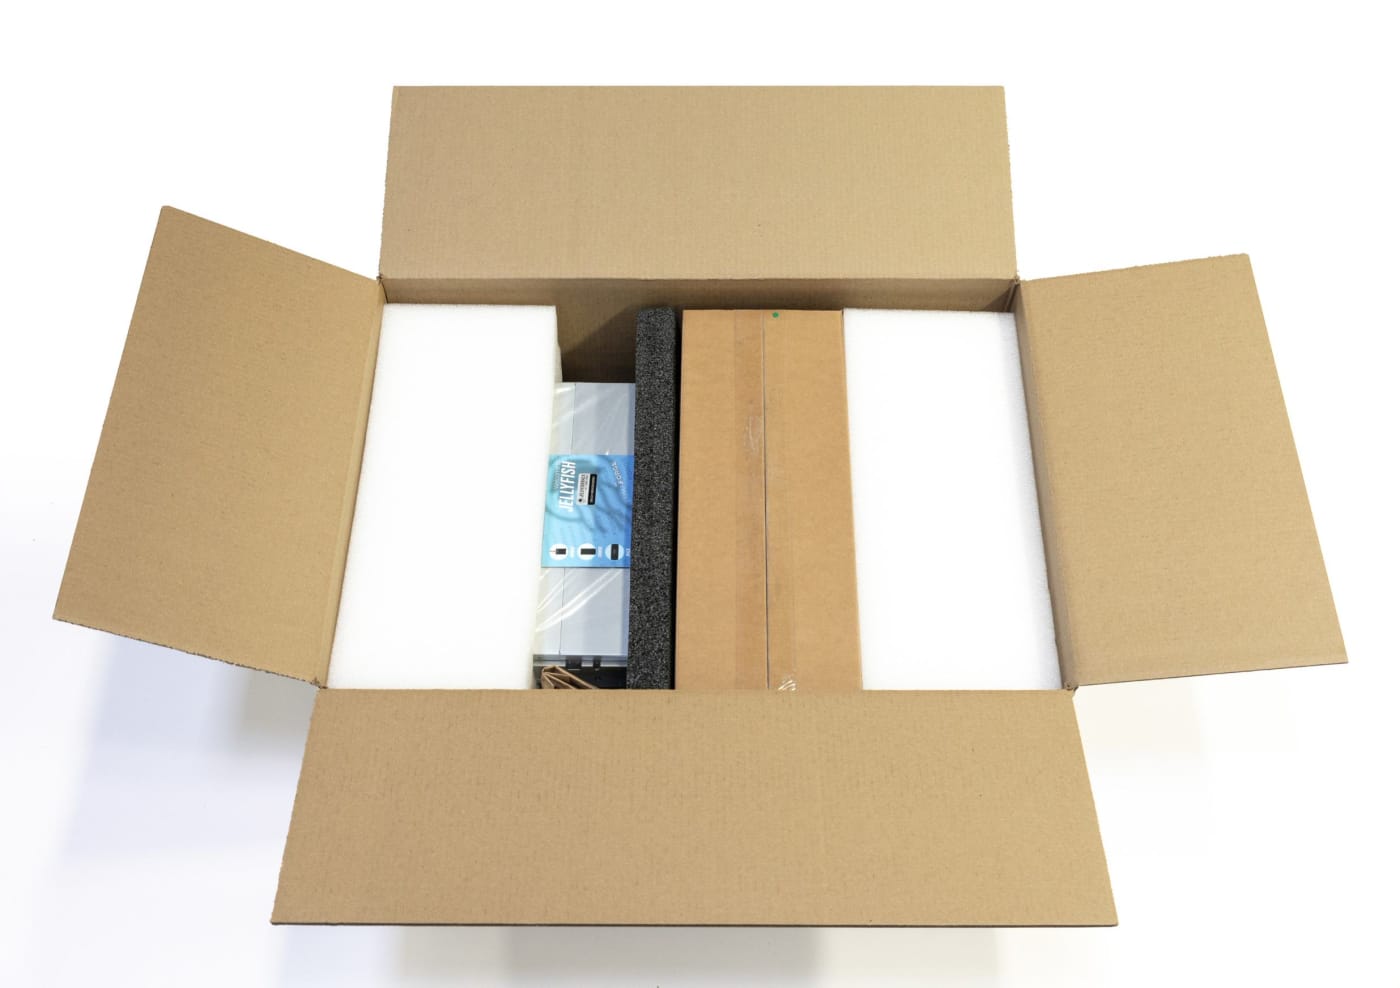
- Congratulations on the purchase of your OWC Jellyfish R24! Everything you need will come shipped in two boxes, with the following items in the first box:
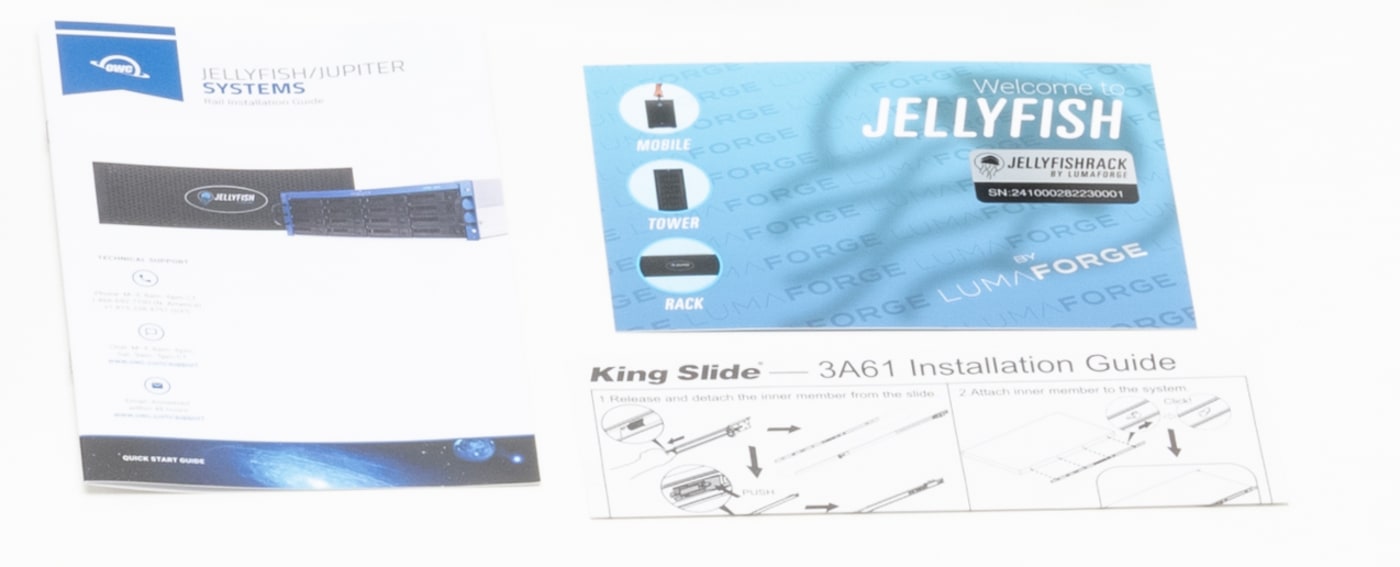
Instruction Booklet and Welcome Card
- You’ll want to hang on to this handy resource. It contains important information, like quick links to our setup and support websites, and the serial number for your unit. The instruction booklet includes a guide for physical installation of the rails and rack. A copy of this can also be found at https://support.lumaforge.com/products/jellyfish/setup.
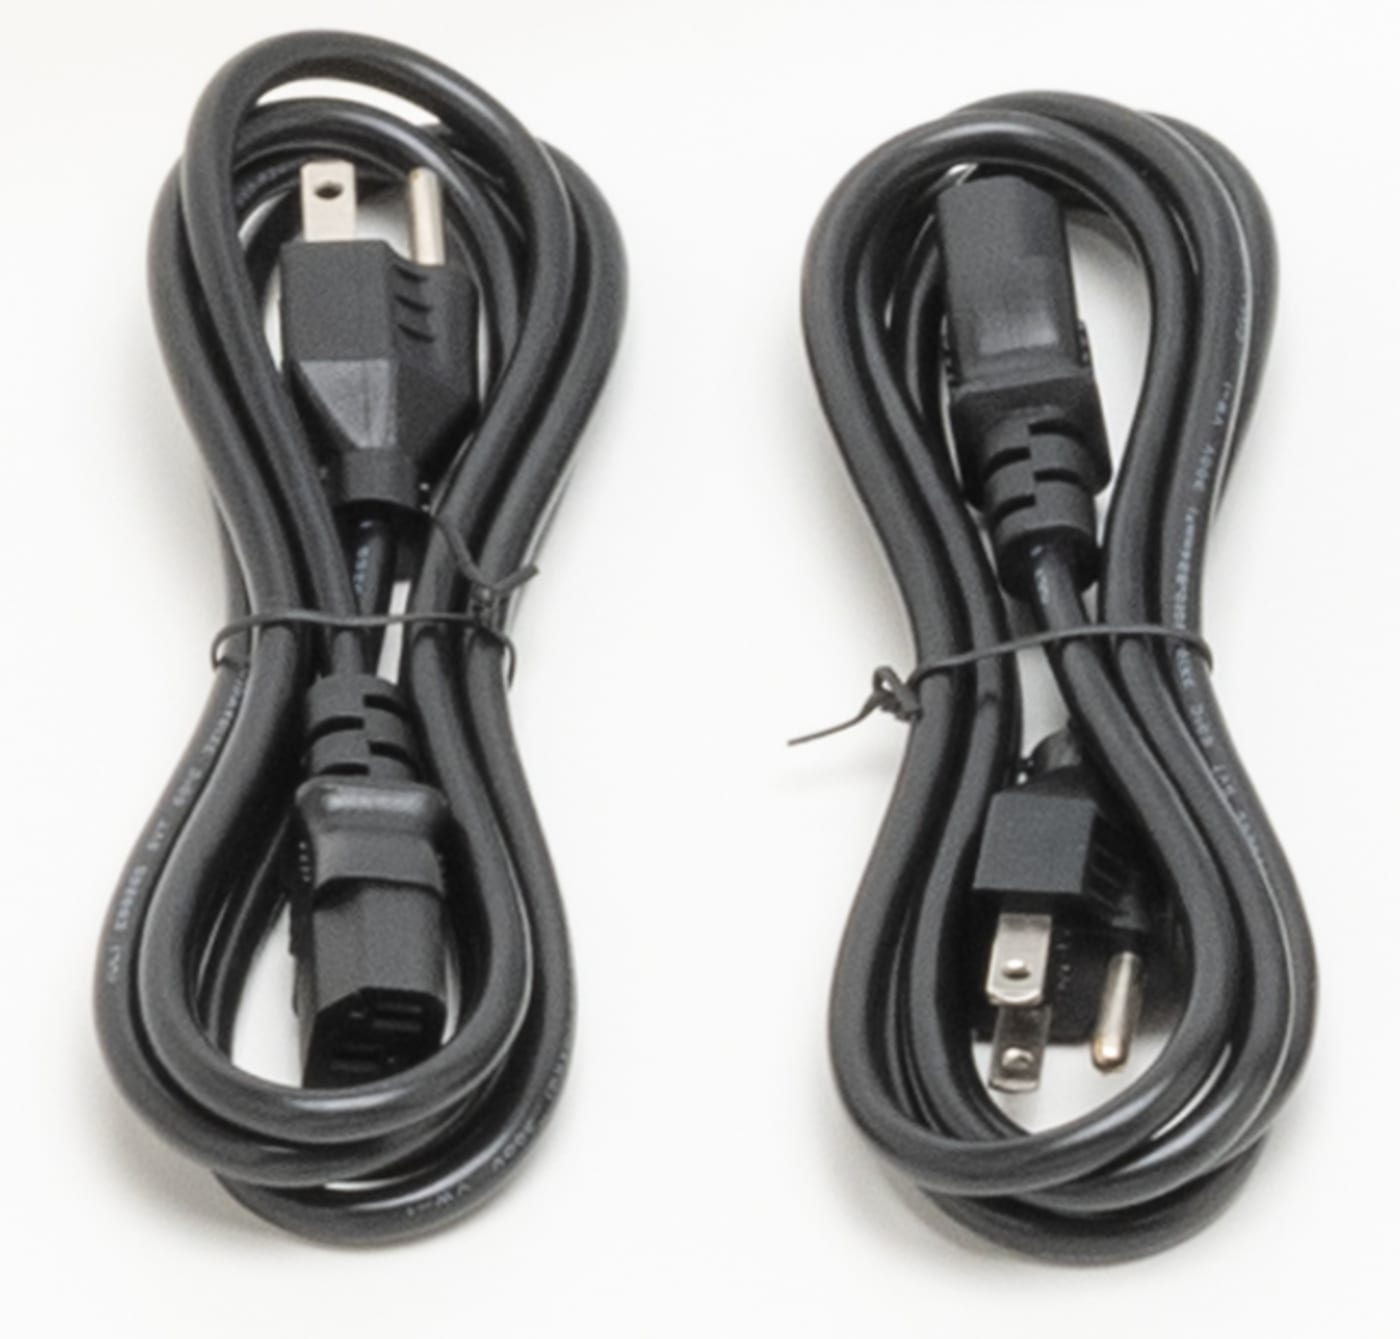
Power Cables (2)
- These will plug into the back of the unit. We recommend connecting to an uninterrupted power supply (UPS).
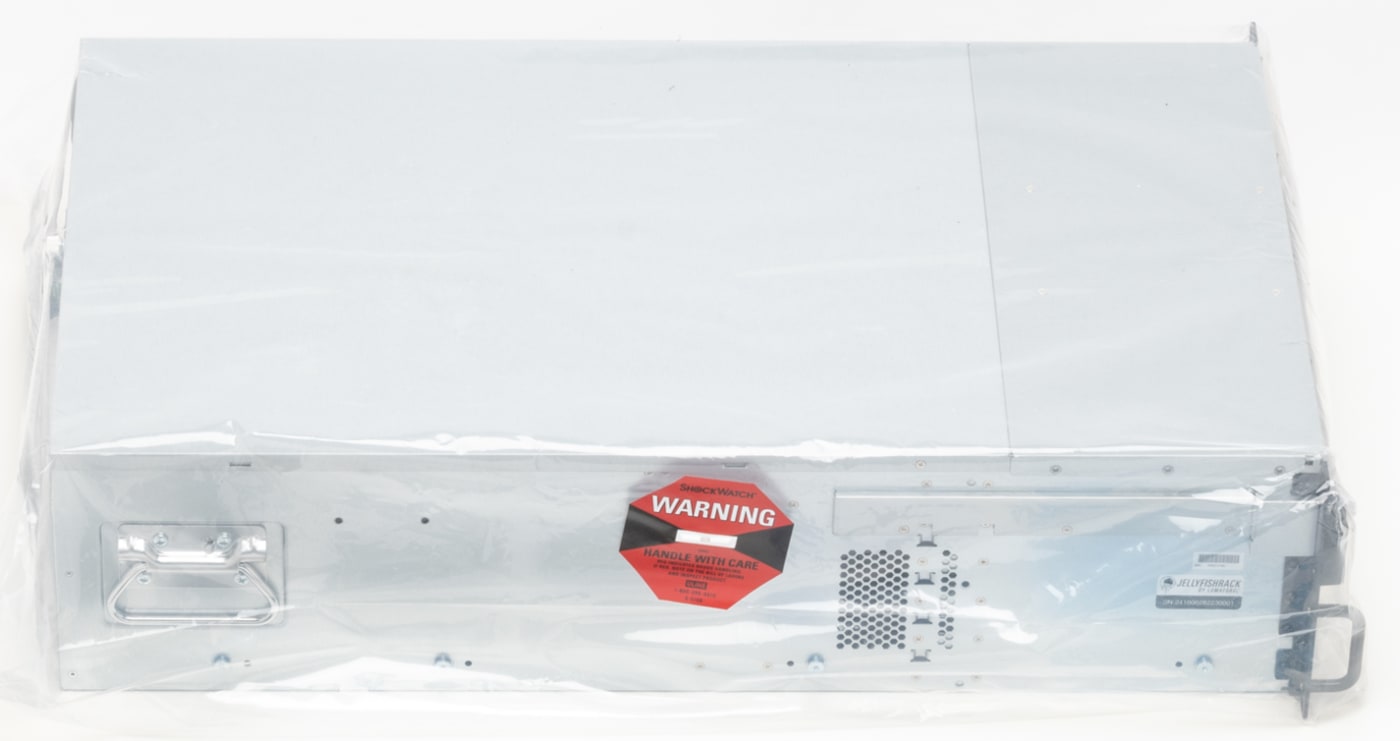
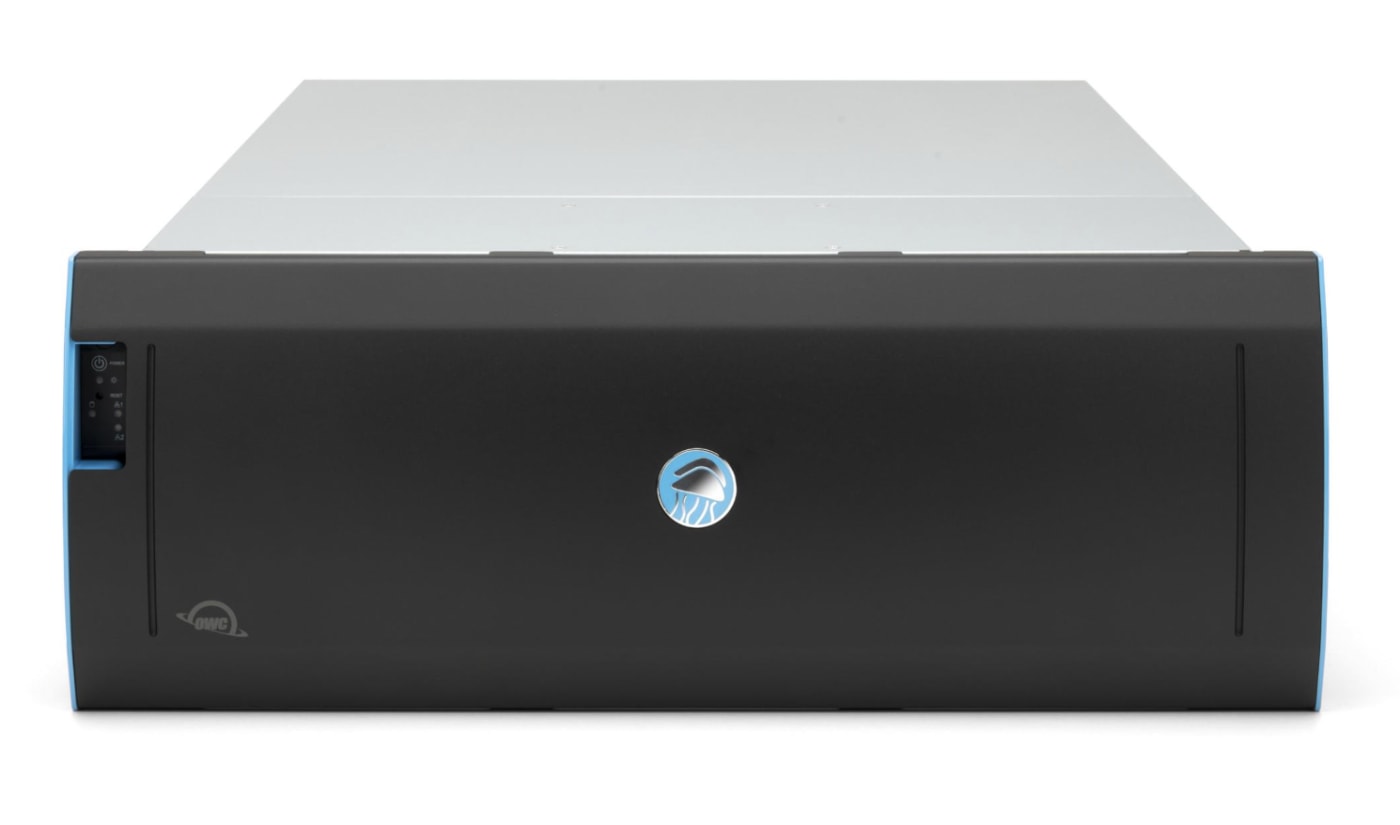
The OWC Jellyfish R24 Chassis
This is the body of your OWC Jellyfish R24 in which everything is stored. Note: the R24 will not have any drives in it when shipped.
Inner and Outer Rails (2 pairs)
- These will need to be installed to hold your R24 in a rack cabinet. (Instructions on how to install these and rack mount your system will be detailed in the next section.)

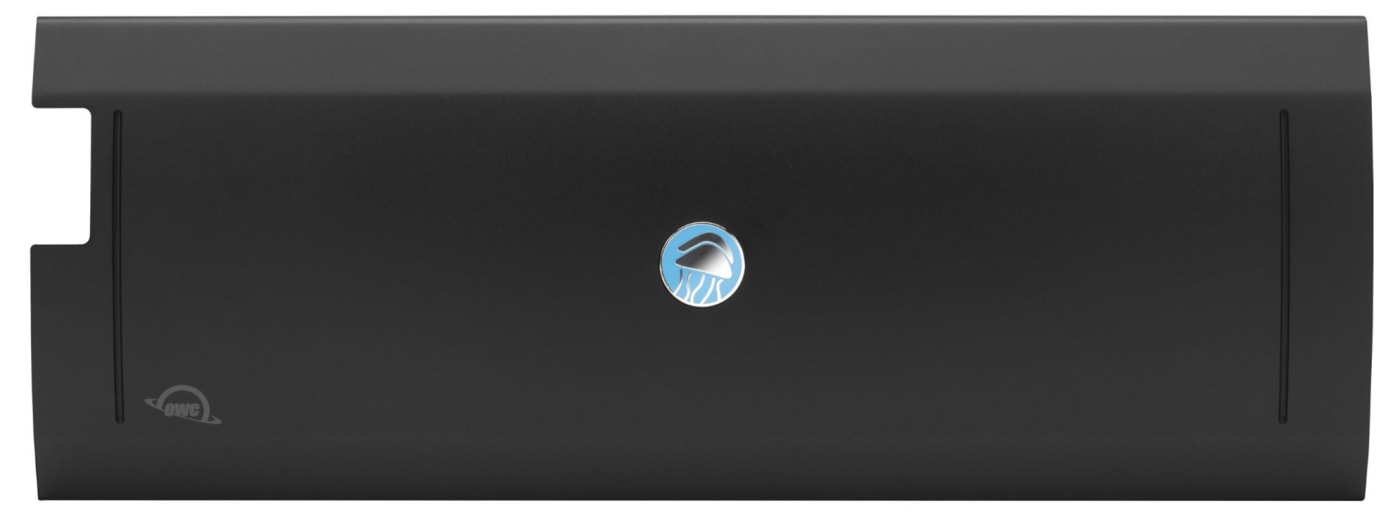
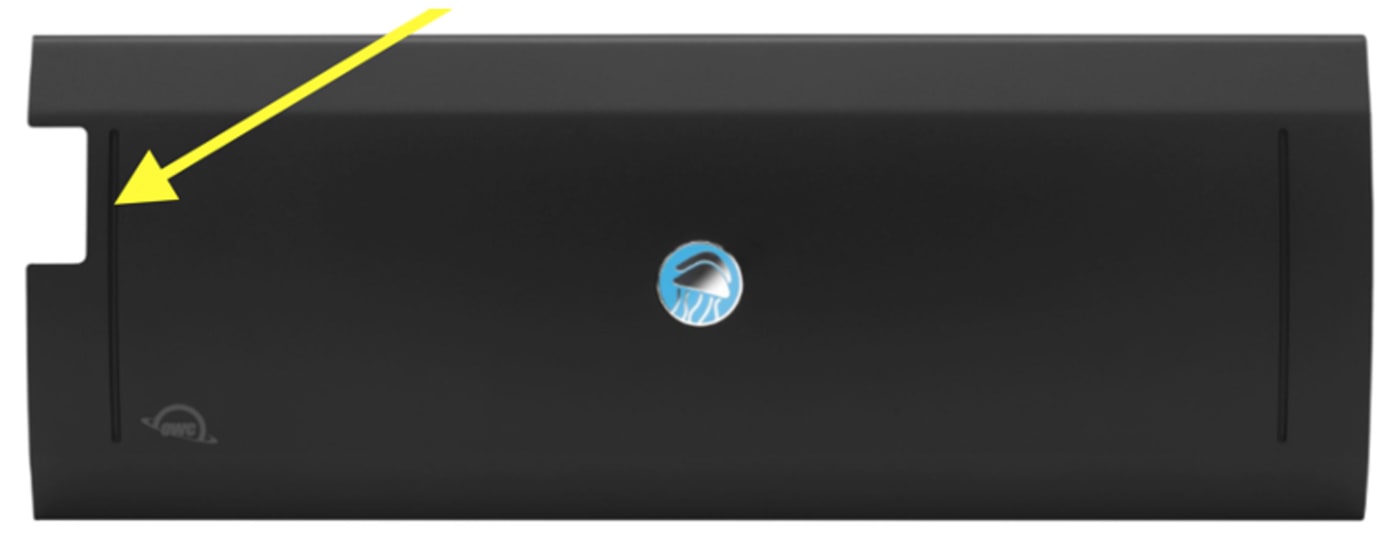
Bezel
- This is the removable front cover of your R24. You won’t need any screws, bolts, or tools because it is secured by magnets. You’ll need to remove it any time you install, replace, or change any of your drives.
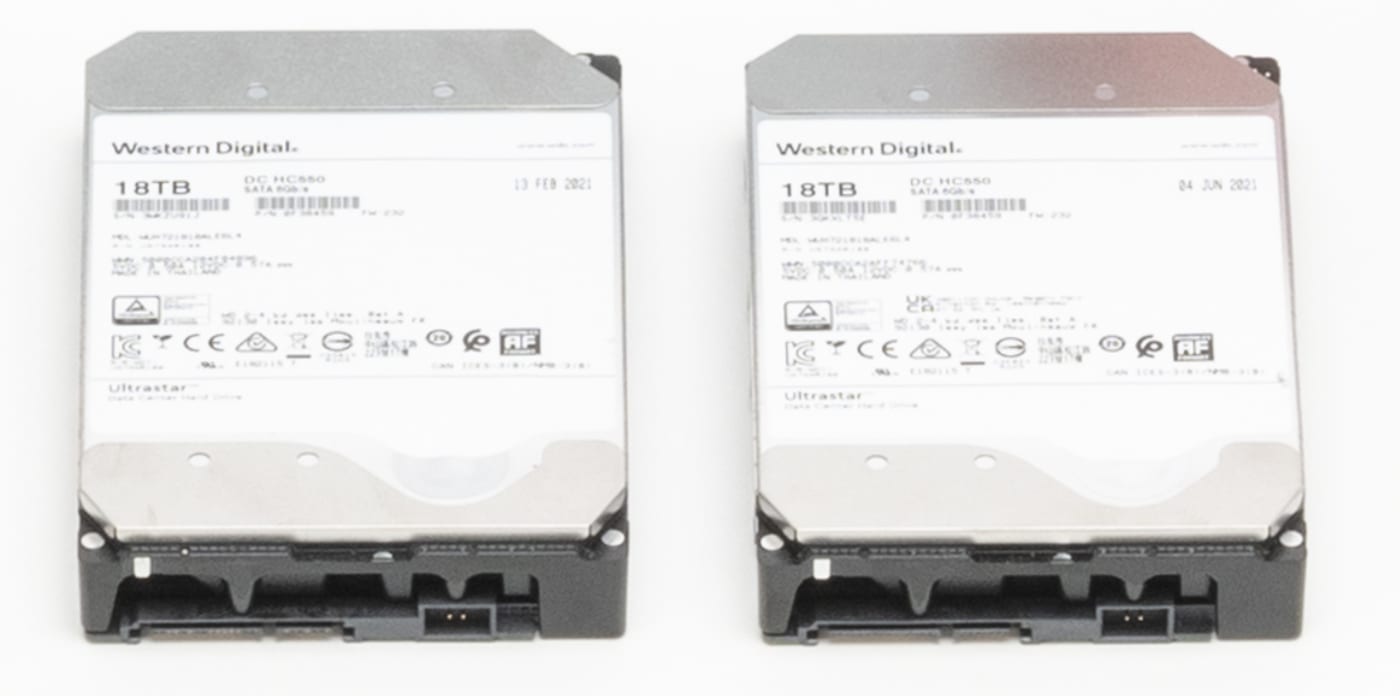
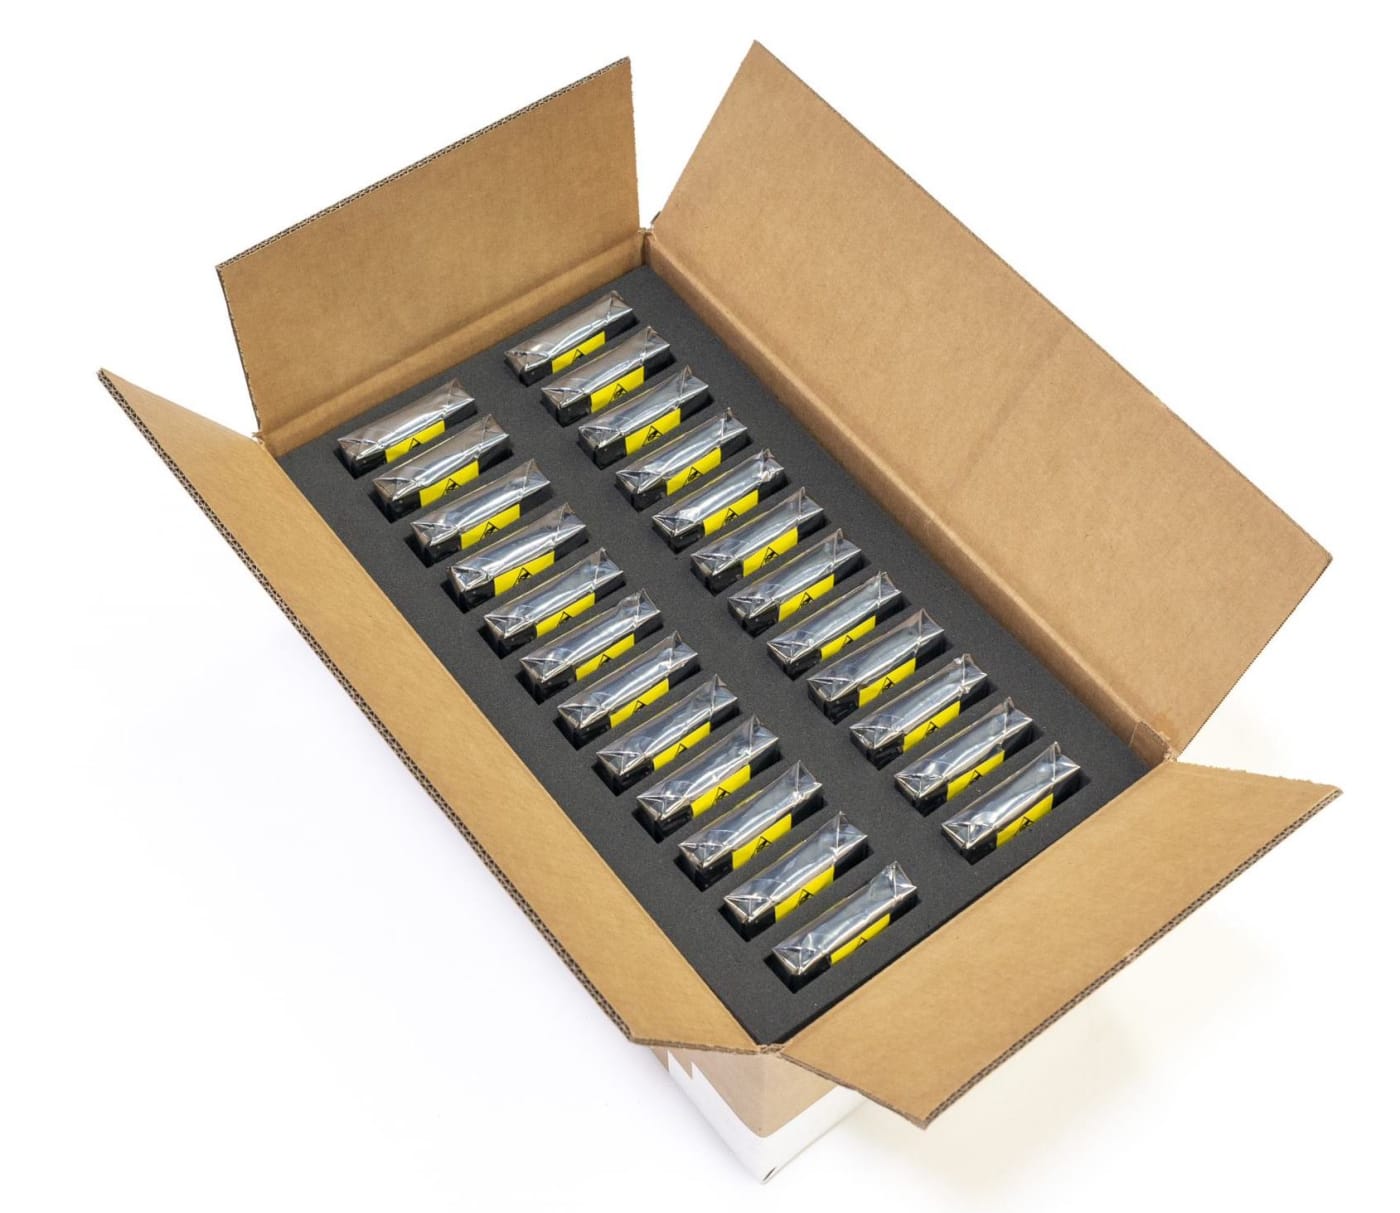
Drives
- You will receive two spare drives in the same box as the R24. The spares are included in case you ever need to replace a drive. There will be a second box with your 24 ready-to-install drives.
How to Rack Mount the System (R24)
- In this section, you will learn everything you need to know about rack mounting your R24.
NOTE: Do not install your drives before rack mounting your system. Installing them increases the weight of the unit significantly and doing it before racking your R24 will make the process much more difficult.
Preparing For Installation
1. First, you’ll need to separate the inner and outer rails. To do so, fully extend the outer rails until you see a white button.
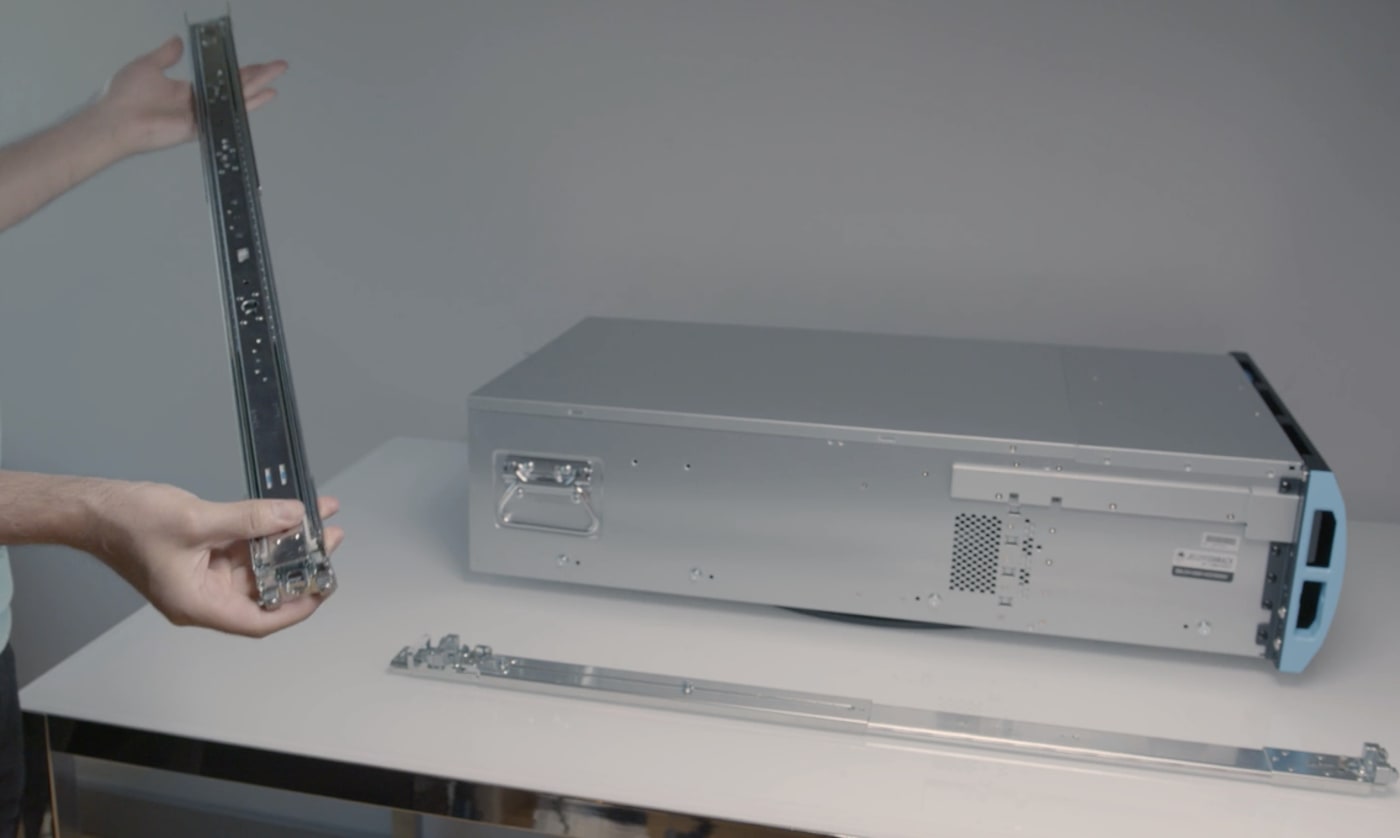
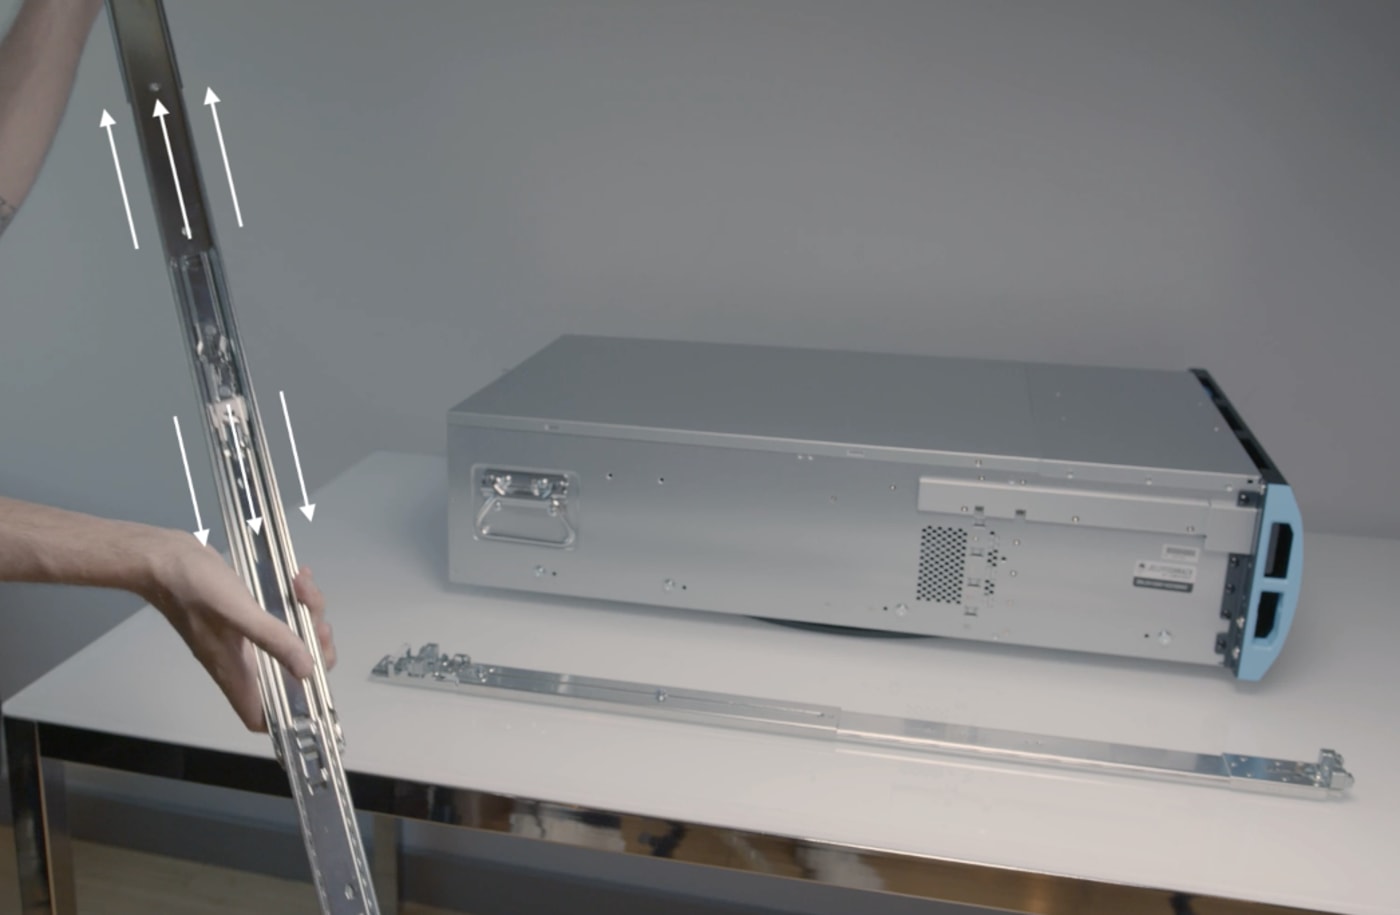
2. Slide the white button forward to release the inner rail and pull until separated.
3. Now repeat the same process for the other rail.
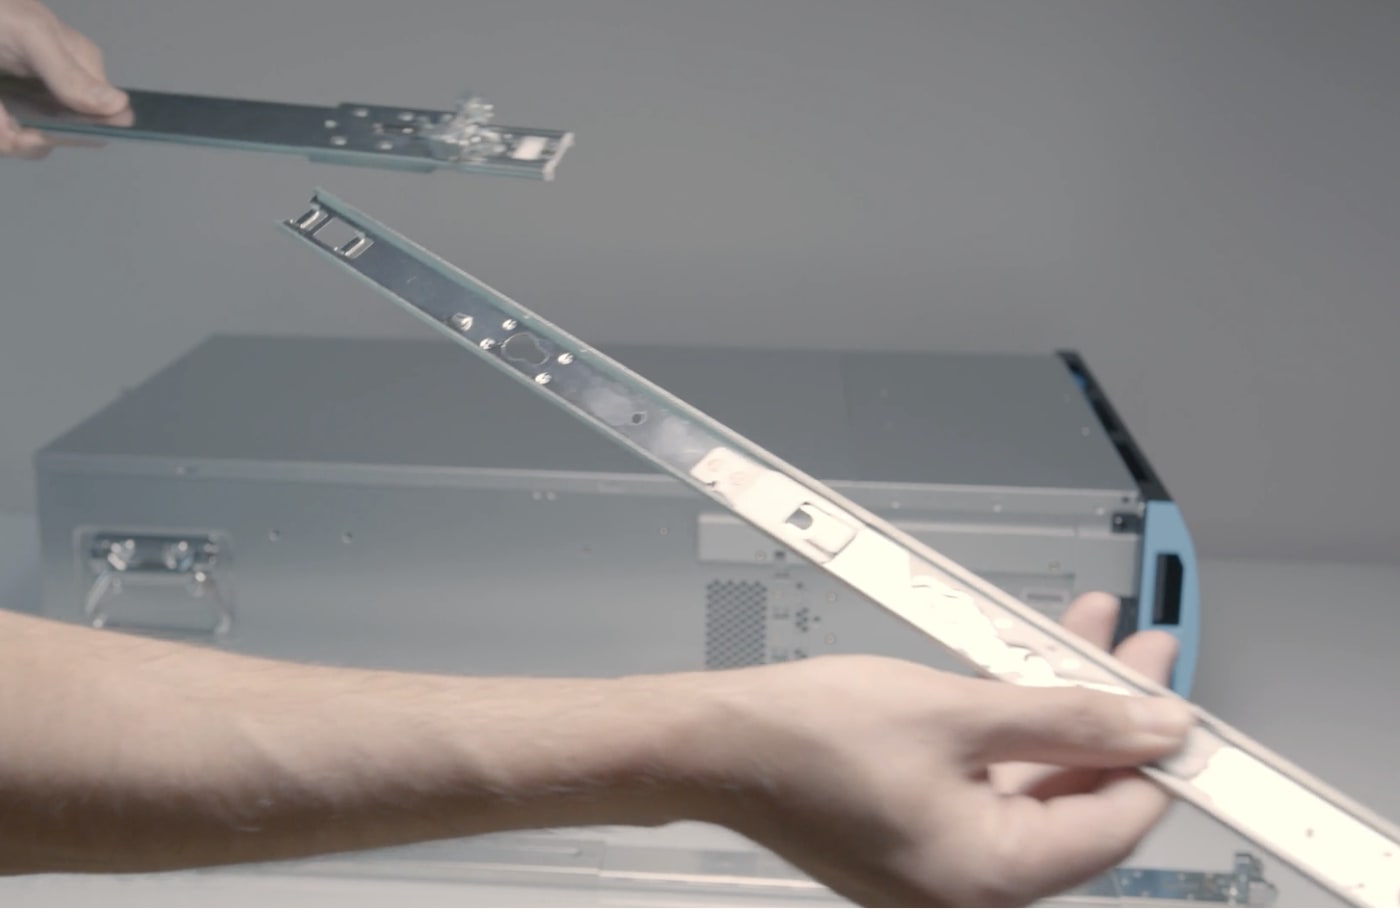
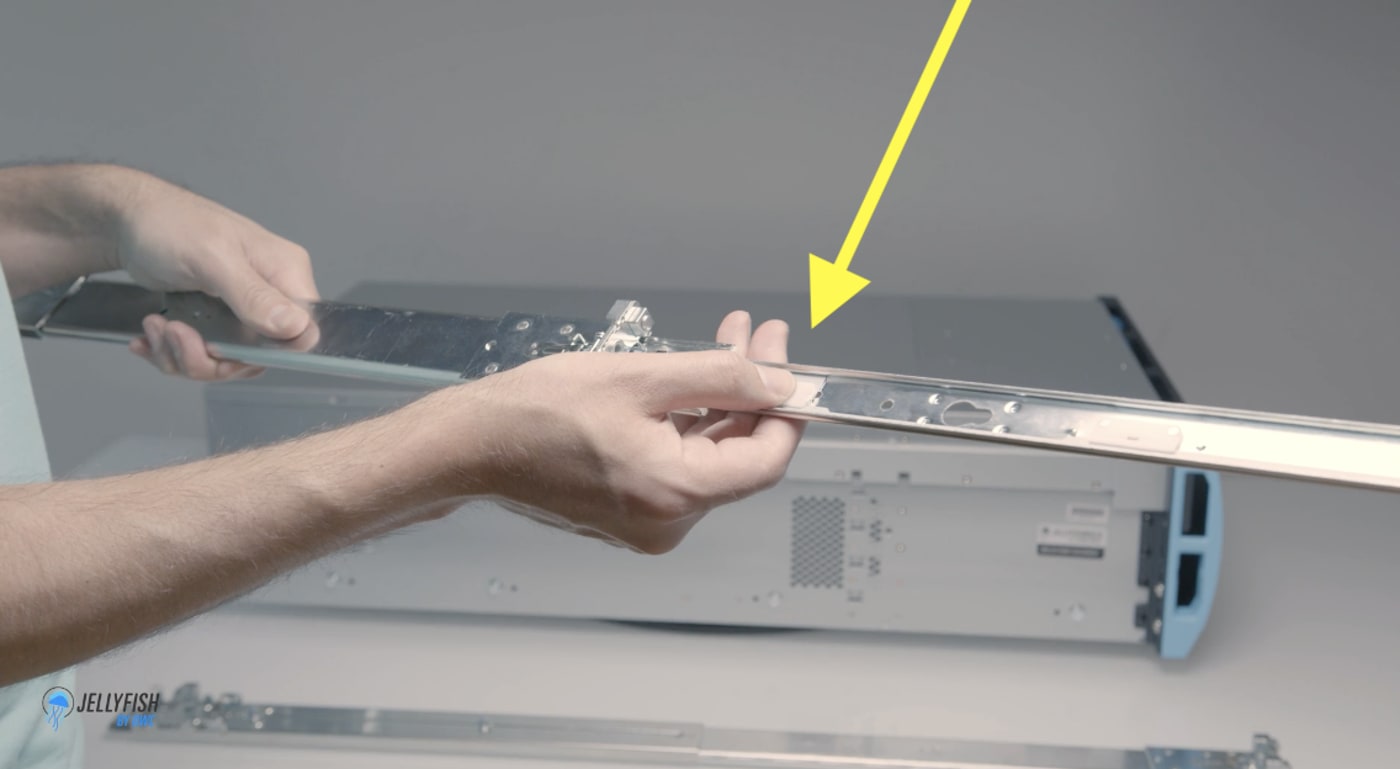
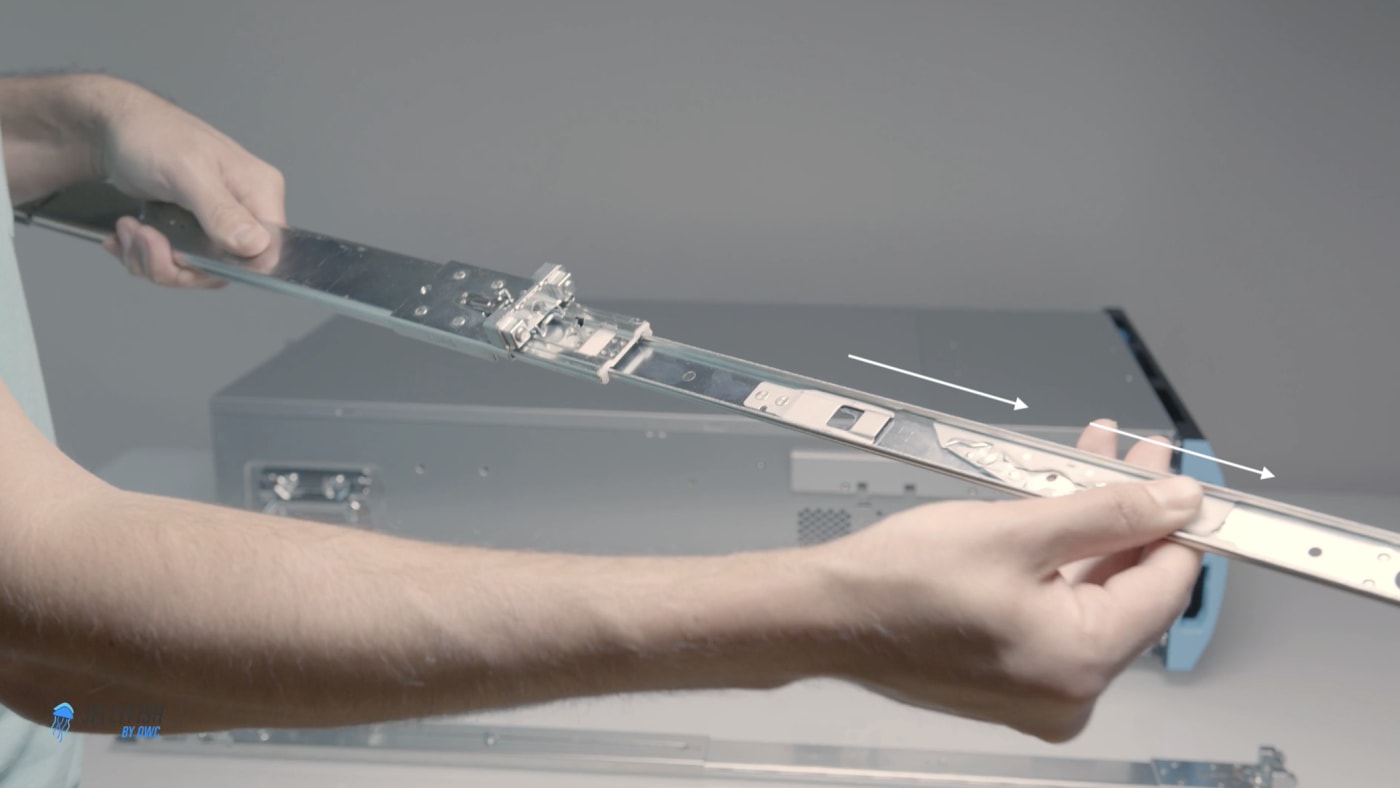
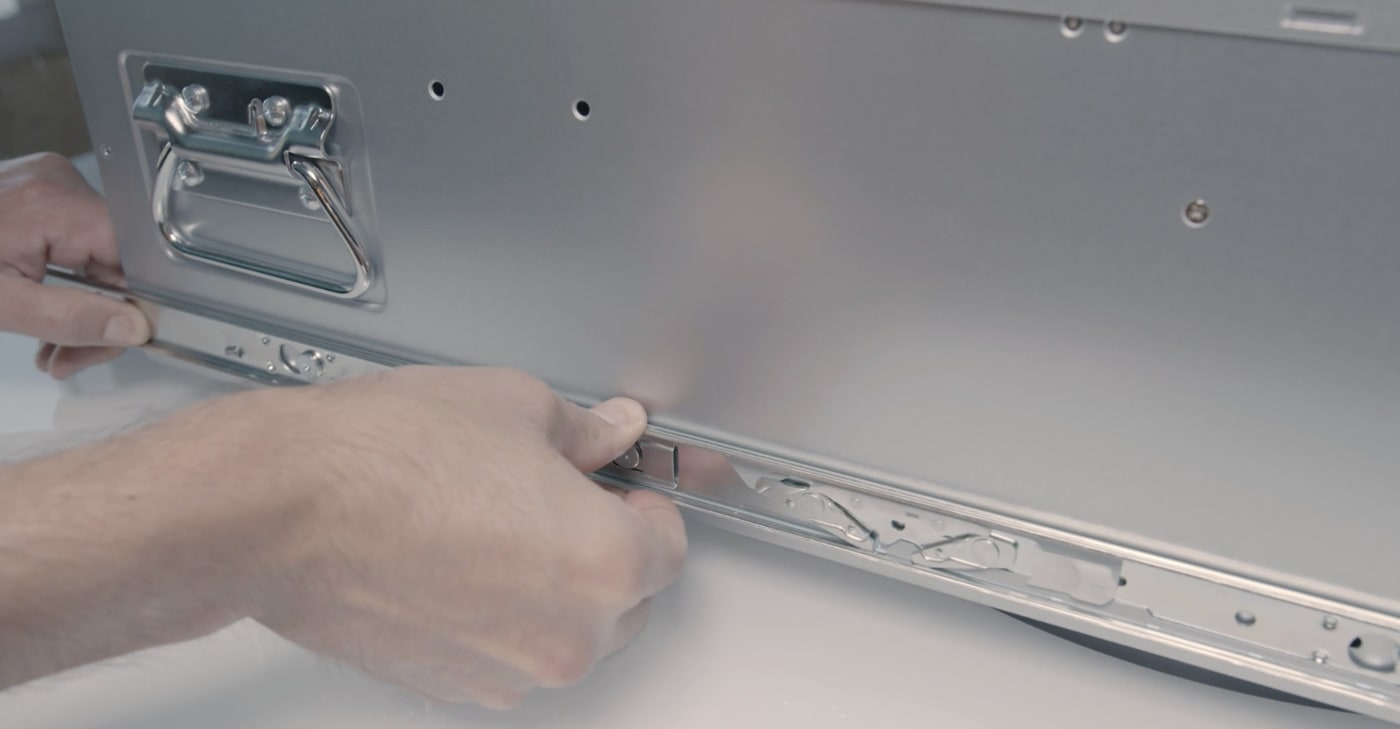
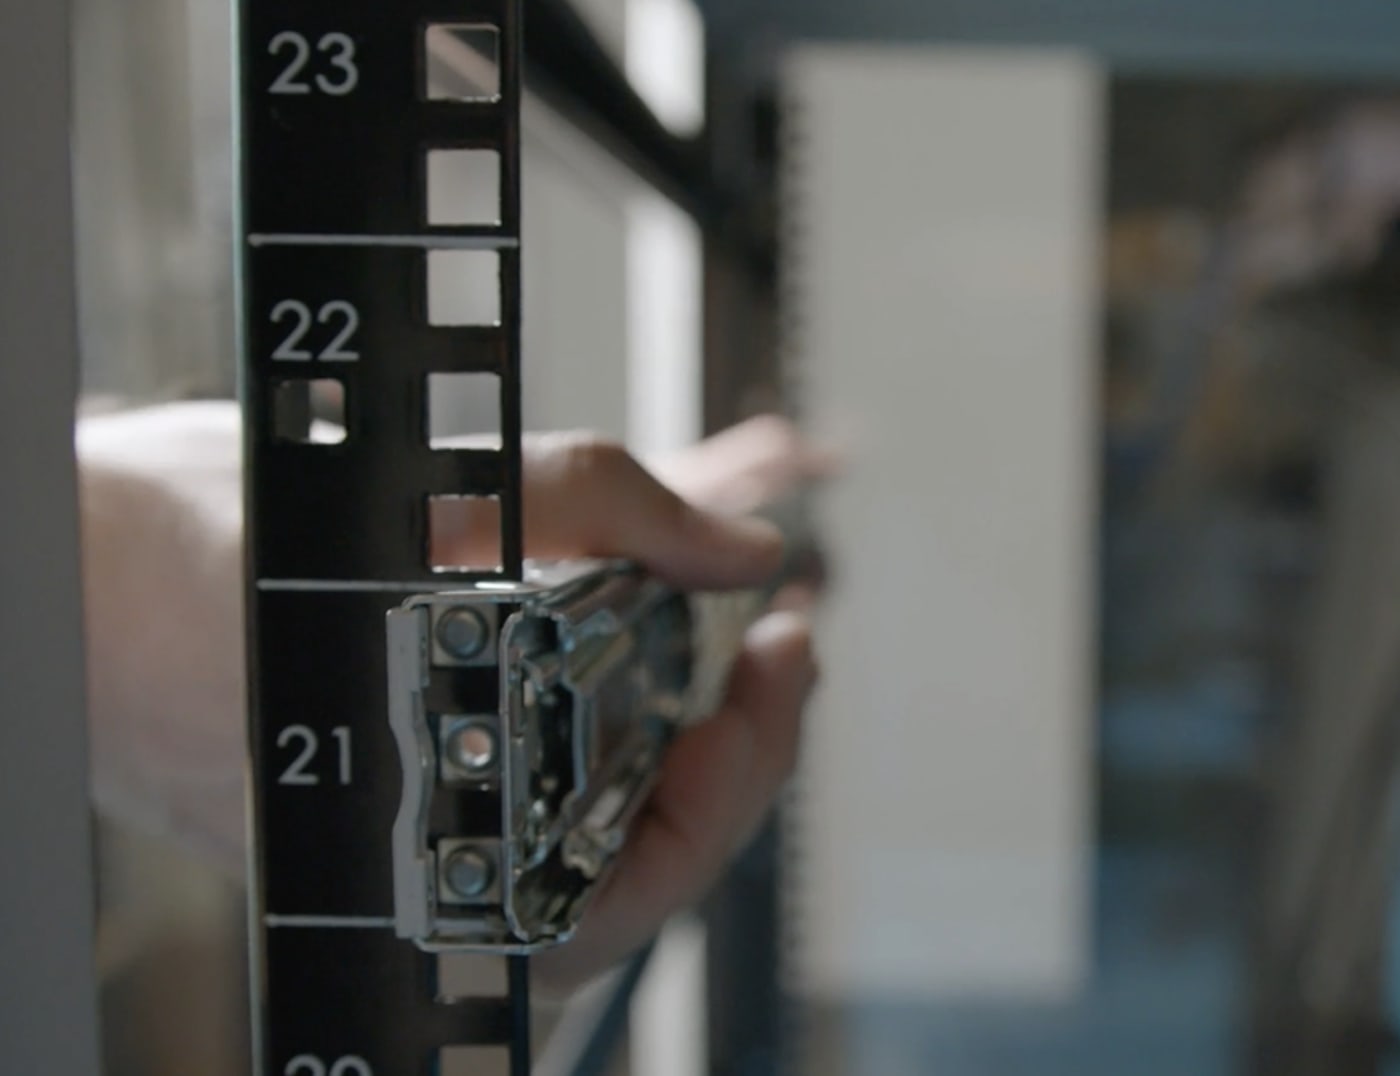
4. Locate the four posts noted here on the side of your R24.
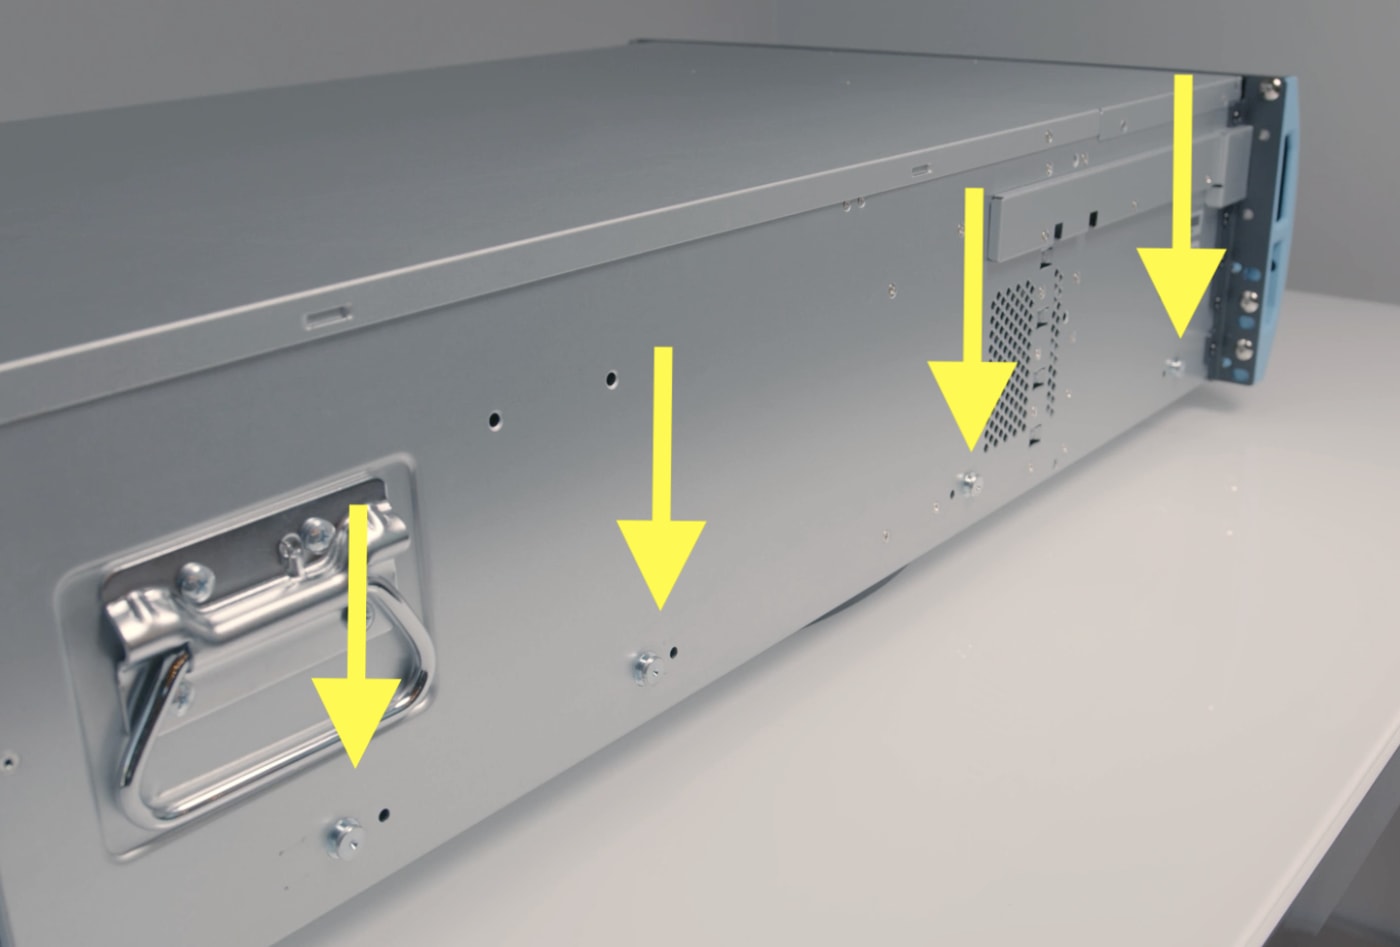
5. Line up the bigger holes of the inner rail with the four posts on the chassis. Now slide the rail until the rail clicks into place.
6. Repeat the same process with the other rail on the other side of the chassis.
Rack Installation
- The R24 is a “4U” unit, meaning it takes up four spaces in a traditional rack.
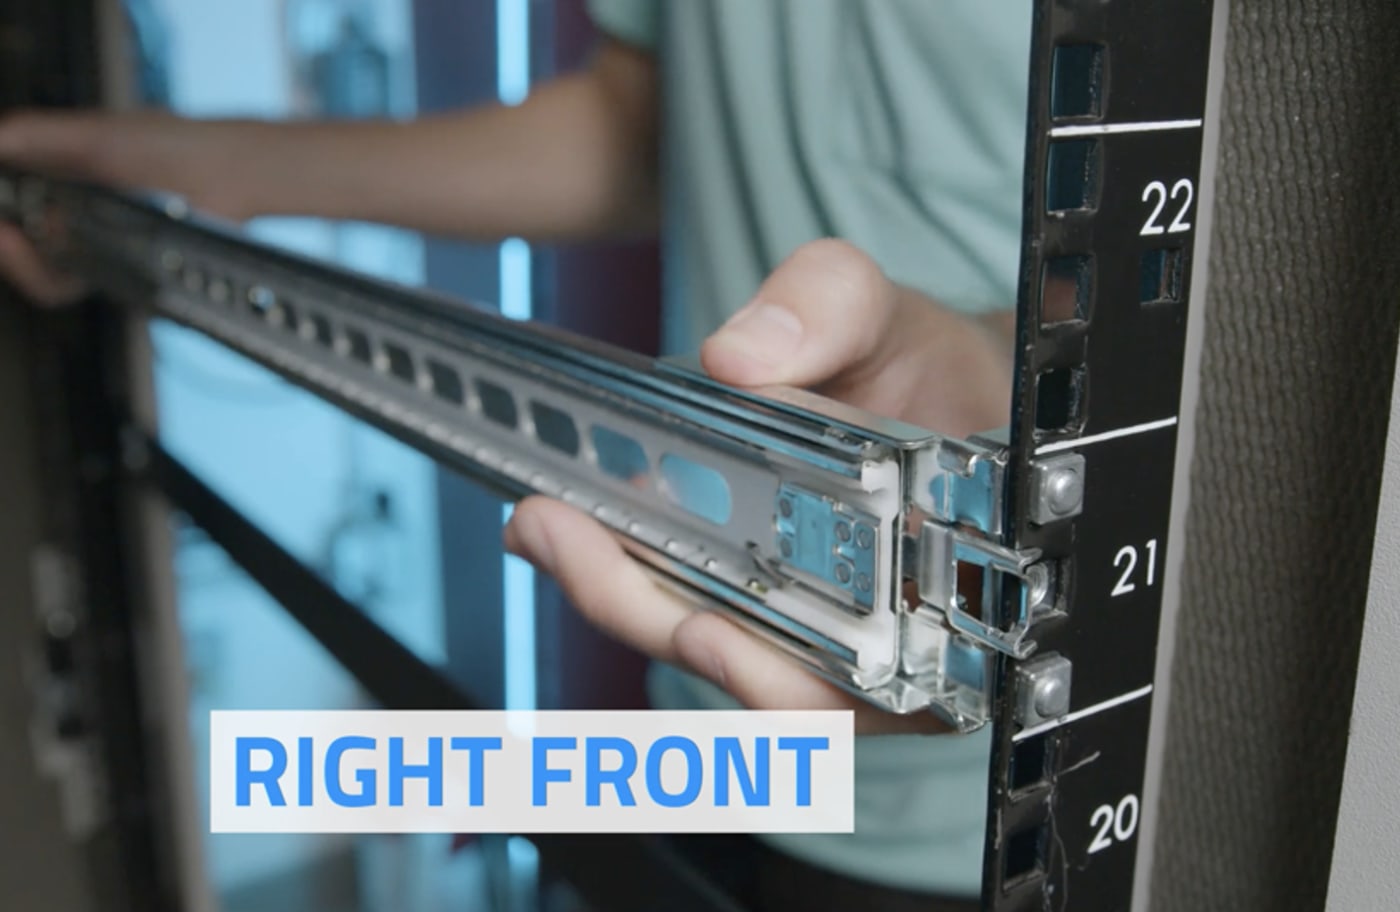
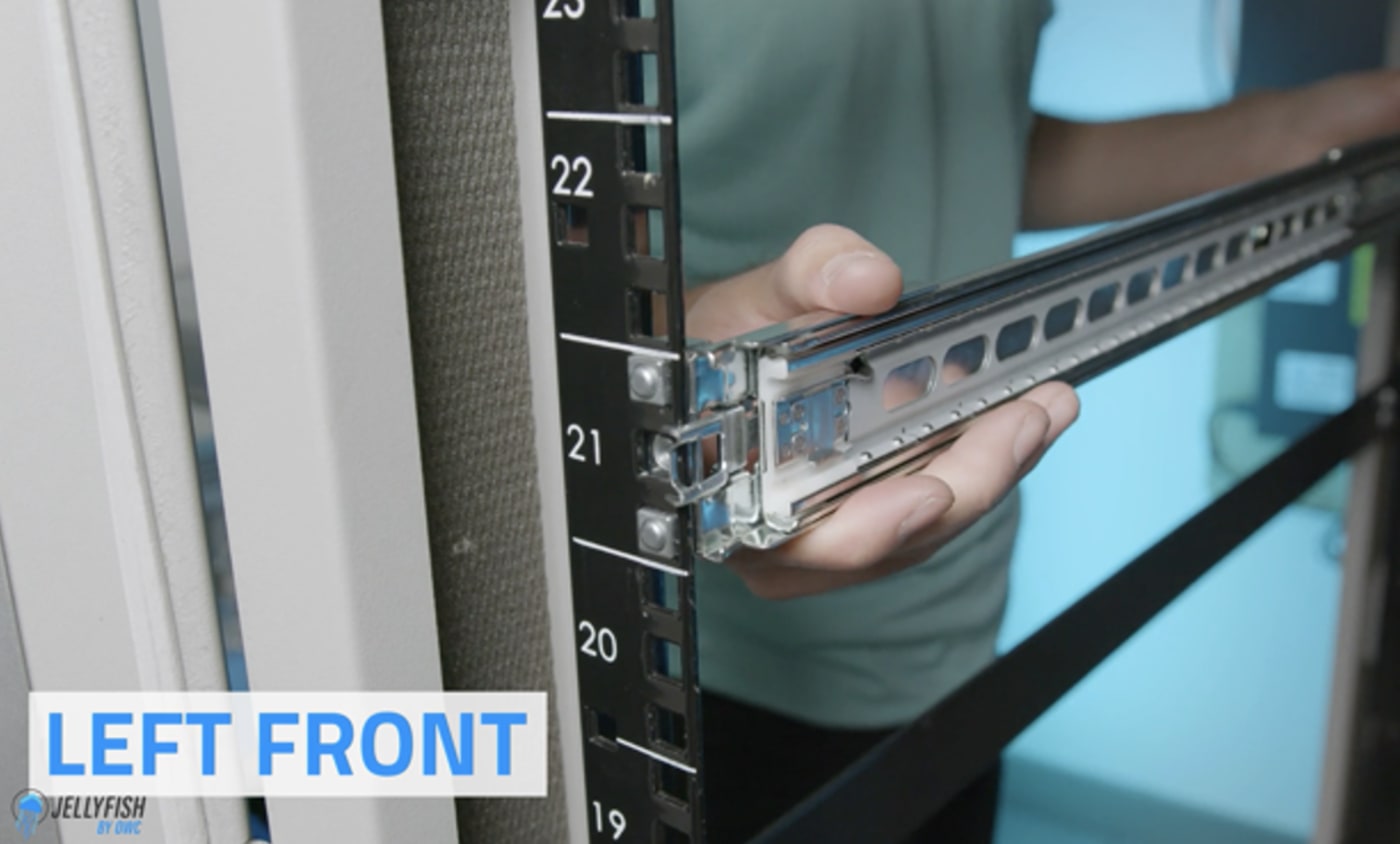
1. First, you’re going to choose where you want your rack to live. The rails are on the bottom of the R24, so in this case we are choosing space 21 through space 24.
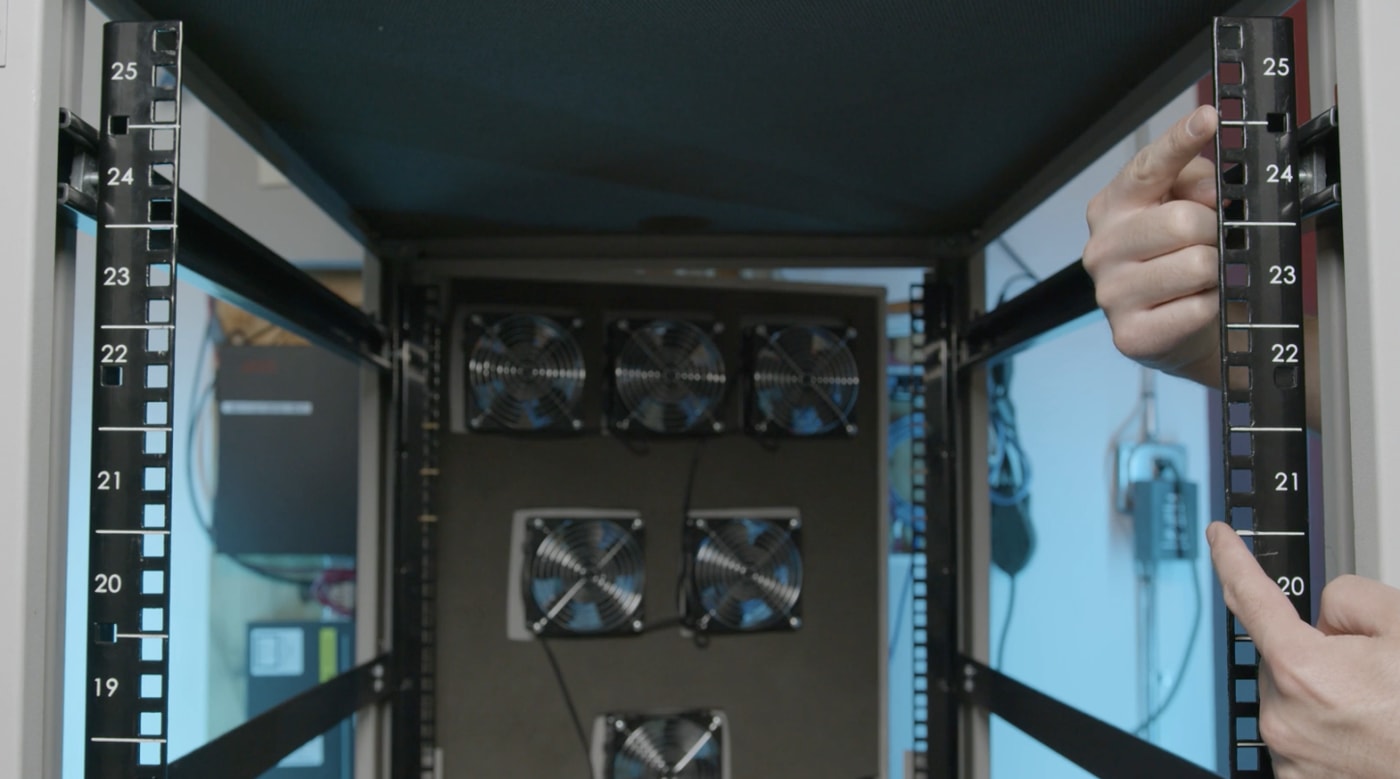
2. Insert the front of the rail in your chosen space.
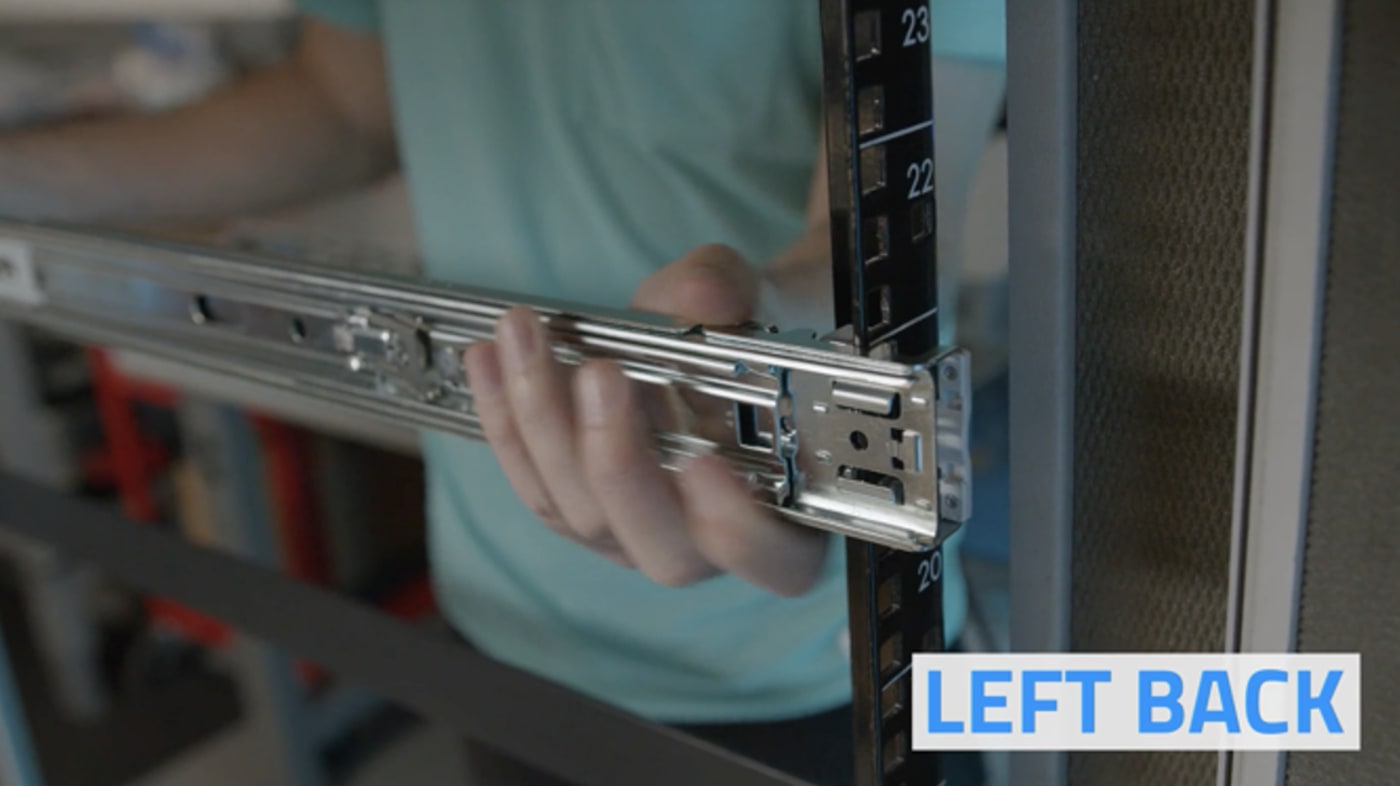
3. Then, insert the back of the rail in the corresponding space in the rear.
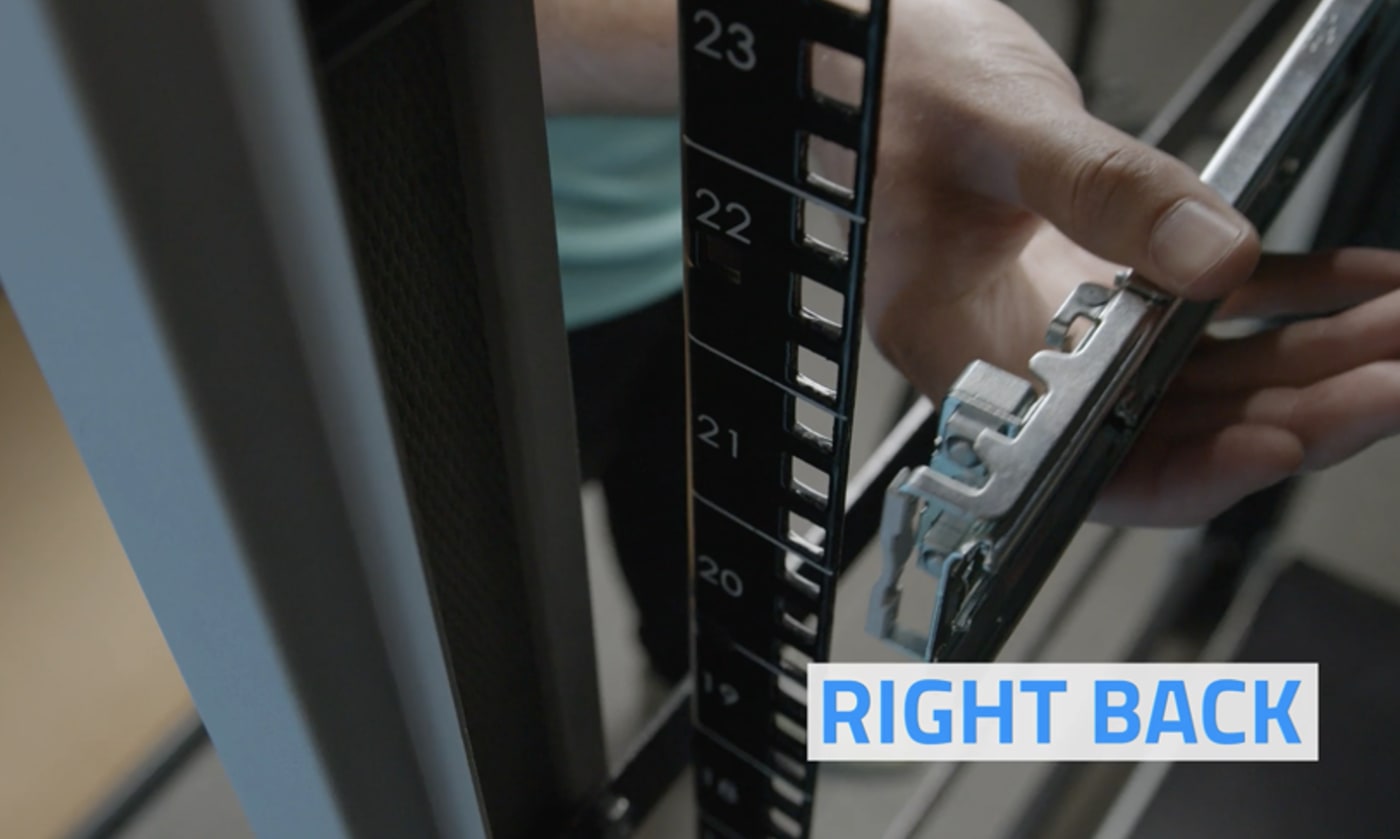
4. Ensure the rail is level and has firmly clicked into place.
5. Repeat the same process on the other side.
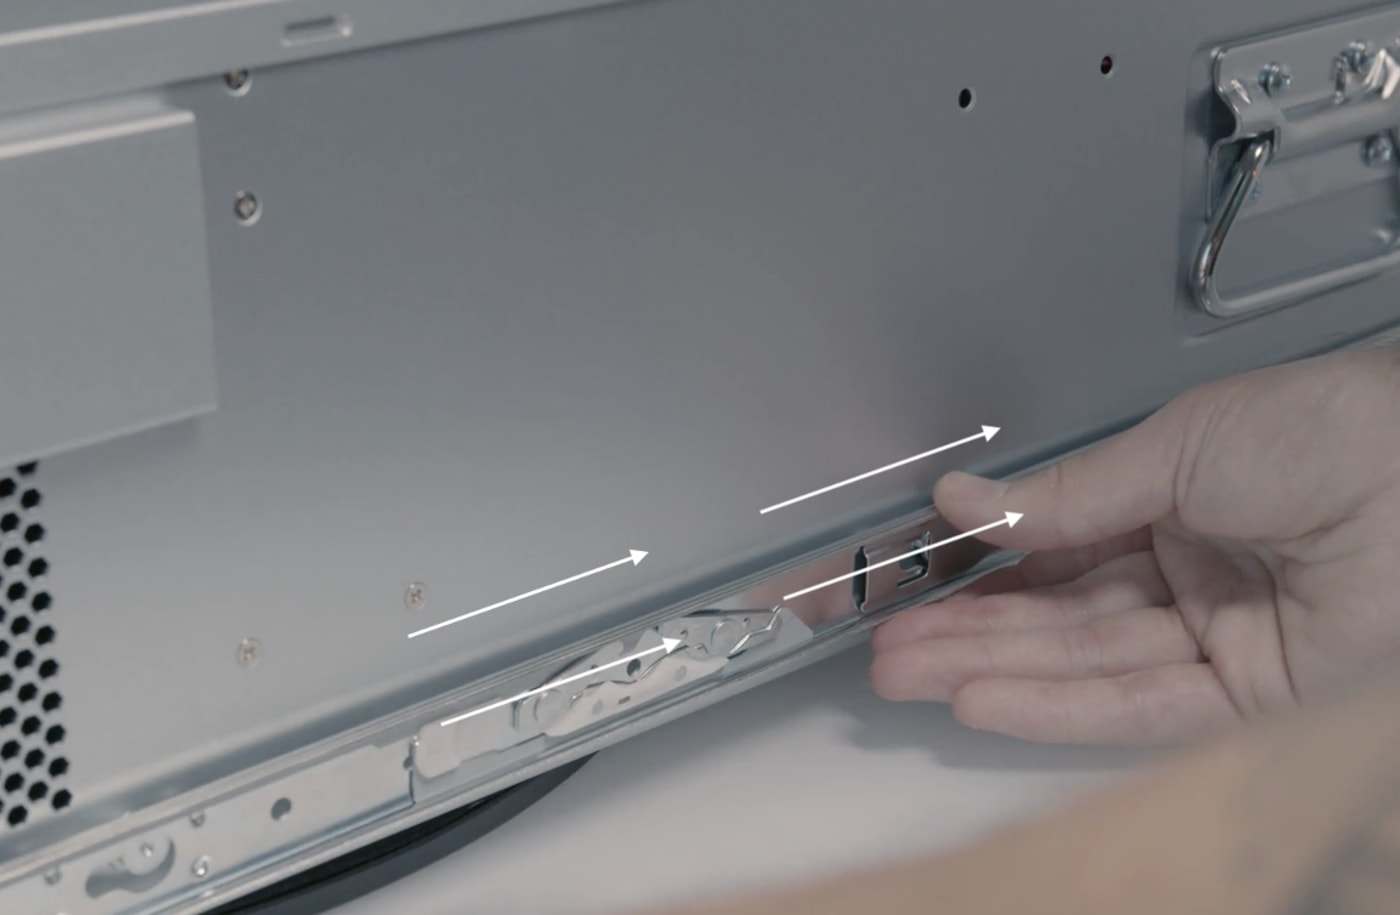
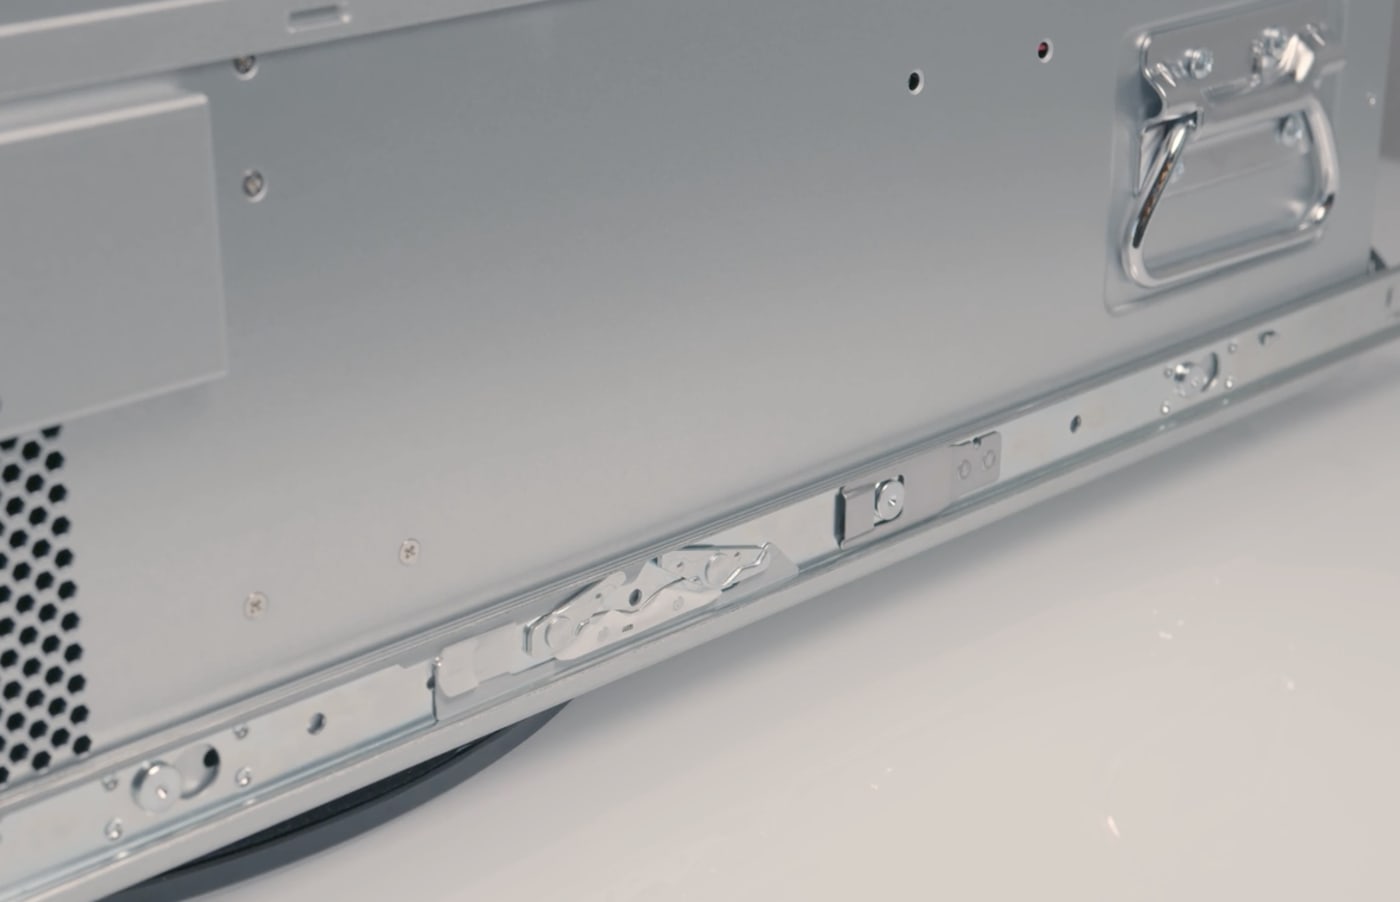
6. Now extend the inner part of the right rail until it clicks. Repeat with the left rail.
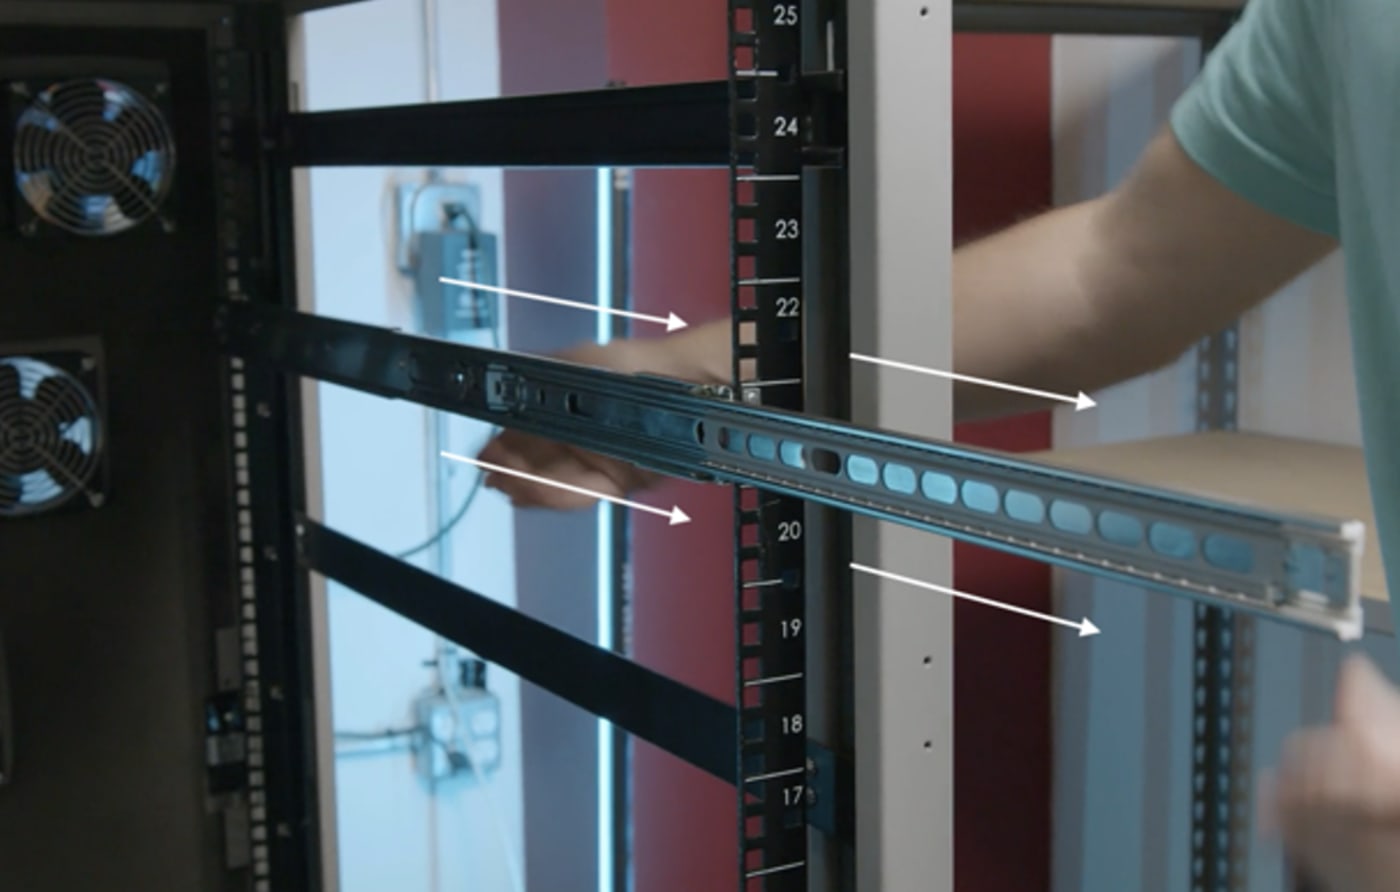
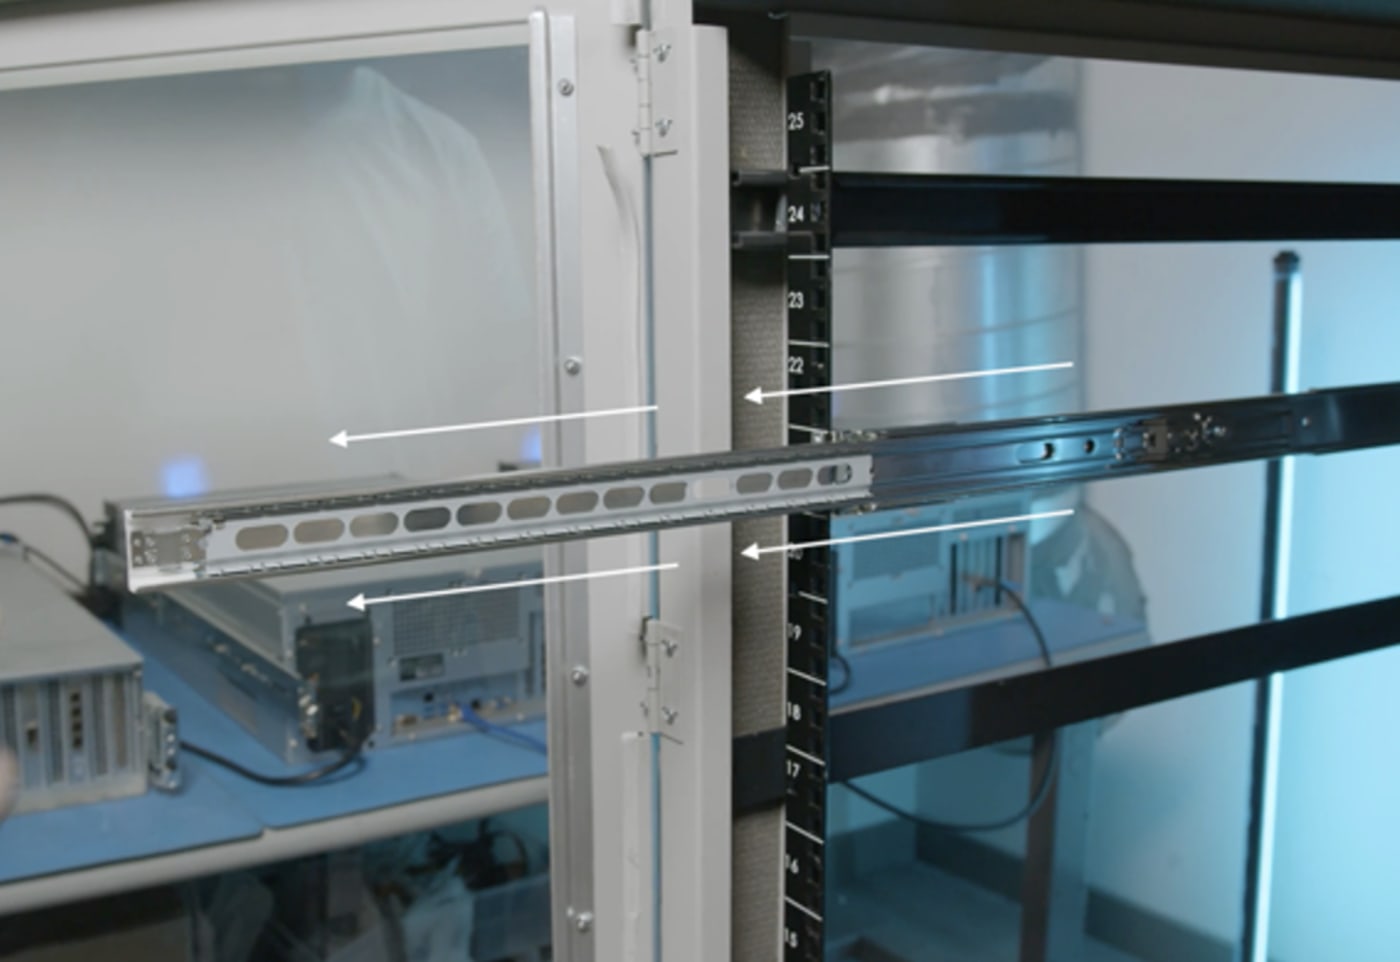
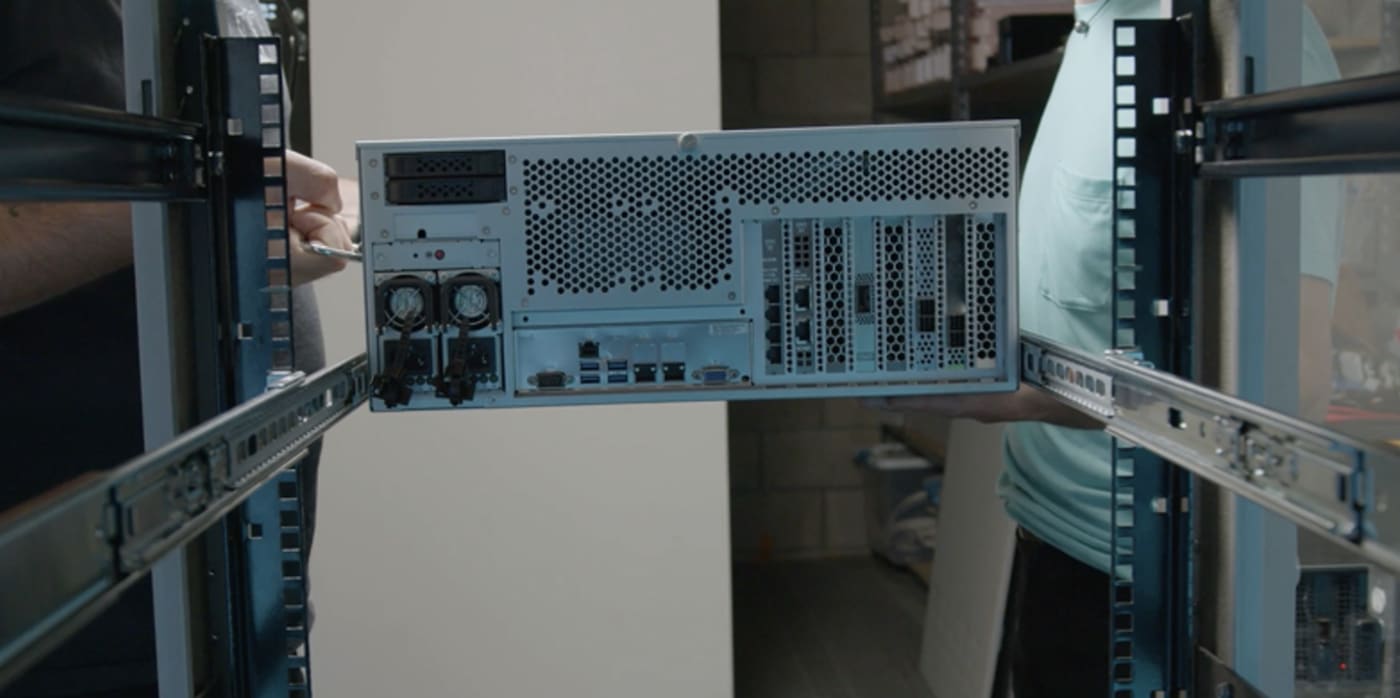
7. Now you are ready to install your R24. This step will require the assistance of another person. Line up the rails attached to the chassis with the rails installed on your rack.
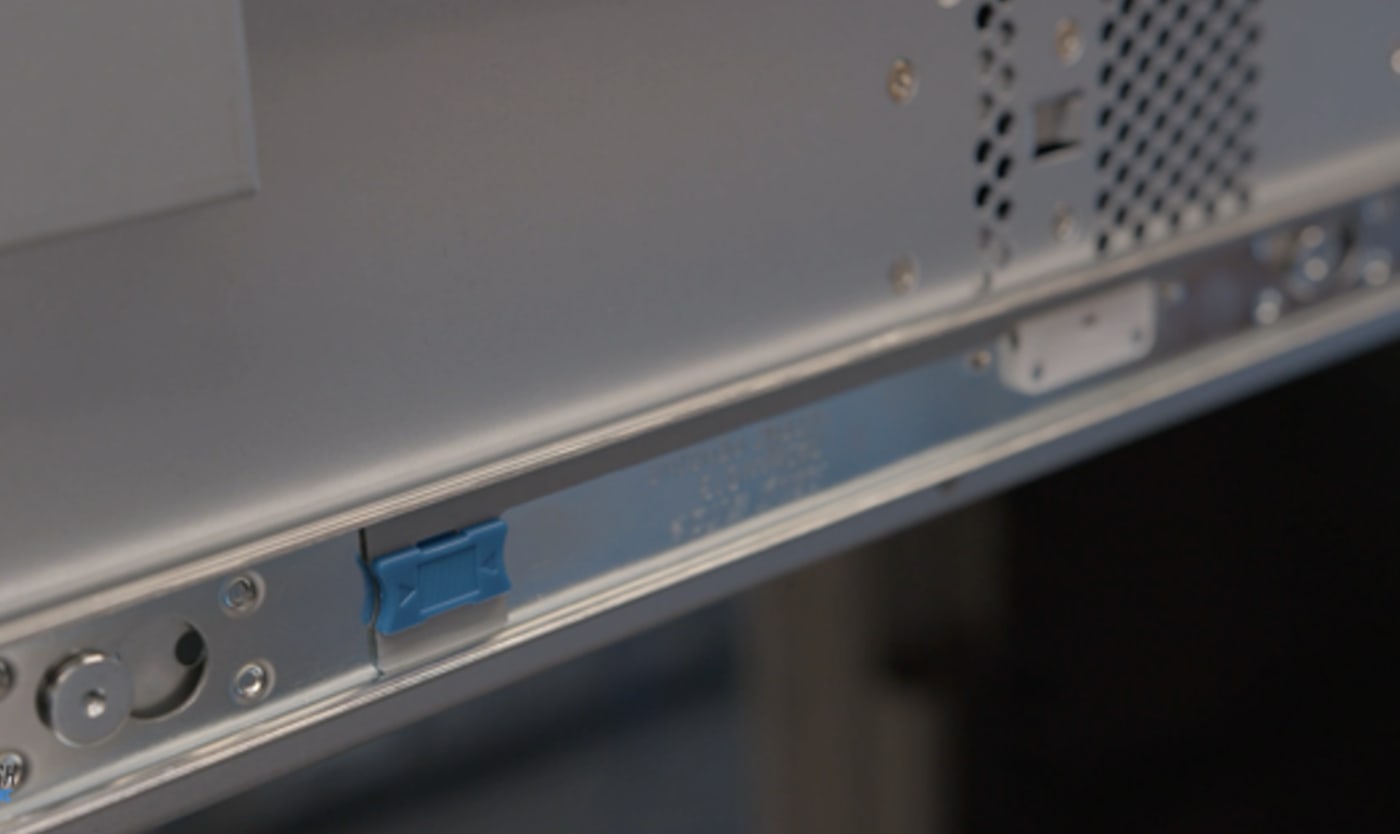
8. Ensure the R24 chassis is level and once both sides are aligned, gently push the R24 into the rack. You will hear another click and meet some resistance.
9. Slide the blue button located on both rails attached to the chassis. This will release the resistance and you can slide your R24 completely into the rack.
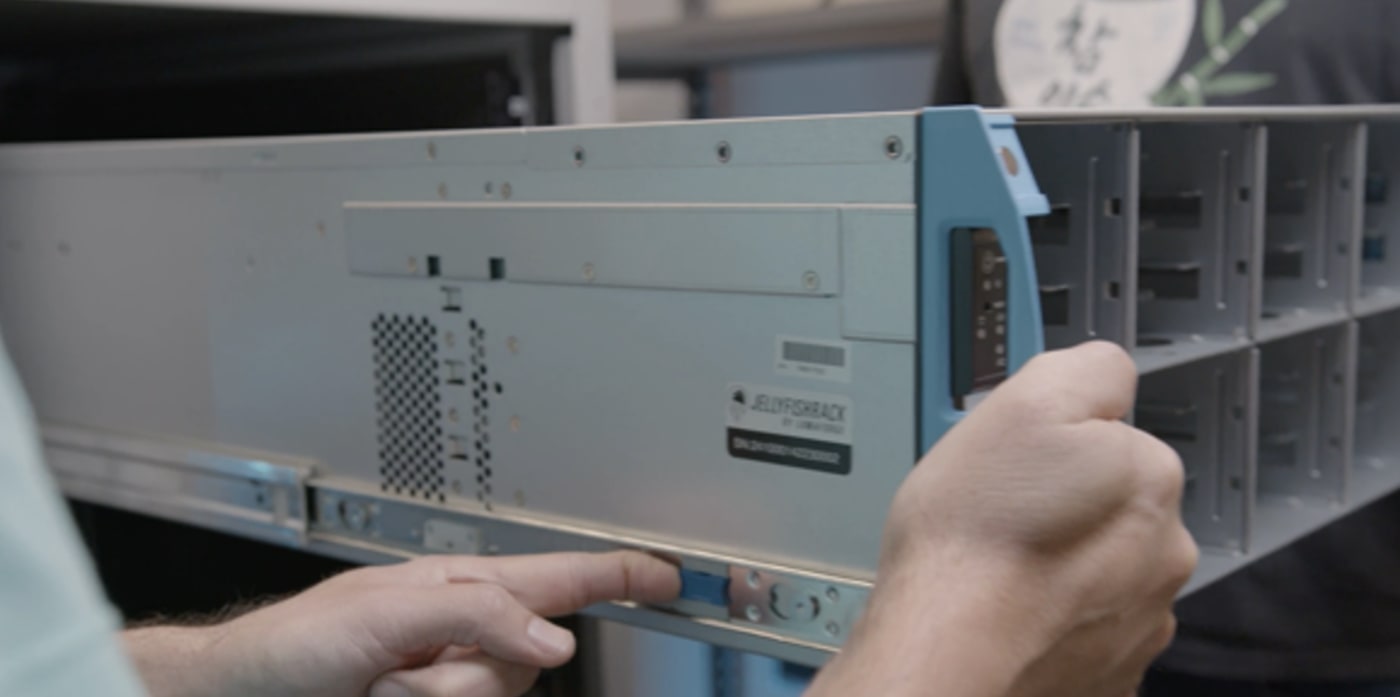
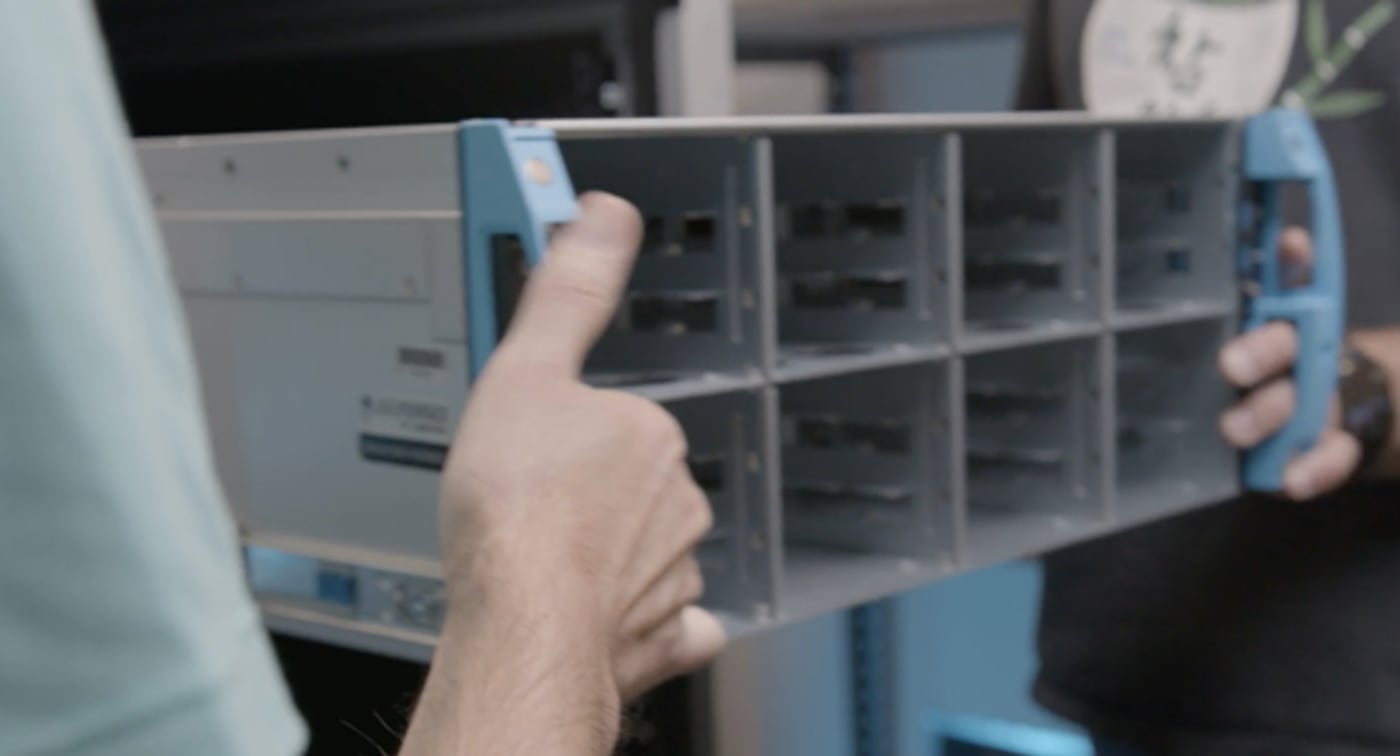
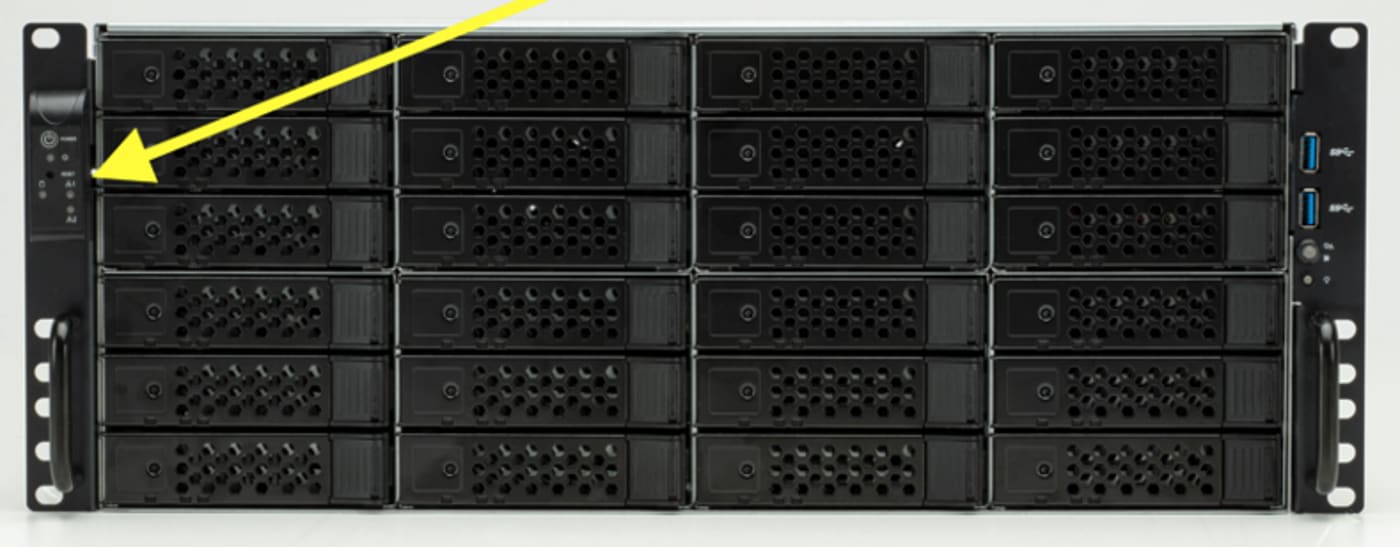
How to Install Drives
- The next step after rack mounting your system is to install your drives into the body of your OWC Jellyfish R24. Drives will come pre-installed in their individual drive sleds.
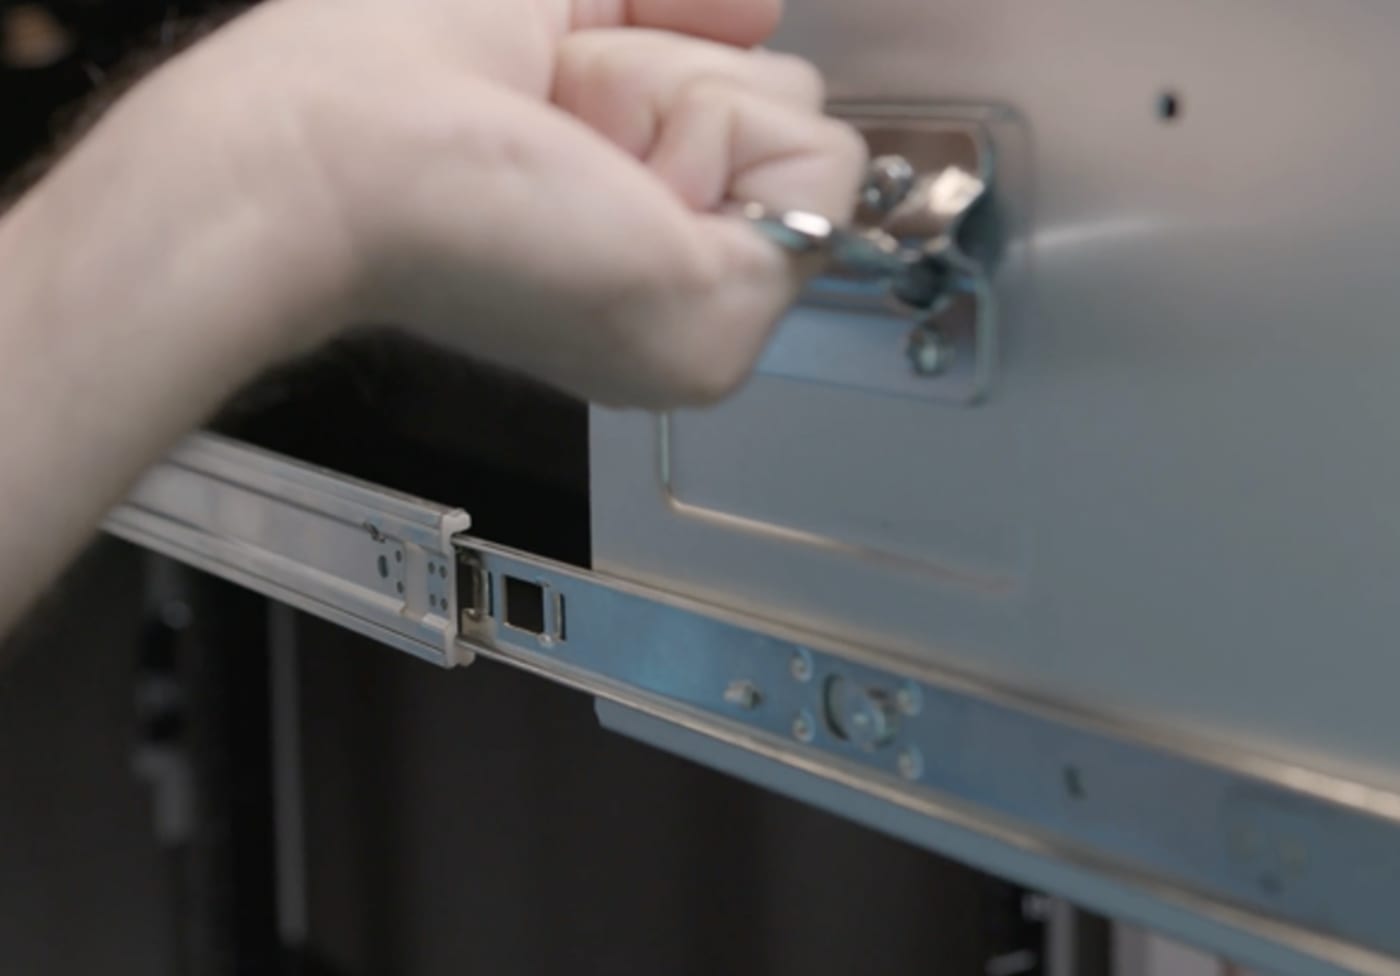
1. With the tab open on the front, slide the drive sled all the way into the first slot on the front of your R24. It does not matter the order in which you install them.
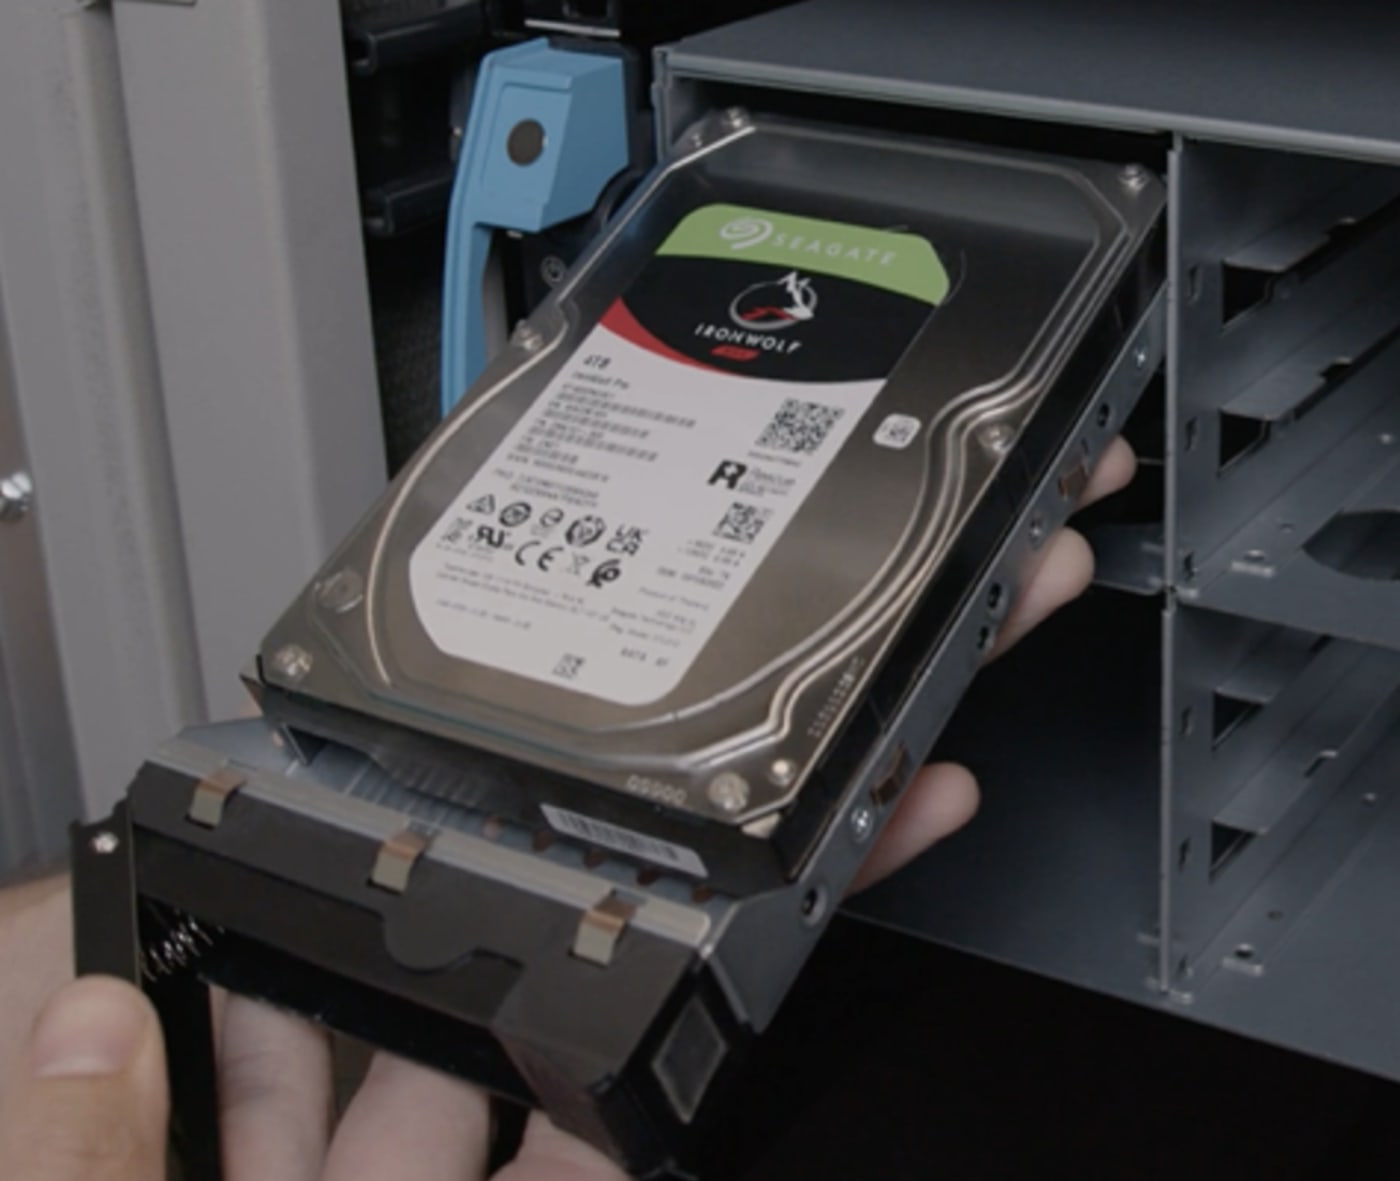
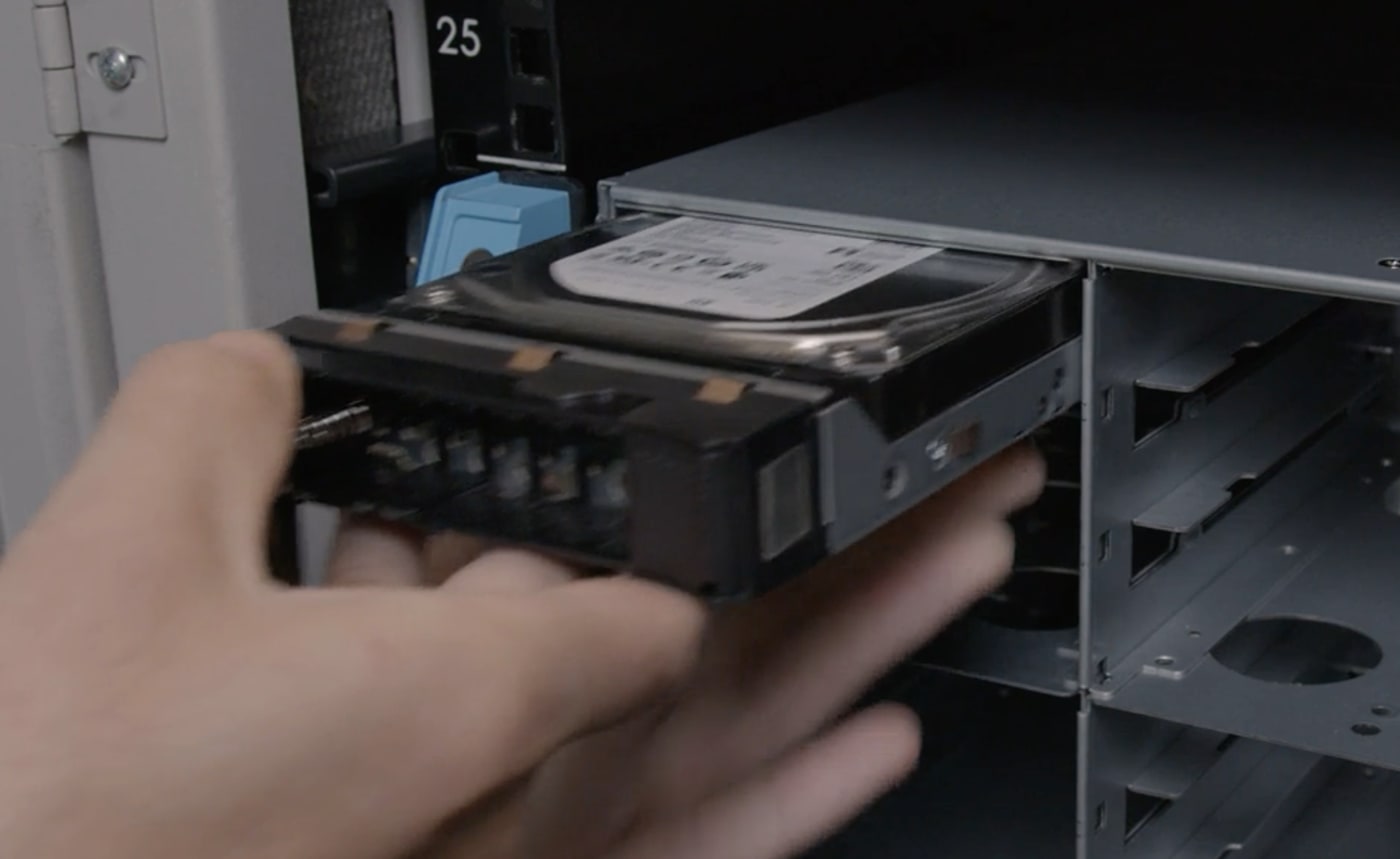
2. Next, push the tab closed as pictured. You’ll hear a click when it is securely installed.
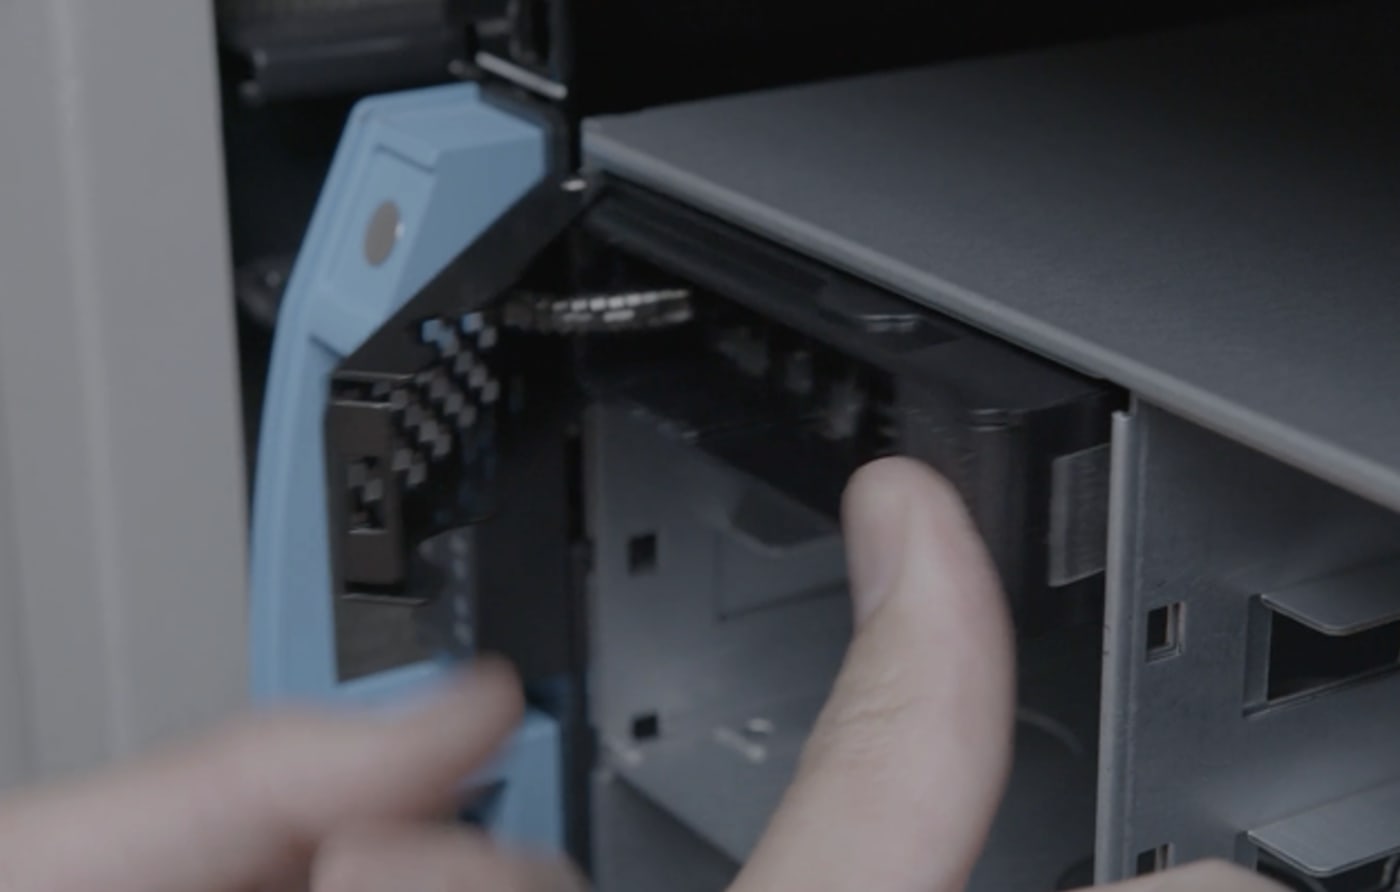
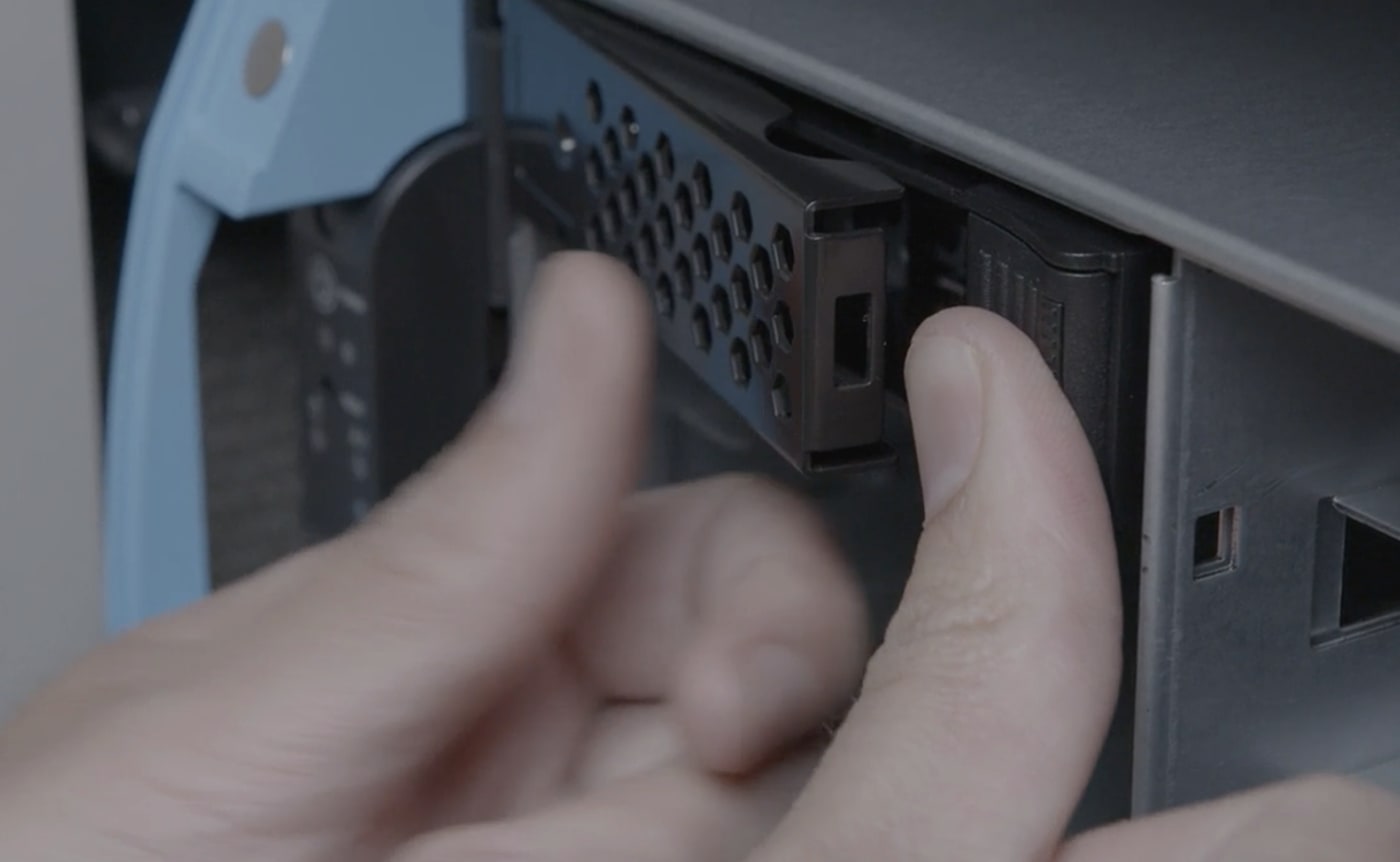
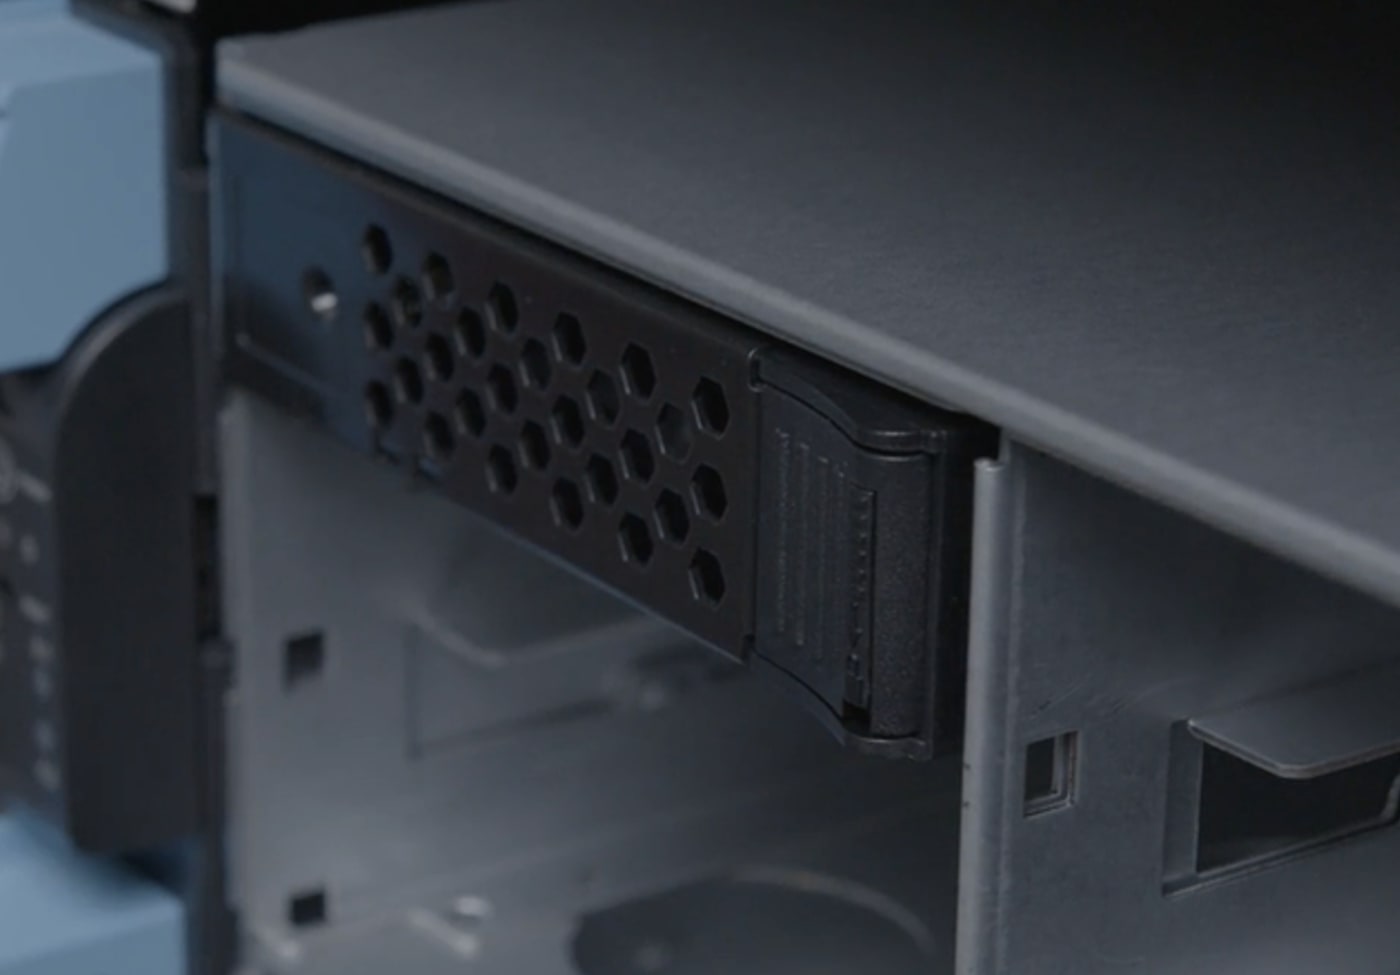
3. Repeat this process until all available slots are full.
Affixing the Bezel
- After completing installation of all 24 drives, you will need to affix the bezel to the front of your R24. The magnetic closure on this makes it simple to affix and remove, yet keeps it securely fastened to the R24 body once in place.
1. With the logo on the bezel facing you, line up the cutout on the left with the power control panel on the front left of the R24.
2. They should fit perfectly together. You should feel the magnetic pull as you get the bezel very close to the front of the R24. Once it attaches, installation is complete. There are no screws to tighten. You are ready for the next steps in setting it up!
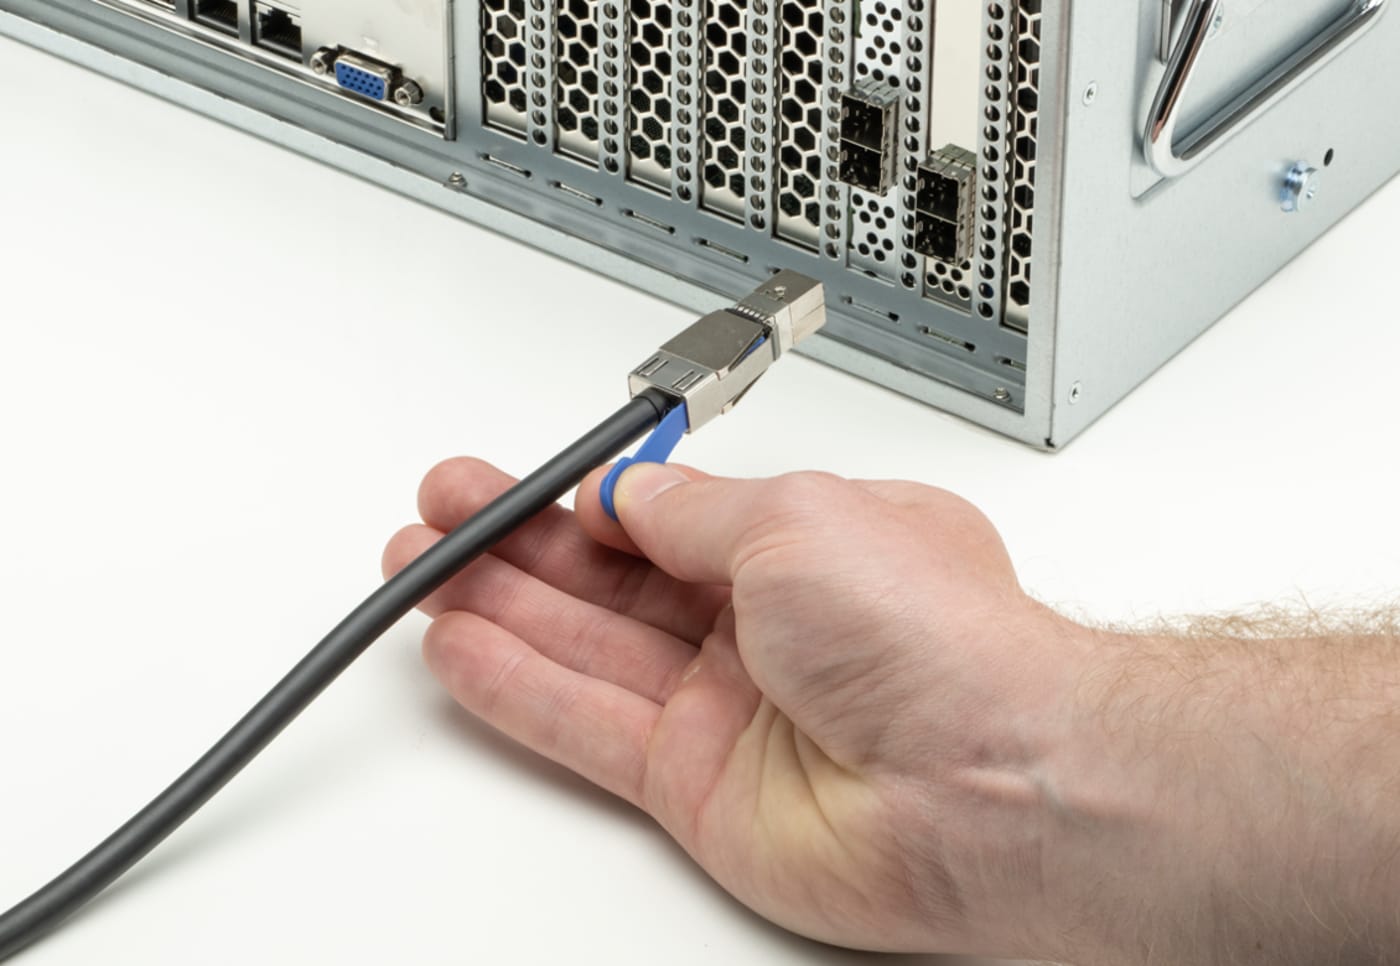
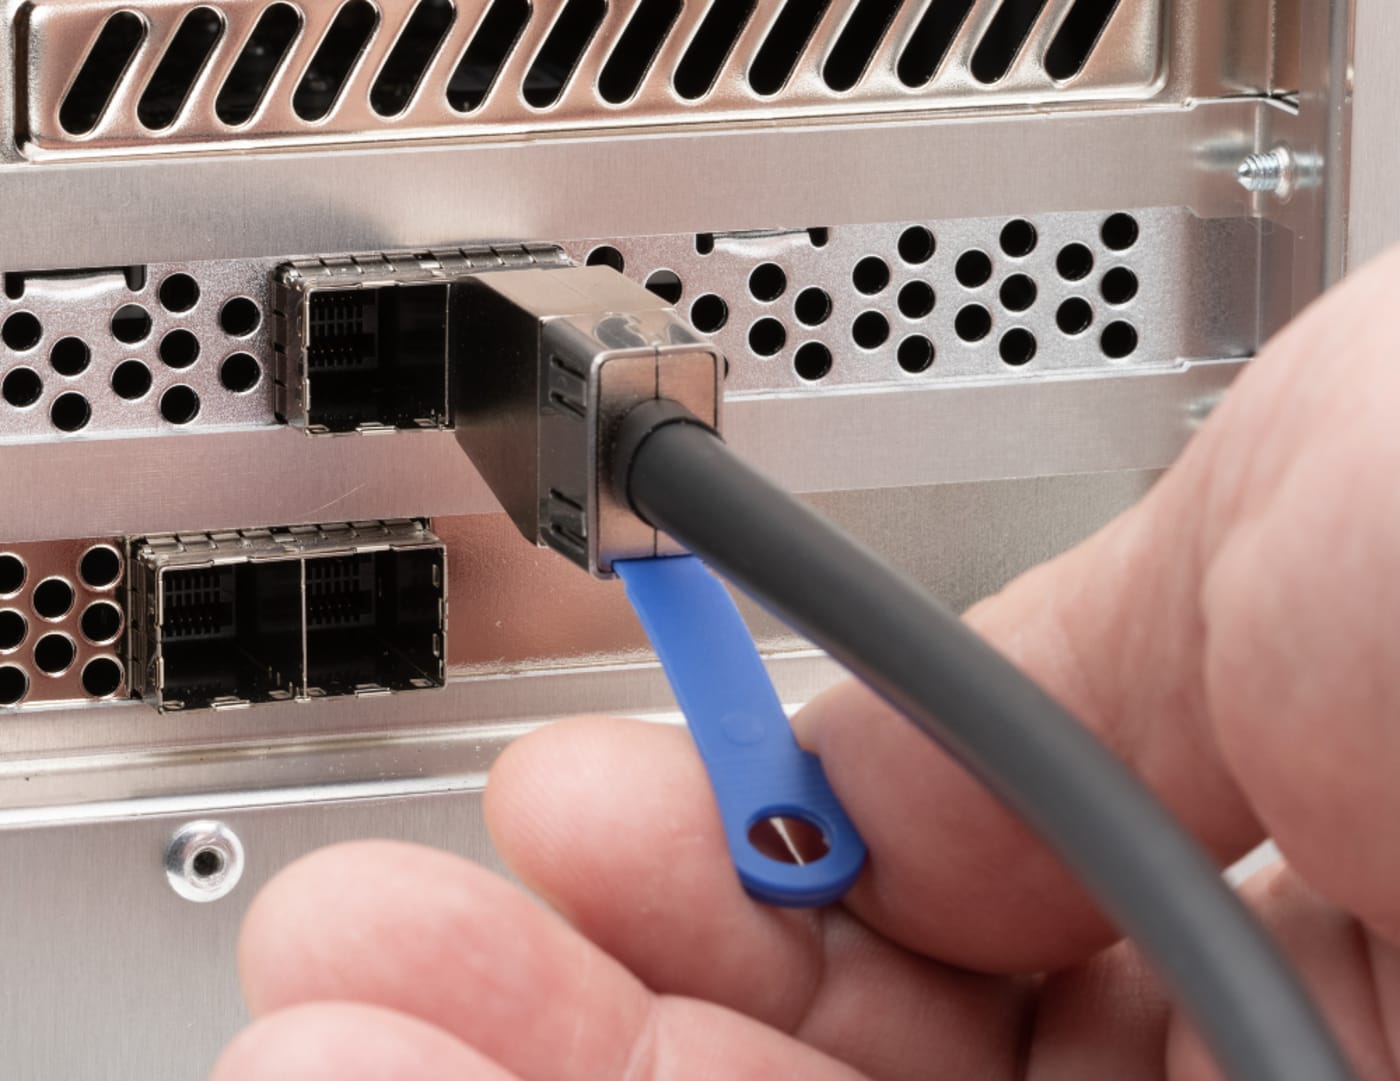
How to Connect a SAS Cable if Using an Expansion Bay
- If your workflow requires additional storage, you may opt to utilize an expansion bay to add more. In this event, you’ll need to connect your expansion bay directly to the OWC Jellyfish using a SAS cable.
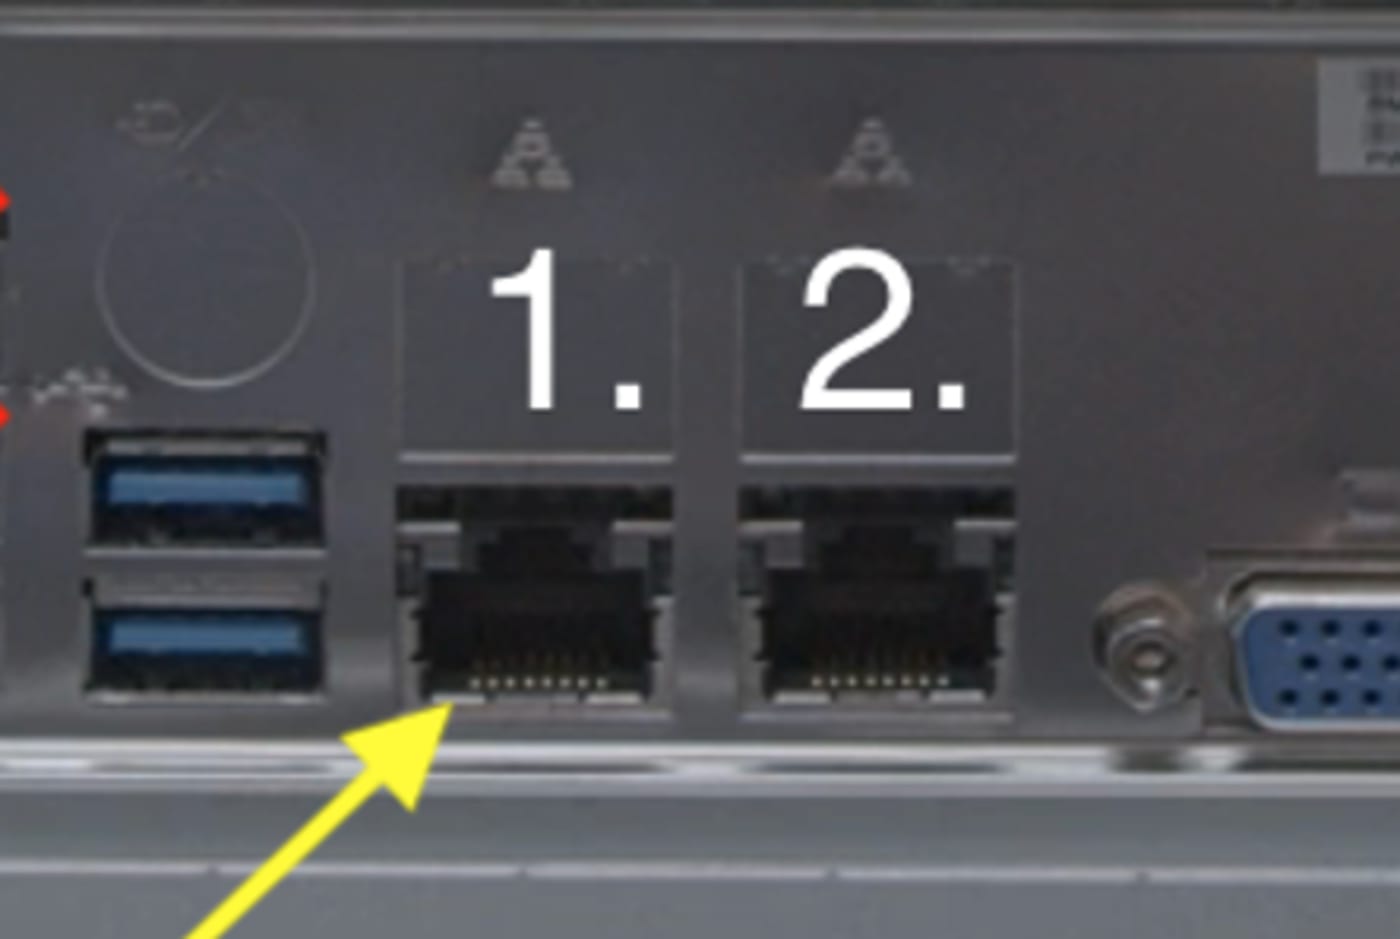
1. Plug your SAS cable into your HBA port as labelled below.
NOTE: while the port to the immediate left looks similar, please do not plug your SAS cable into that port. Only use the one on the right.
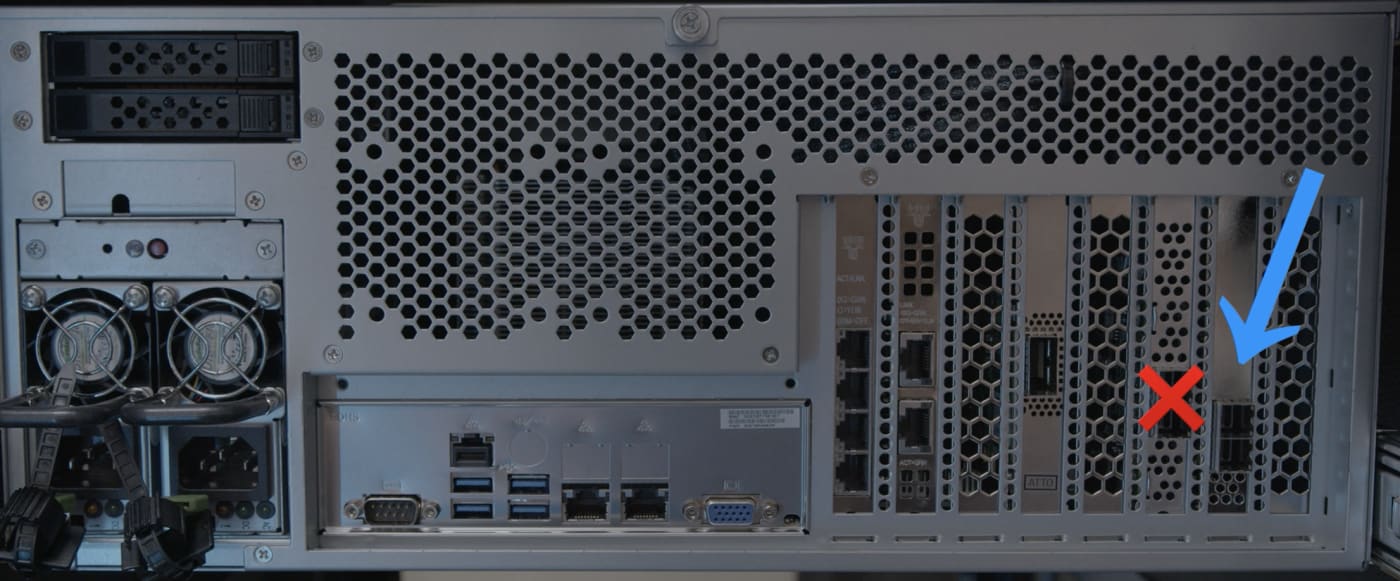
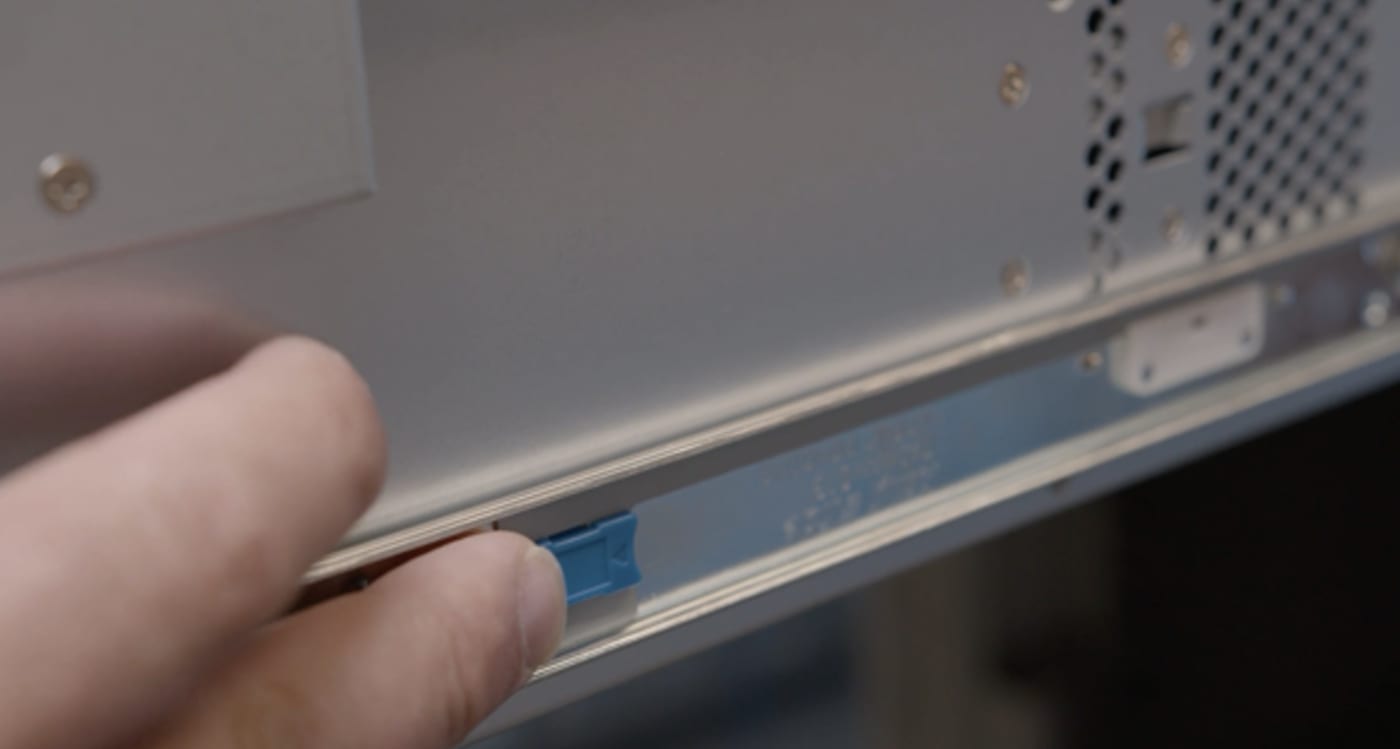
2. Insert your cable into the correct HBA port, with the cable’s blue tab facing the right.
NOTE: SAS cables only fit one way. Please do not force these cables.
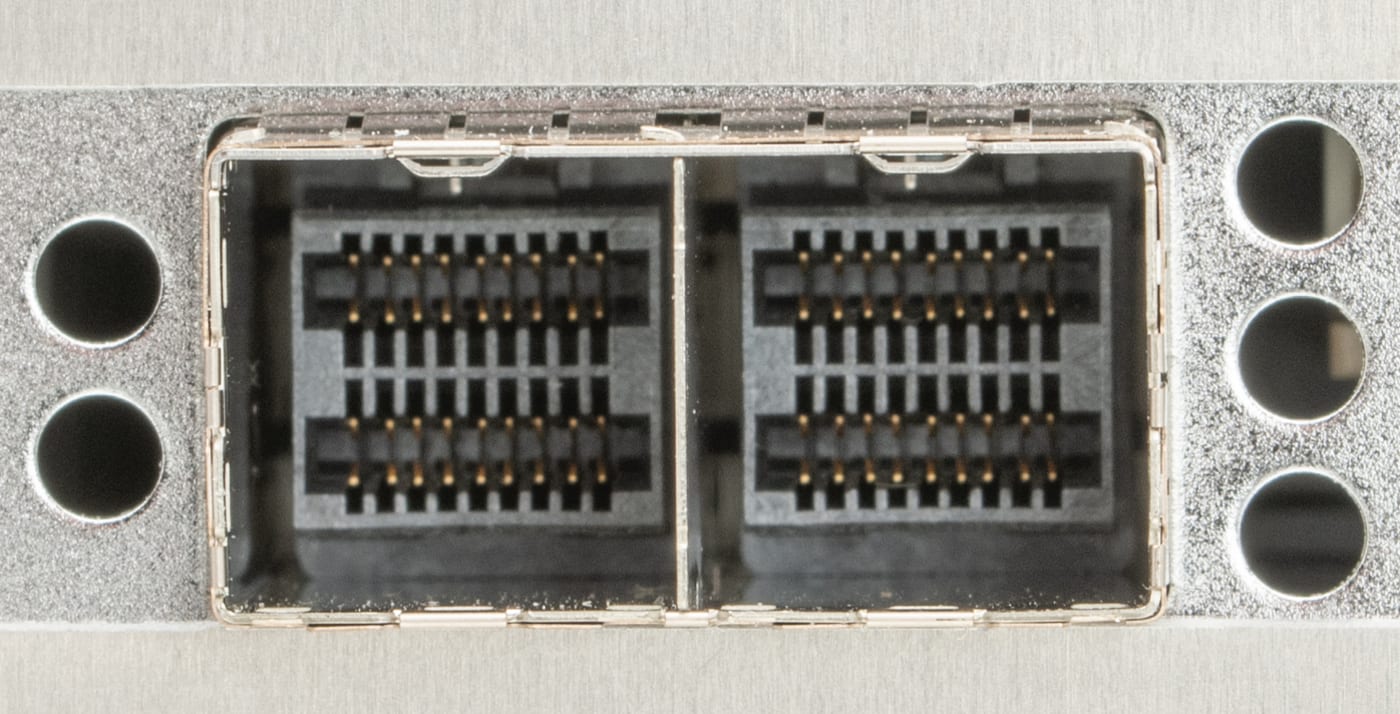
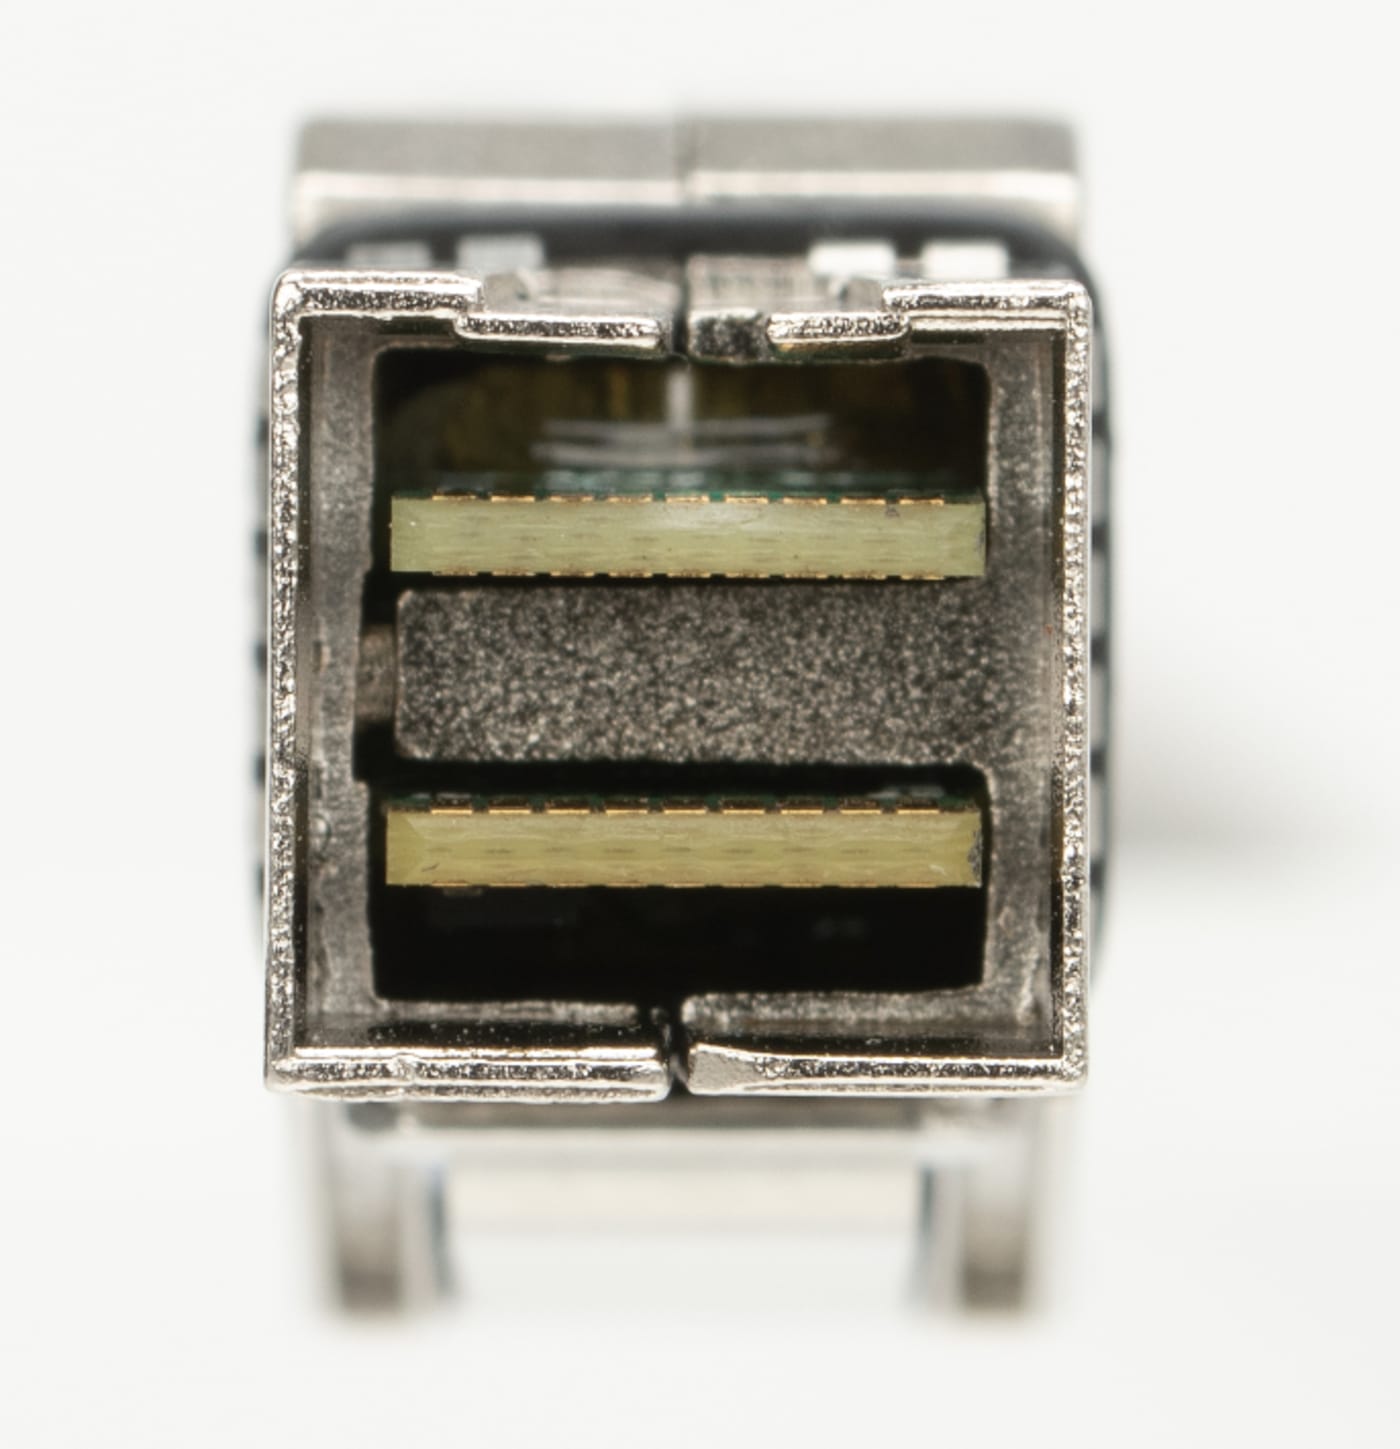
3. Above left is a close-up of the port itself, and above right is a close-up of the cable head.
NOTE: In the event you need to remove the cable, you can do so by pulling on the blue tab to release the connection. Please do not pull on the cable itself.
Powering Your OWC Jellyfish On/Off
Powering Your OWC Jellyfish On
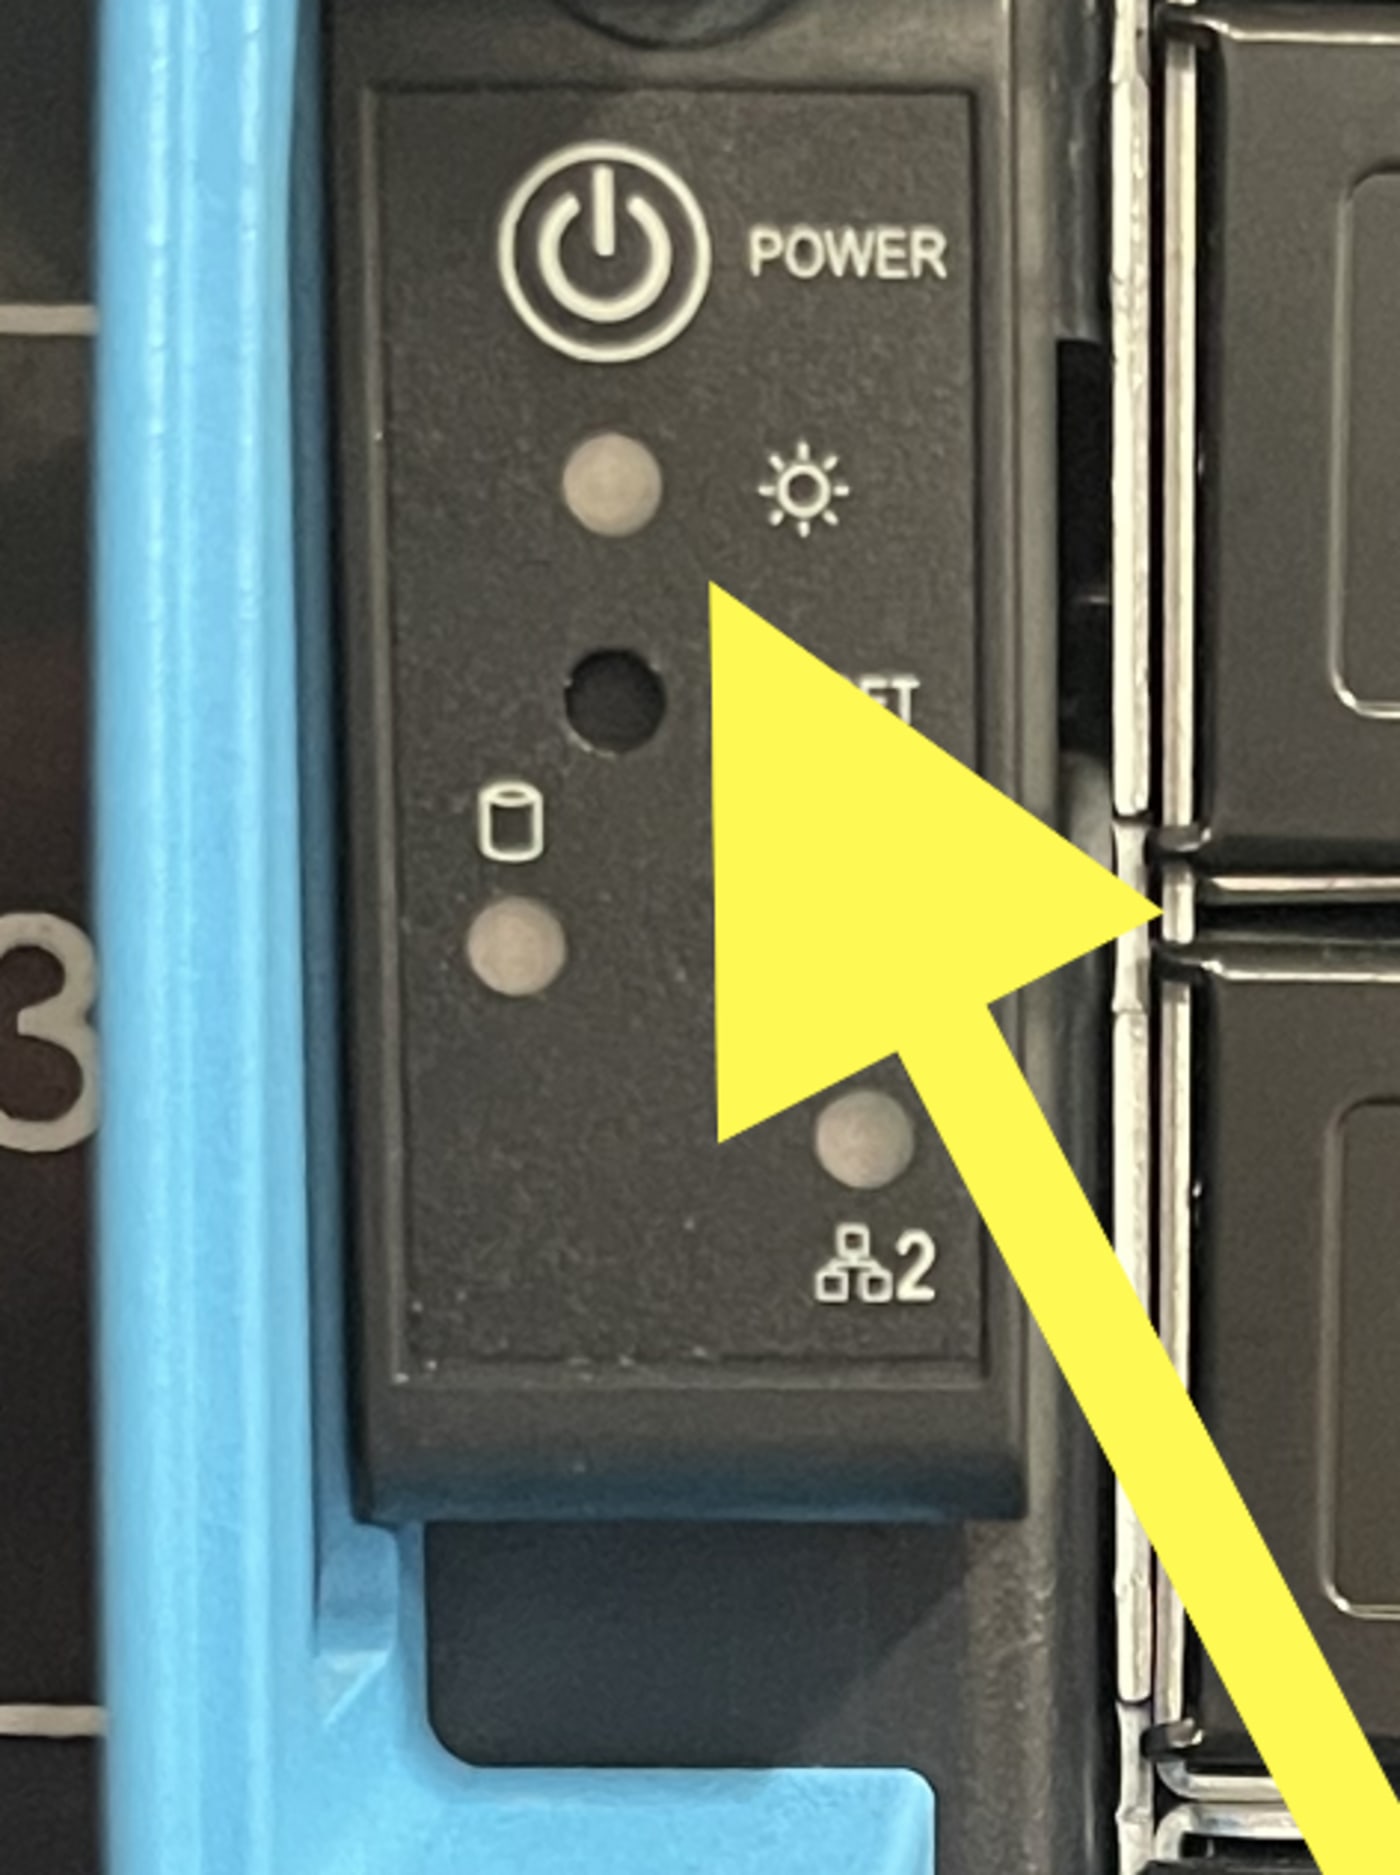
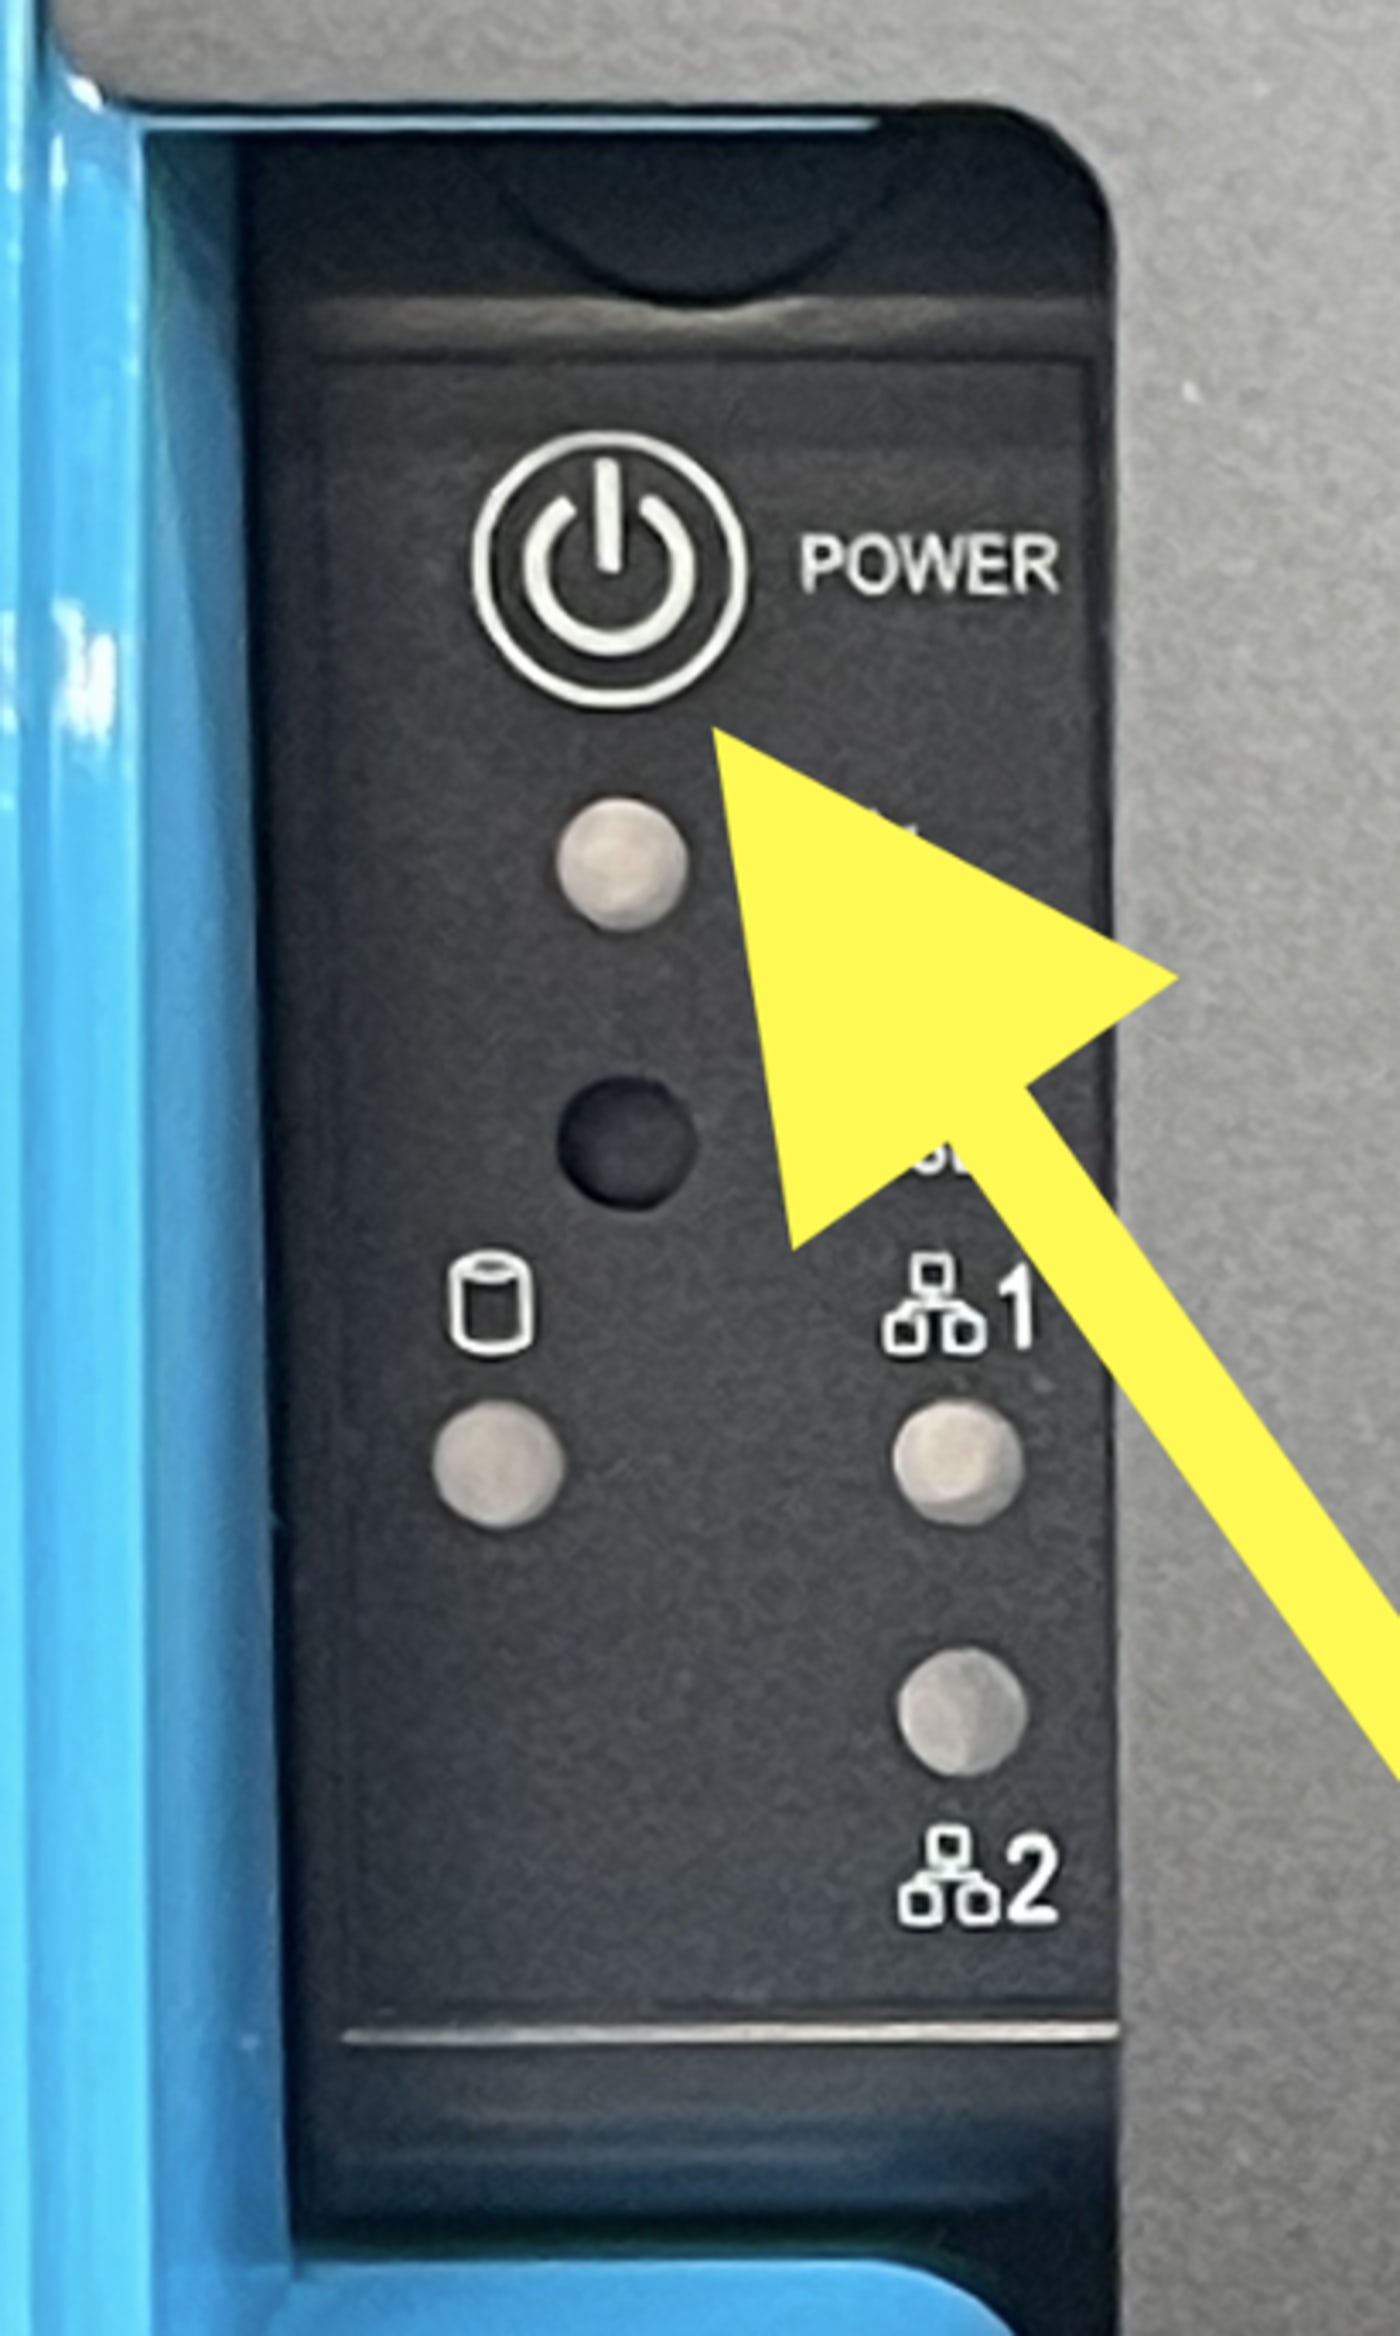
- Once you’re all set up, you’ll need to power on your OWC Jellyfish. Powering your R24 on is very simple. The R24’s power button is located on the top left panel. The light underneath it with the sun icon is the power indicator. This will illuminate a bright blue when system is powered on, and the hard drives will light up green. When you use an Expansion Chassis, always make sure the Expansion Chassis is powered on before you power on the OWC Jellyfish.
Powering Down Your OWC Jellyfish
- Powering down your OWC Jellyfish is just as simple. Clicking the R24’s power button on the top left of the front panel will initiate shutdown.
NOTE: If you hold the power button, it will force-power off your R24, and can cause system corruption. You should always let it run its shutdown process whenever possible.
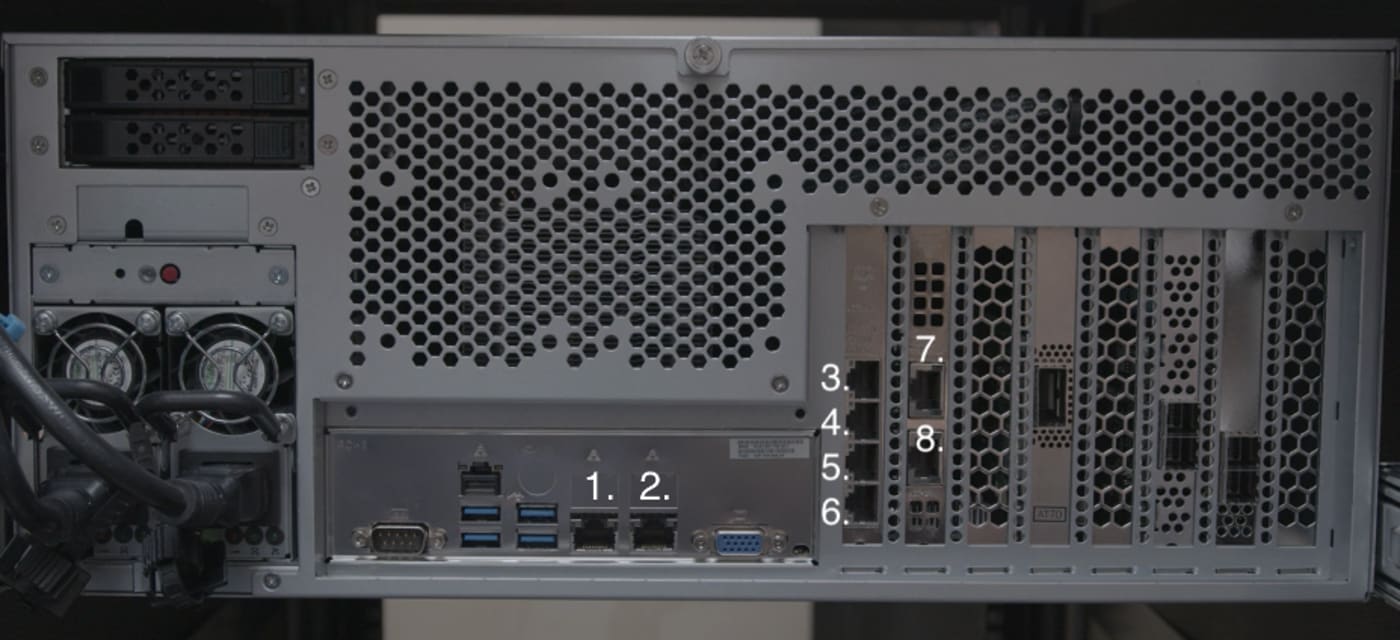
Ports and Cabling Overview
- In this section, we will label the back layout of the OWC Jellyfish R24, including a brief description of every port. This will help you determine your cabling needs. Please note that all OWC Jellyfish orders are customized entirely, and your build may differ slightly from the model shown.
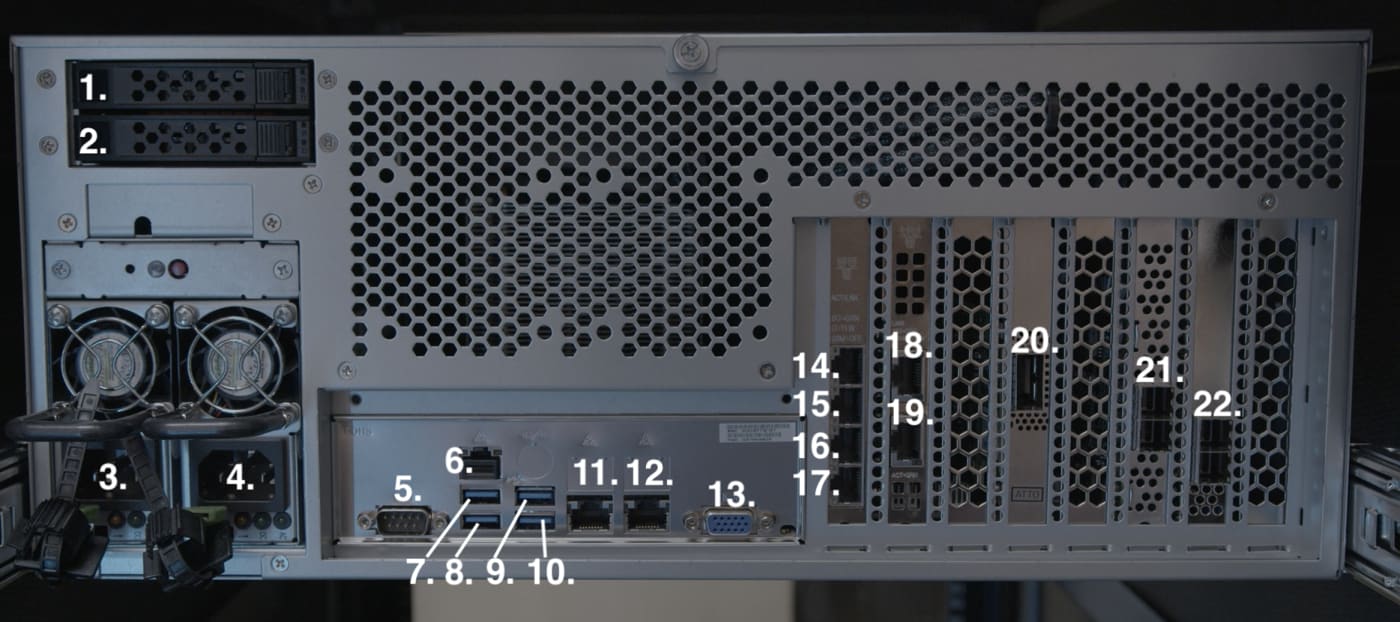
1 & 2 - Cache Drive and Boot Drive (The drives for these two will be pre-installed on your system. You will only need to access these if instructed by our support team to do so)
3 & 4 - Power Supply Outlets (These two outlets will be used to connect power cables to a UPS (uninterrupted power supply))
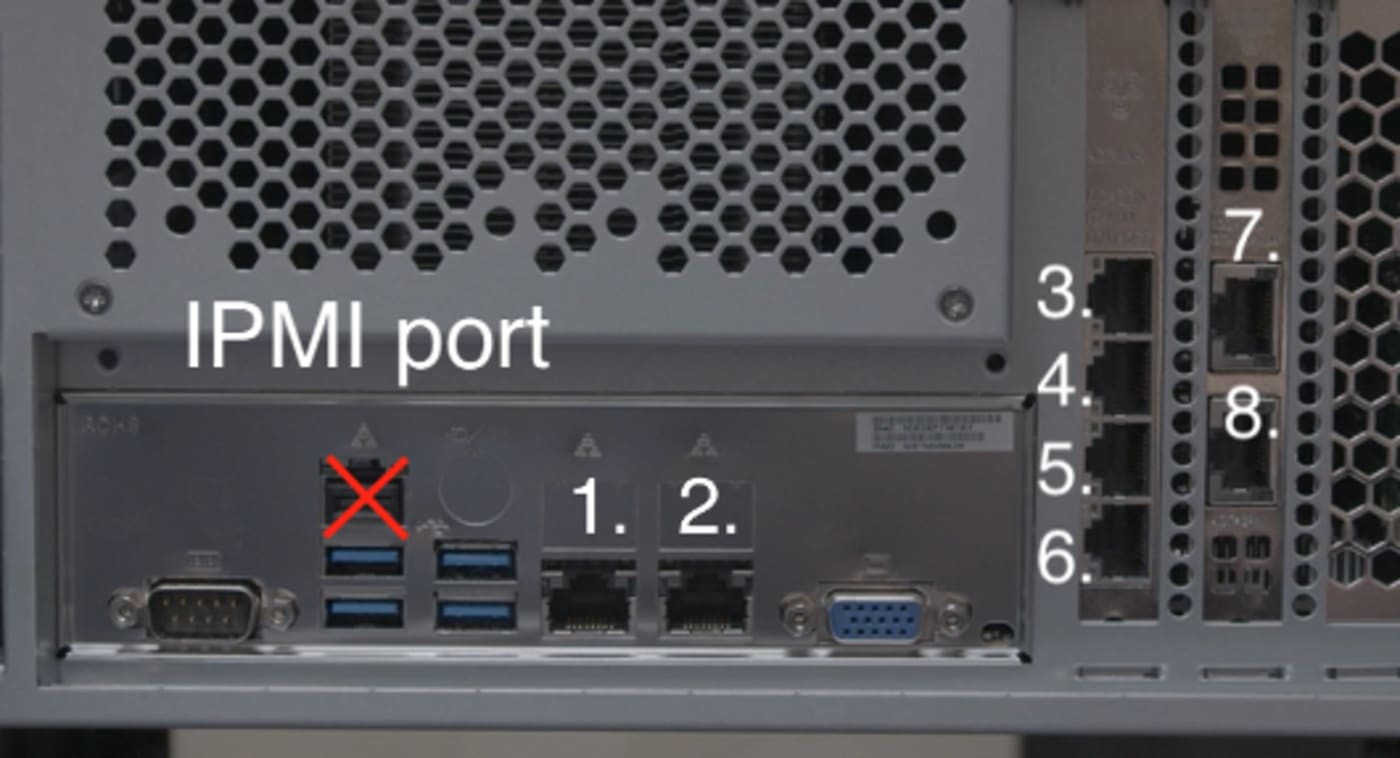
5 - Serial port.
6 - IPMI port (This a service port and cannot be used for data access)
7, 8, 9, & 10 - USB-3 Ports (These are used to directly interface with the terminal without using a workstation. They are be used if you would need to plug in a keyboard and mouse)
11 & 12 - RJ-45 Ports (These two built-in ports are customizable at 1 GbE or 10 GbE speeds)
13 - VGA Port (This is a display connector for monitoring boot processes)
14, 15, 16, 17, 18, & 19 - RJ-45 Ports (You will use these to connect your OWC Jellyfish to your workstations. Please be sure to use CAT 6A or CAT 7 cables to ensure the best performance. Above are nine of these ports with different speed capabilities. The speed of these ports are dependent on your customizations at time of purchase)
20 - 40 GbE RJ-45 Port (This is a 40 GbE port. NOTE: Your device may not have this port depending on the order)
21 & 22 - HBA Ports (If you have purchased an expansion unit for your R24, you will need to connect them together using your SAS cable in one of the HBA ports. Please refer to page 14 for instructions)
Download OWC Jellyfish Connect
- Once your OWC Jellyfish is physically installed and cabled, you’ll need to get started getting your computer to connect via its software. Below are links to download the OWC Jellyfish Connect app.
- Below are useful links for information on setting up and utilizing OWC Jellyfish Connect and Manager for Jellyfish.
Optional Setup Steps
- So far, you’ve racked your R24, plugged in your cables, downloaded and installed your software, and connected your workstations. Next, we will break down a few optional steps you may want to take in setting up your new OWC Jellyfish. In this section, you’ll learn how to connect your OWC Jellyfish to the Internet and acquaint yourself with our many seamless software integrations.
Connecting Your OWC Jellyfish to the Internet
- Depending on your use case, you may want to utilize a 1GbE or 10GbE connection for your network connection. Please note that if you choose a 10GbE port, you will need a switch that is 10GbE compatible. If you will have multiple users connecting simultaneously over LAN, we recommend using at least a 10GbE port. If you are only using it for an Internet connection, 1GbE should be sufficient. Be sure you are not using the IPMI port of the OWC Jellyfish as this will not provide access to your data.
1. First, connect one of your OWC Jellyfish ports to your switch. OWC Jellyfish ports are always counted from top to bottom and left to right.
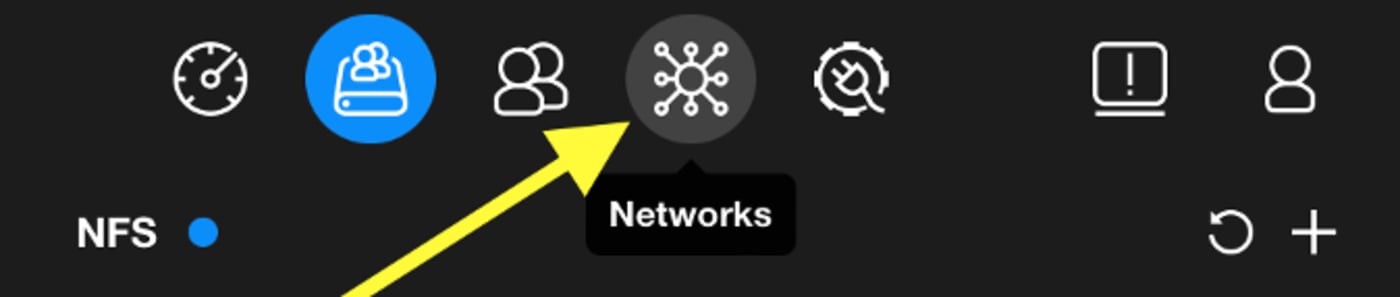
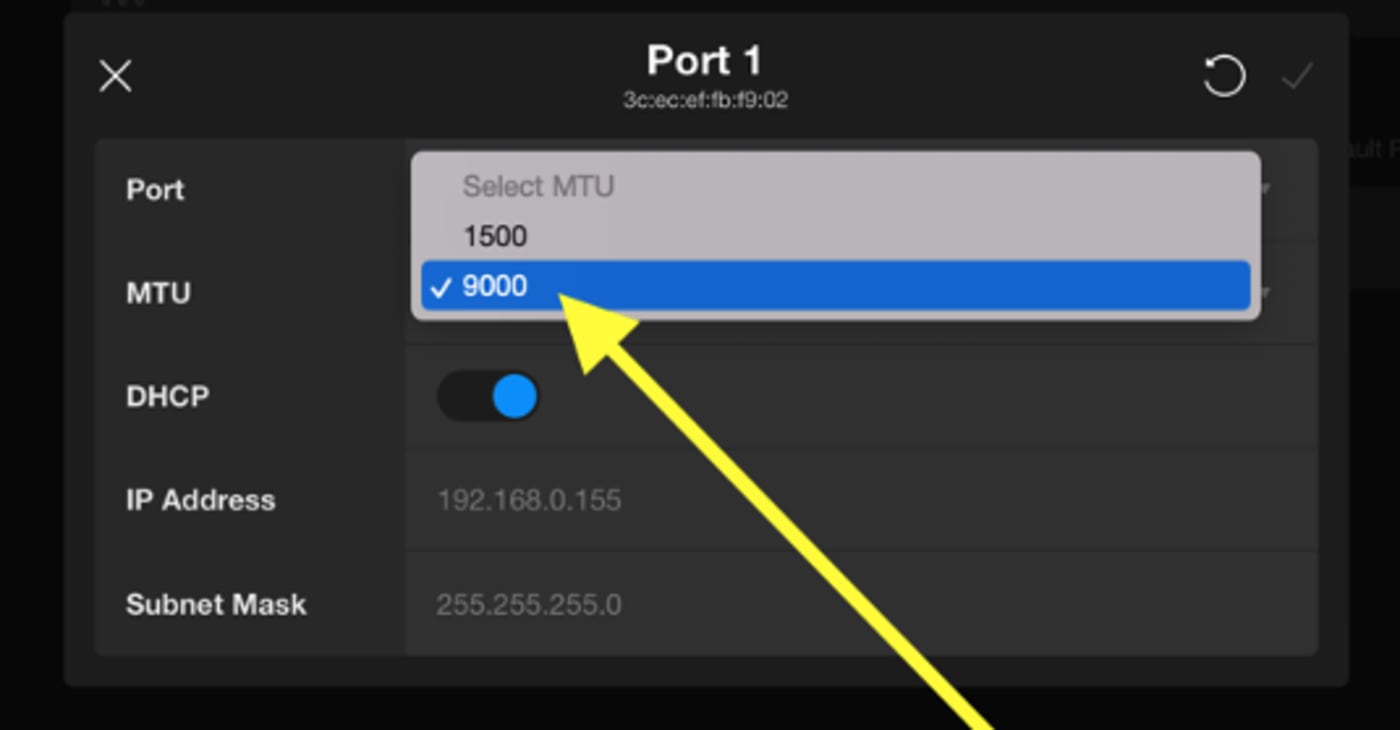
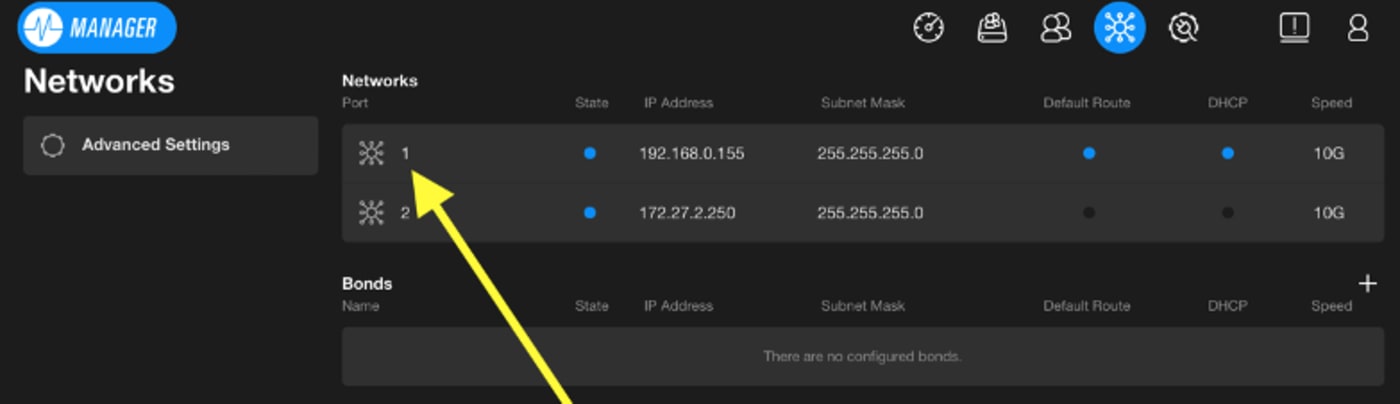
2. Once you have connected to the correct port, log into Manager for OWC Jellyfish and go to the Networks page.

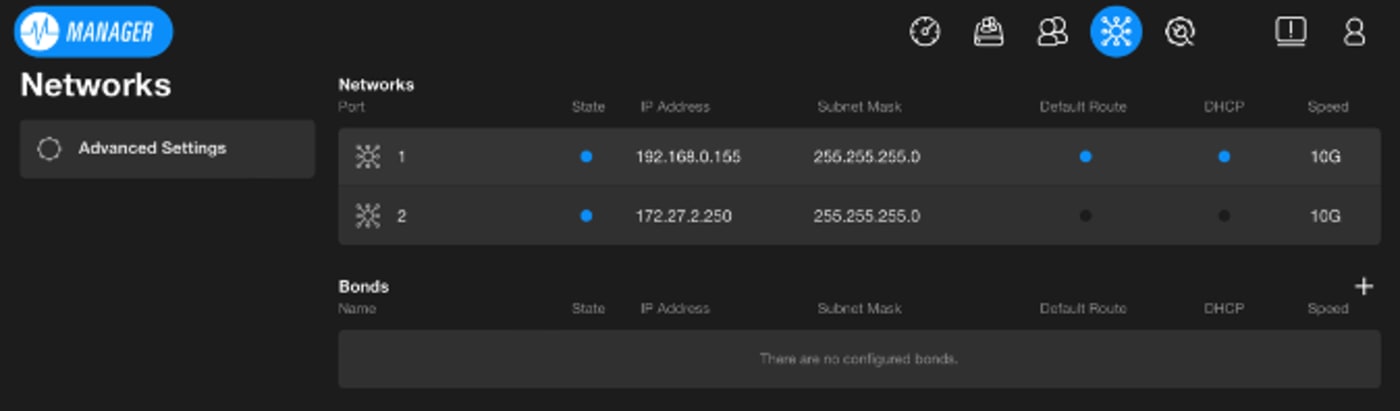
3. Select the port you connected to the switch or router.

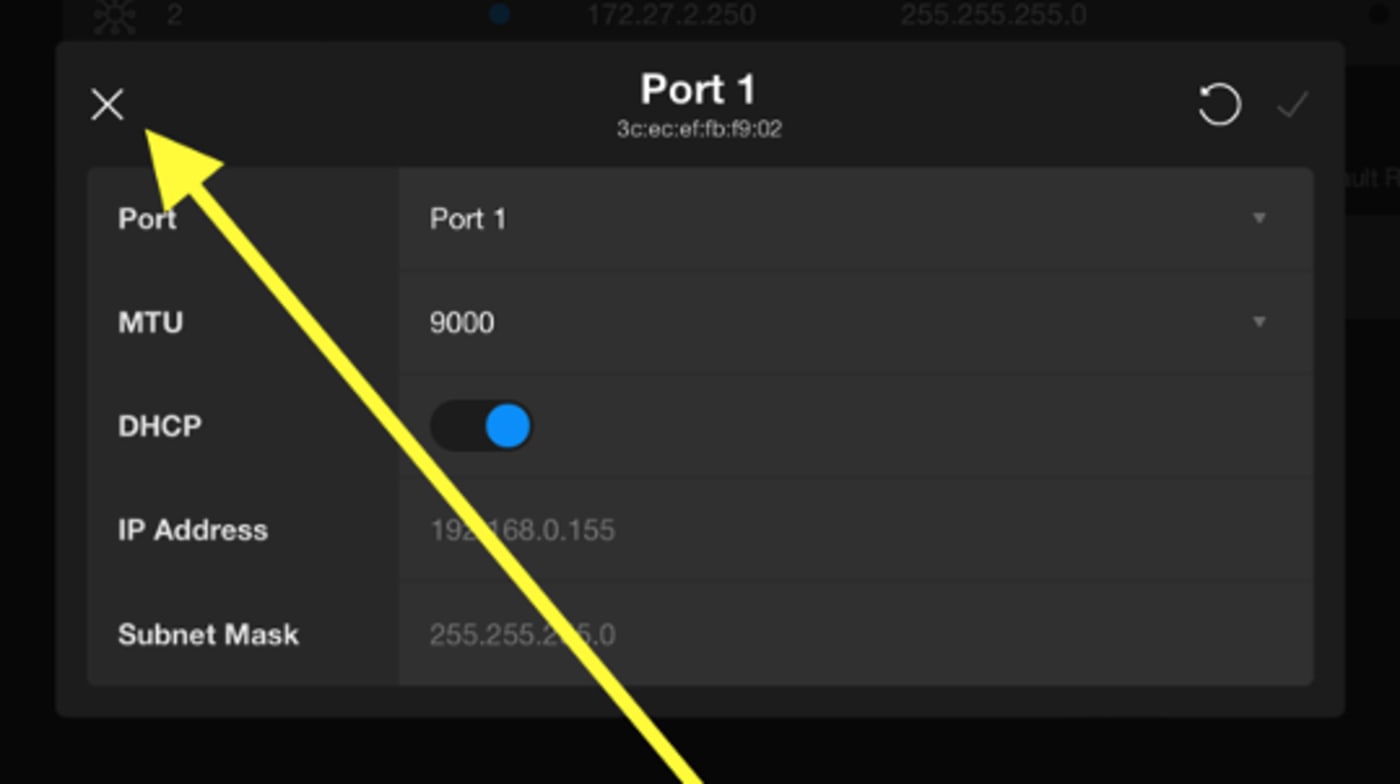
4. Using the drop-down arrow on the right side of the MTU selection, set the MTU to 1500 if you are using a 1GbE connection, or 9000 if you are using a 10GbE connection.
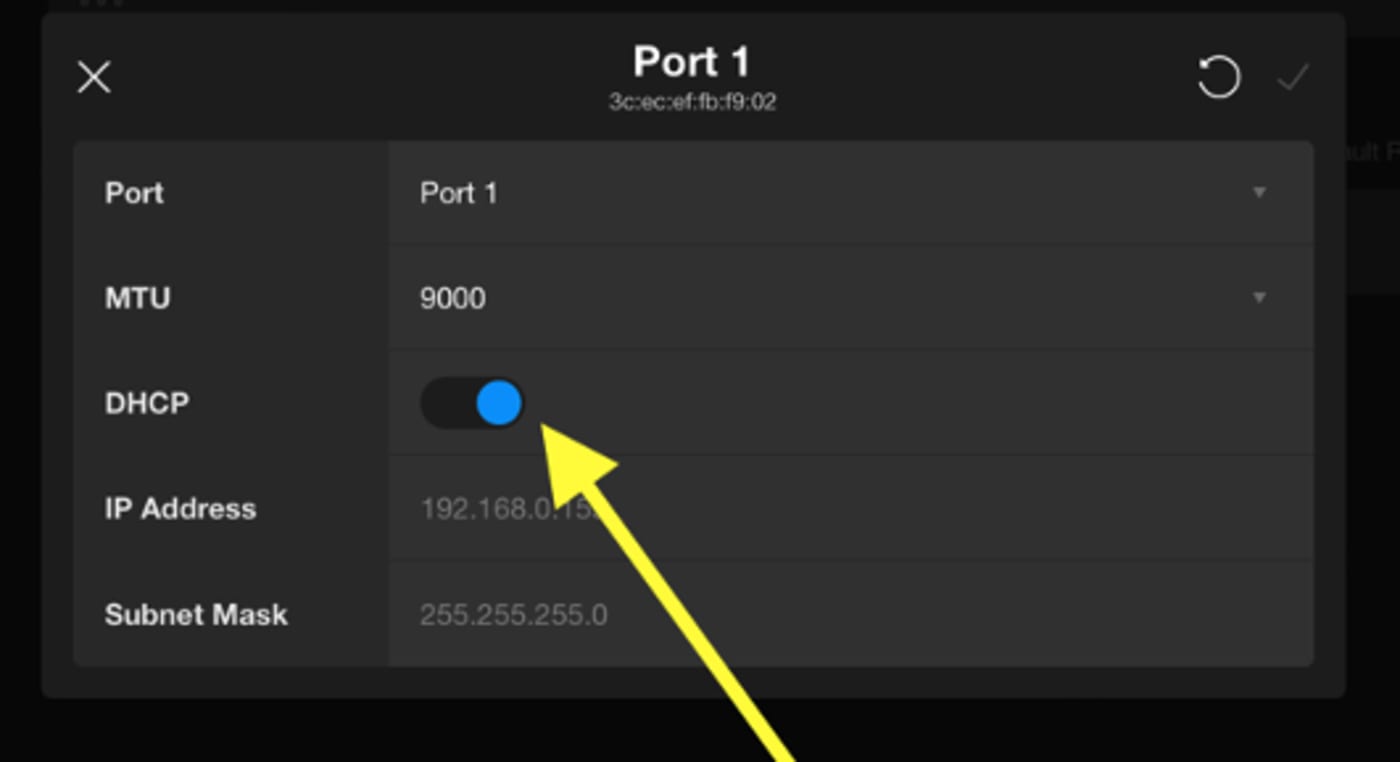
5. Toggle on DHCP. Check your switch settings to make ensure DHCP is enabled. This may be the default setting.
6. Click the checkmark in the top right corner to save.
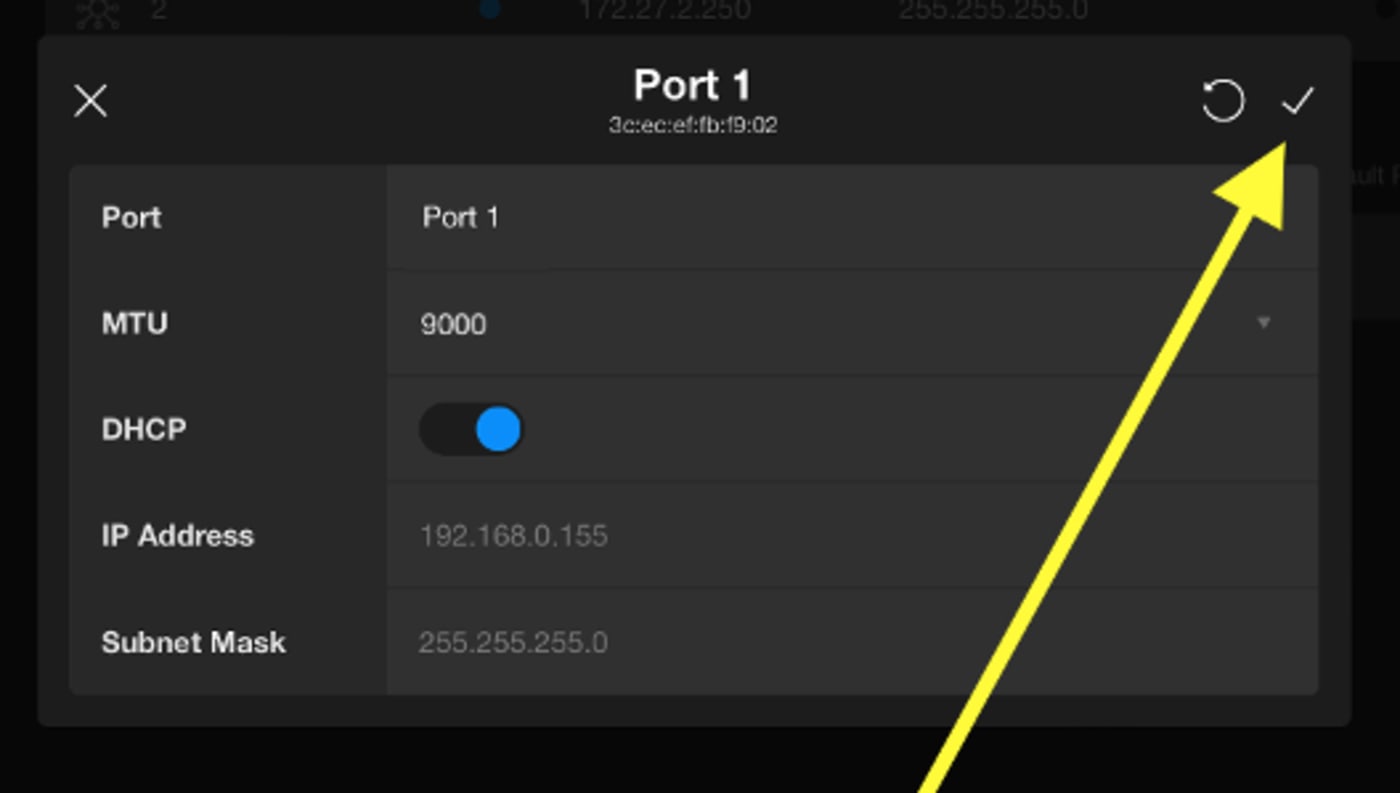
7. Exit out of this dialogue box by clicking the “x” in the top left corner.
8. Refresh the page.
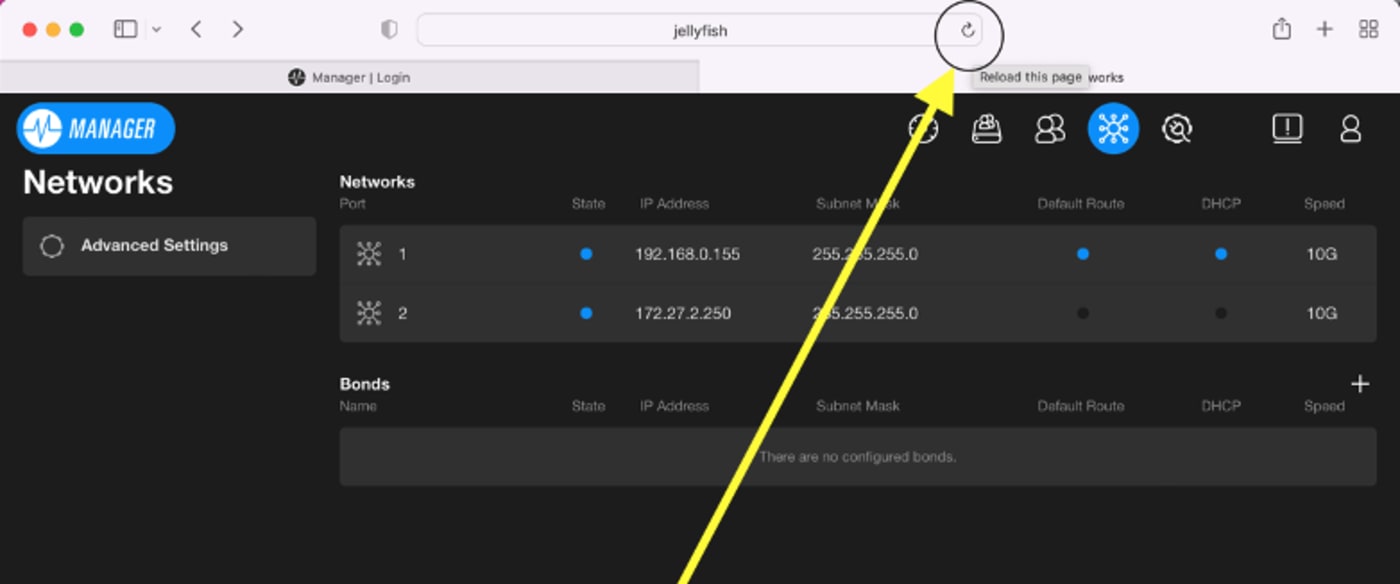
9. The OWC Jellyfish port will now have an automatically assigned IP address.
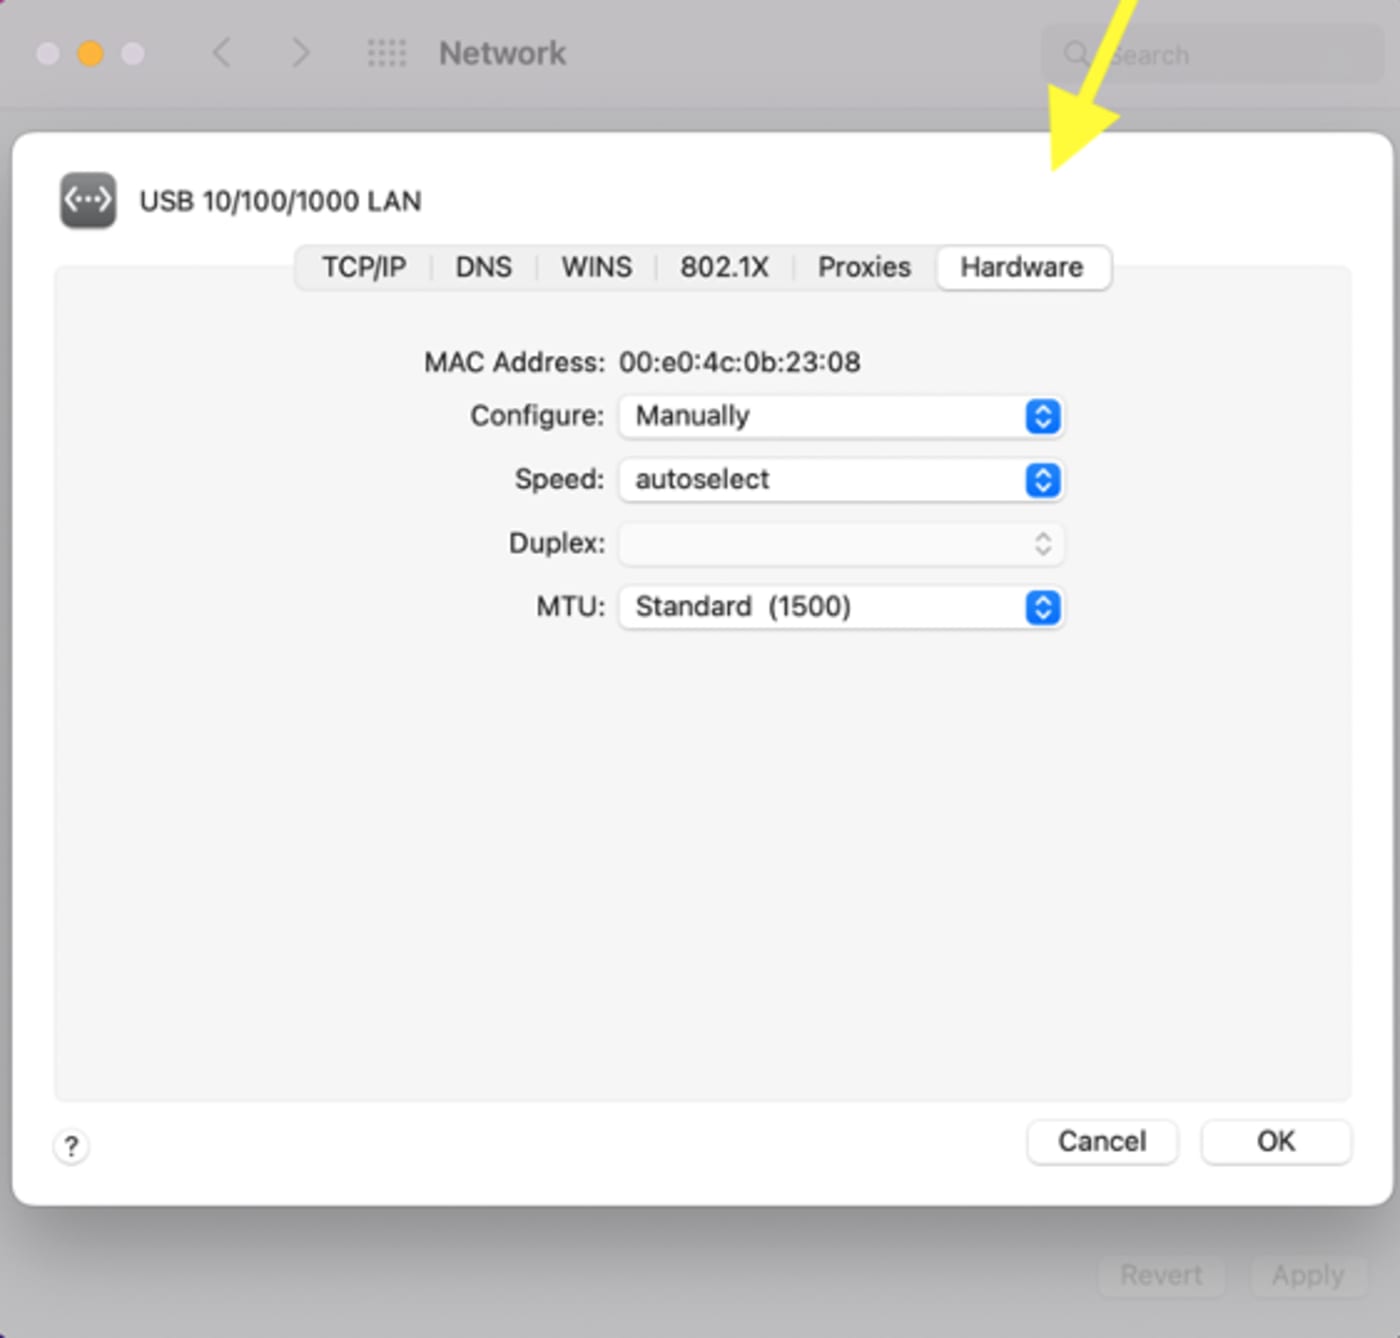
10. Here are the recommended network settings for a 10GbE connection on a Mac.
- Configure manually
- Speed: 10GBaseT
- Duplex: full-duplex
- MTU: 9000
- Make sure the box is unticked for AVB.
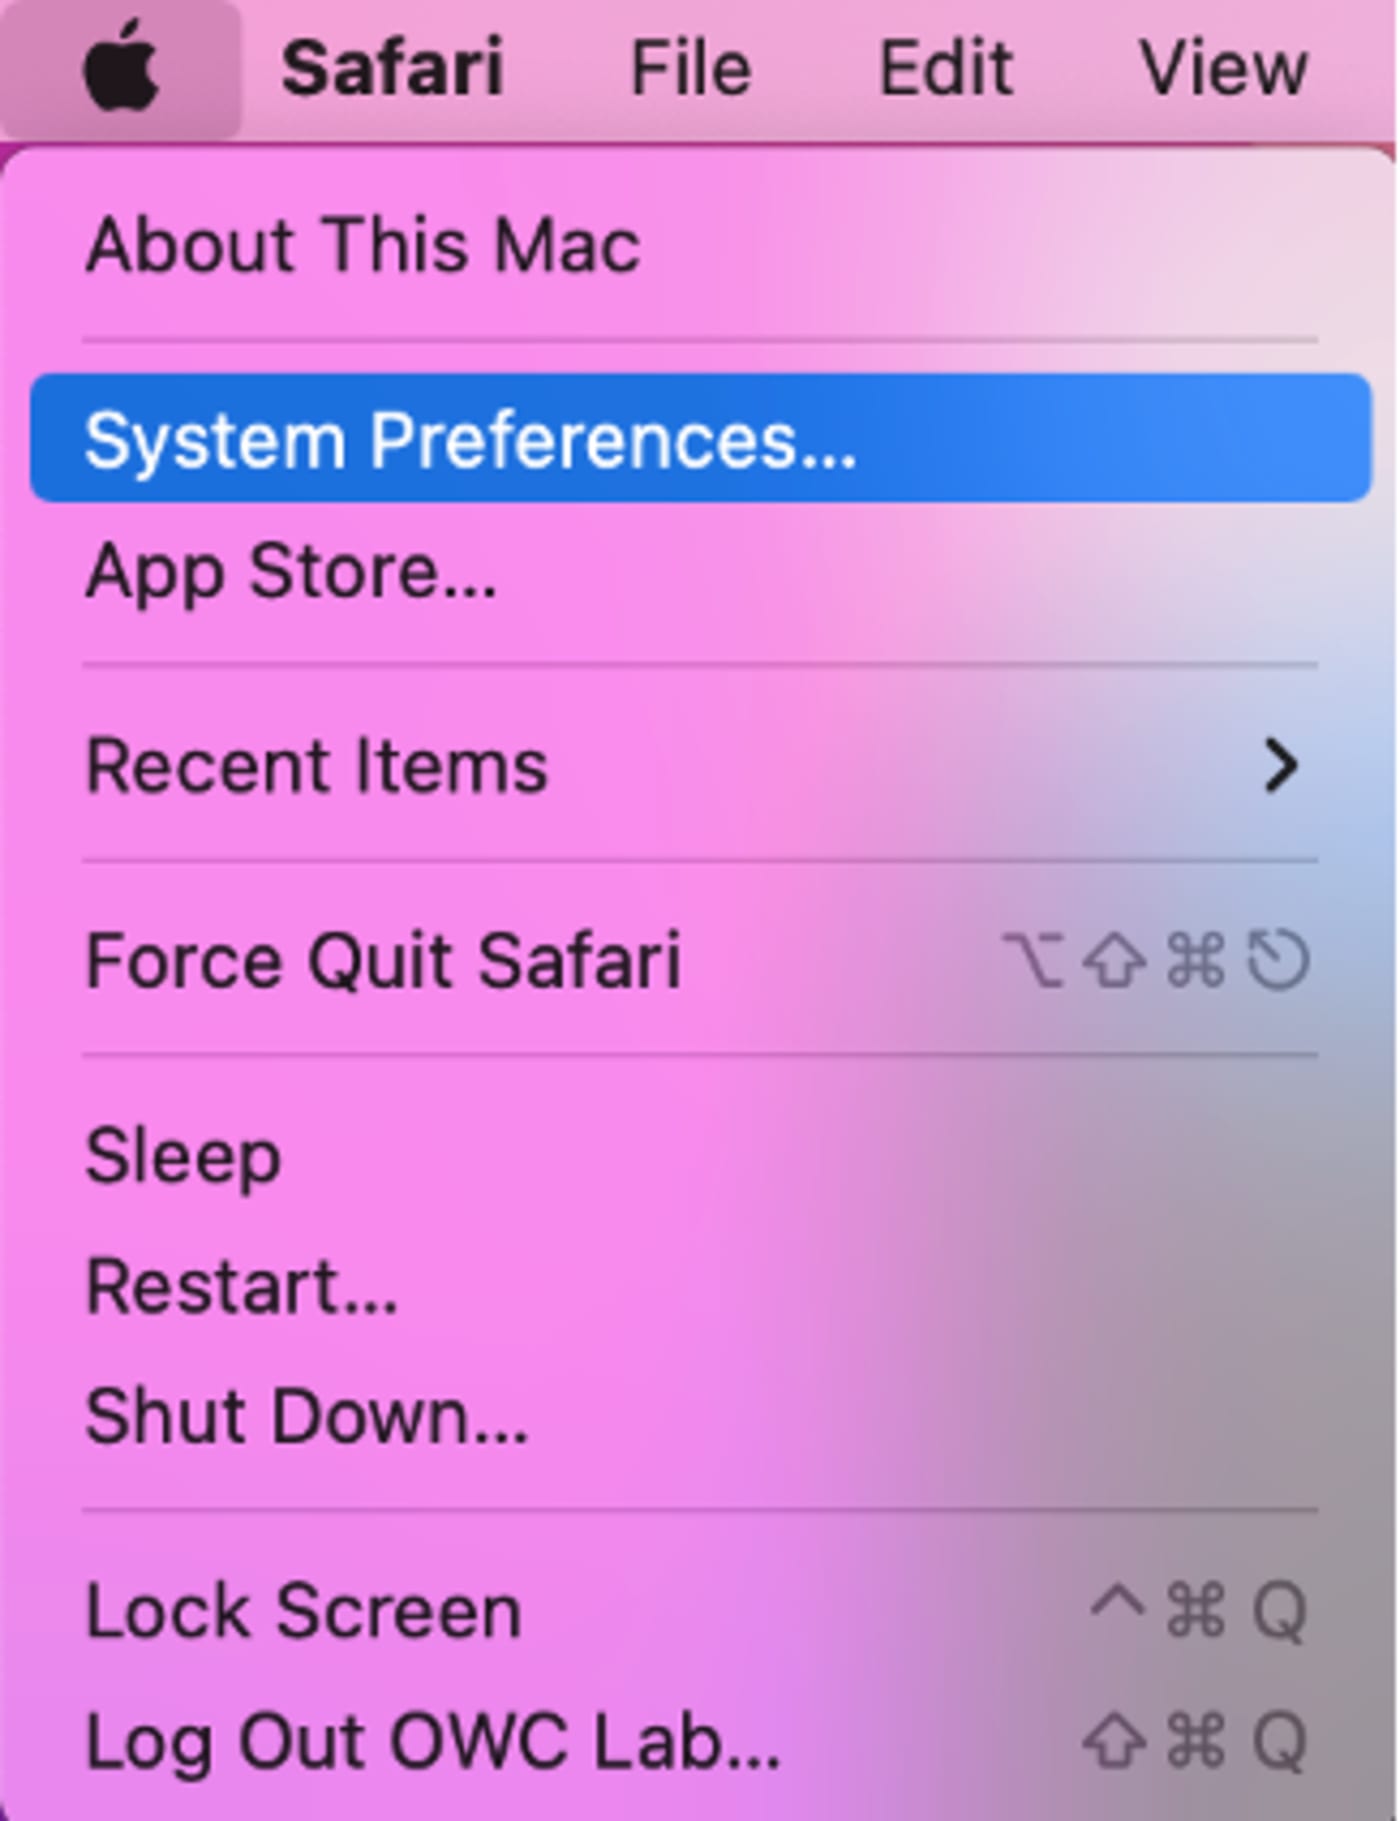
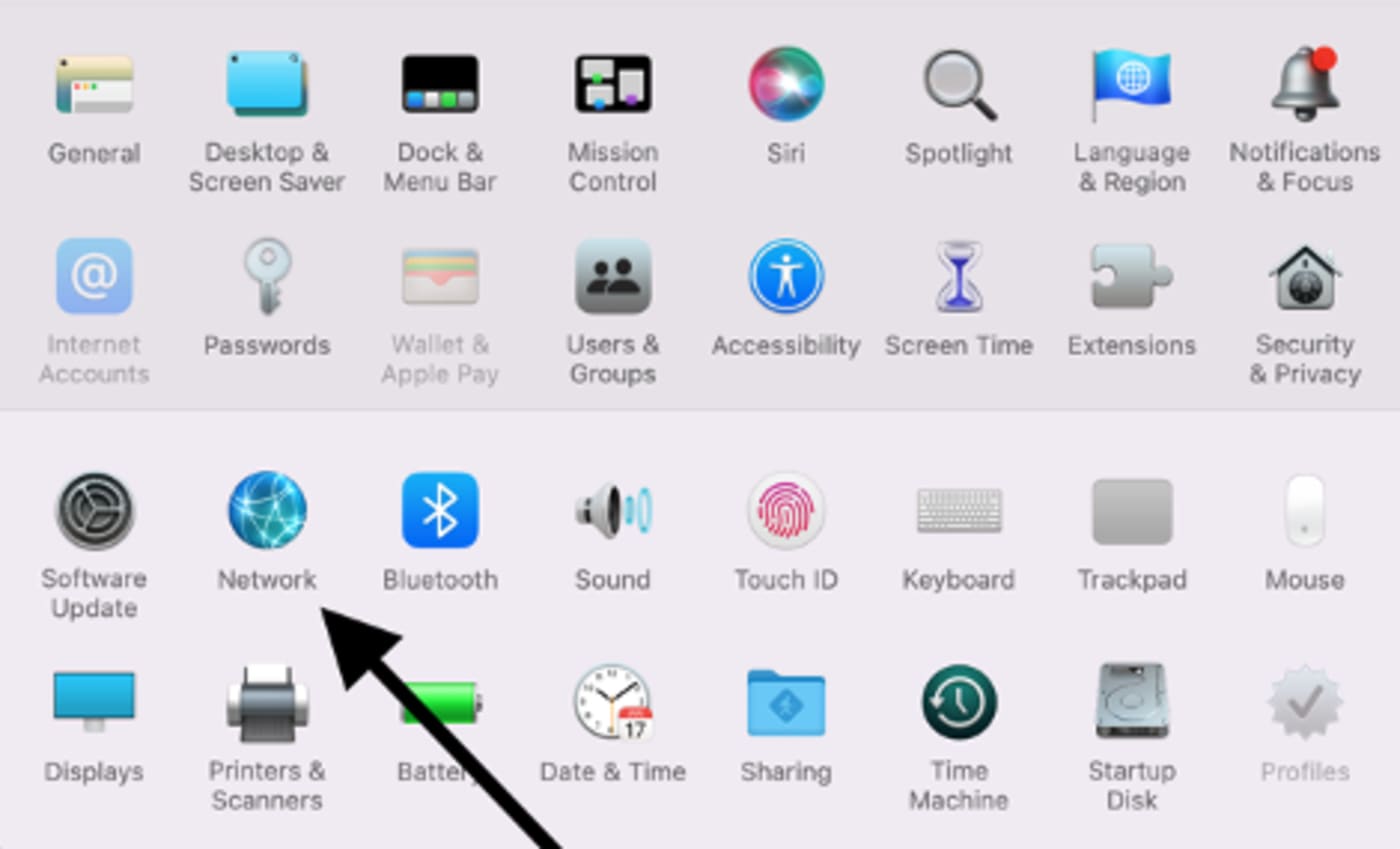
NOTE: These settings can be found by clicking the Apple logo in the top left of your screen and selecting System Preferences.
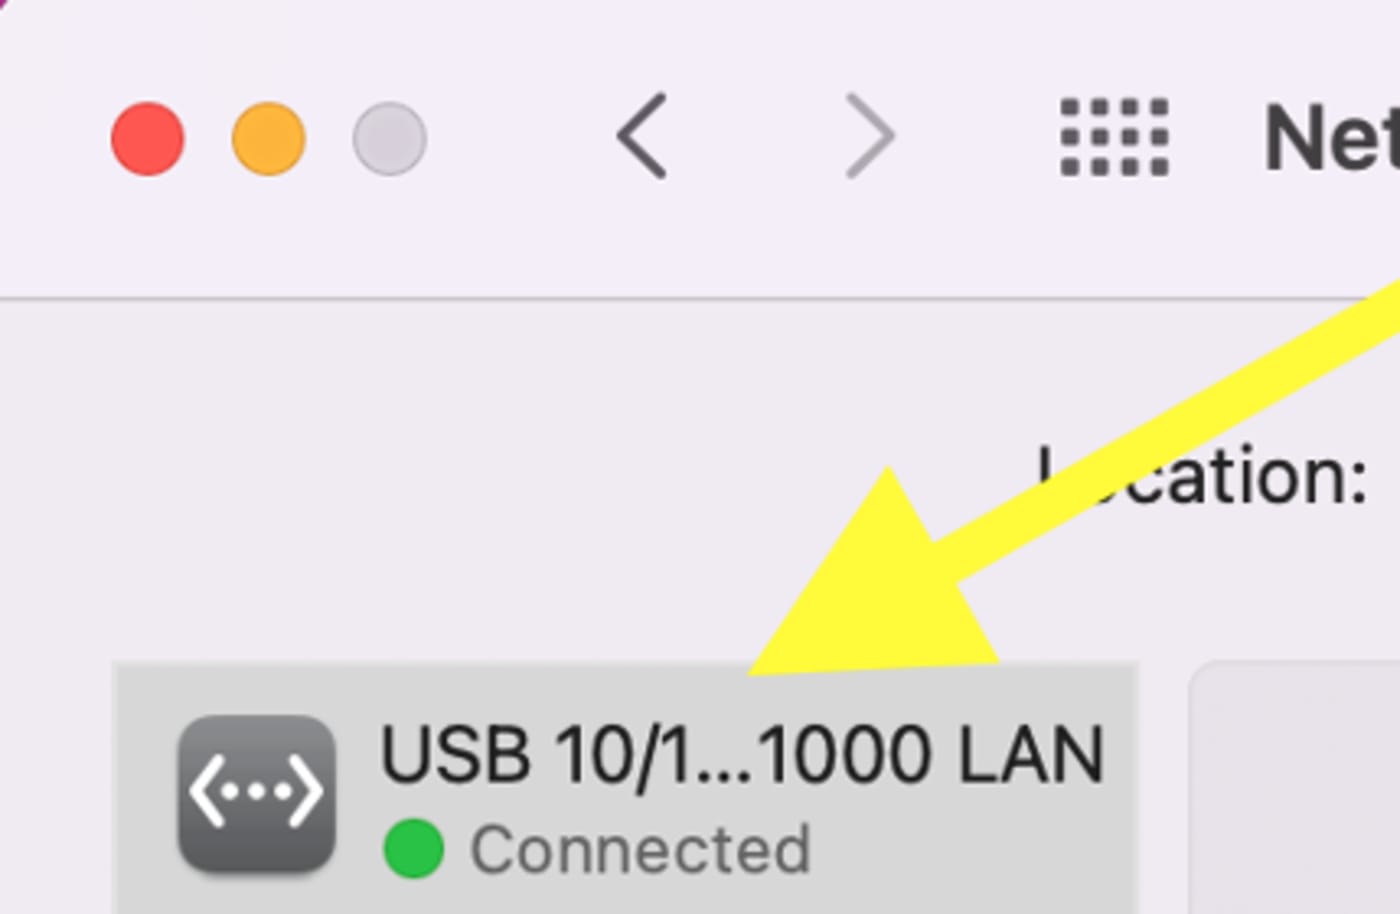
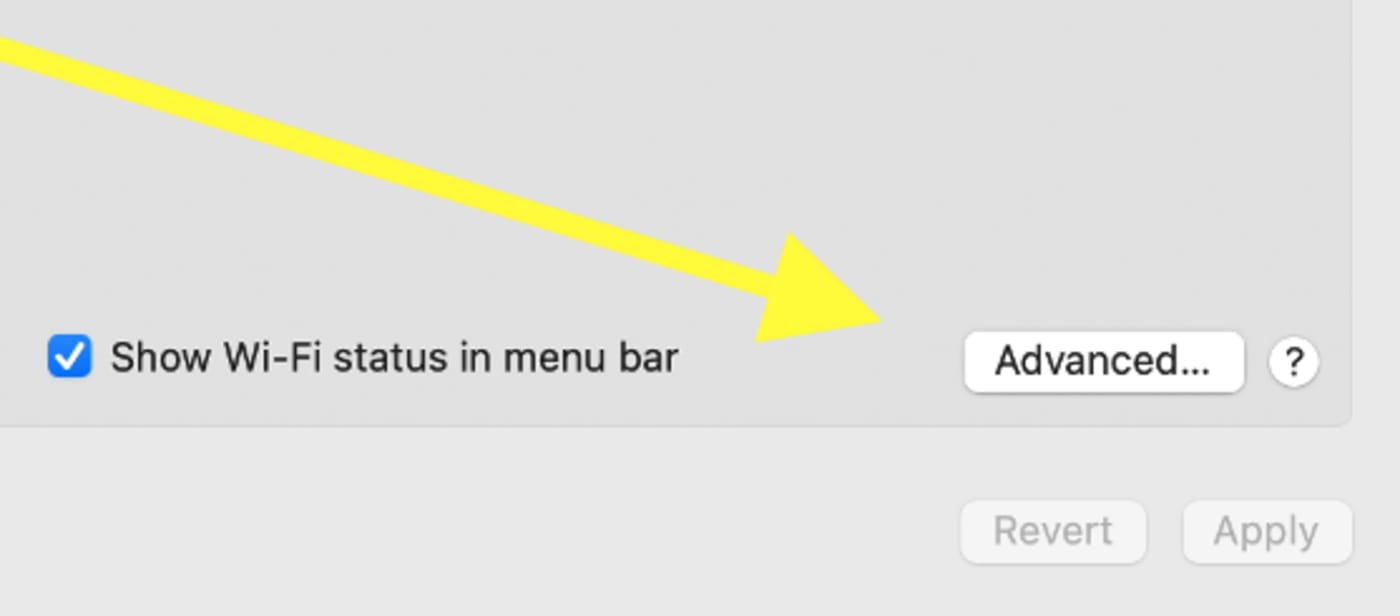
11. From here, select Network. Select your OWC Jellyfish connection in your list of network connections. Next, click Advanced at the bottom right corner of that dialogue box.
12. Click the Hardware tab on the right side to see your adjustable settings. When you’ve finished any necessary adjustments, click OK to save your changes.
13. Here are the recommended network settings for a 10GbE connection on a Windows:
- Jumbo Packet = 9014 Bytes
- Flow Control = Disabled
- Interrupt Moderation Rate = Low
- Interrupt Moderation = Disabled
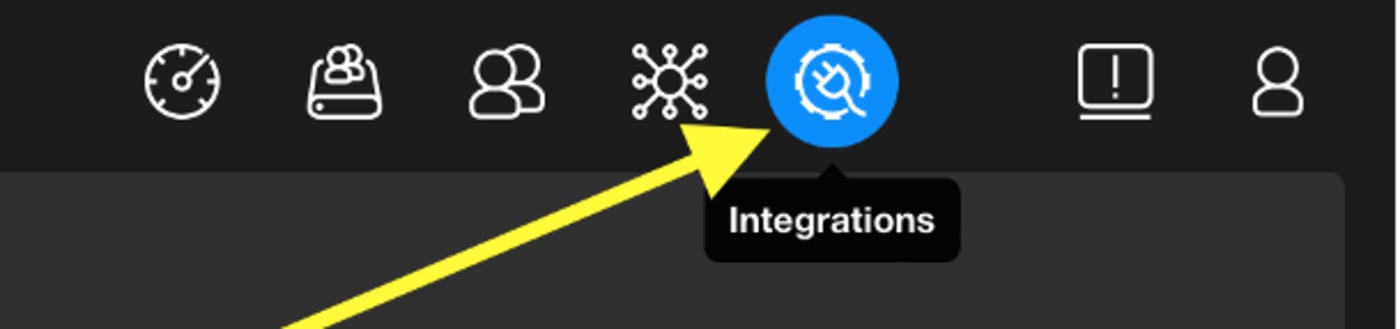
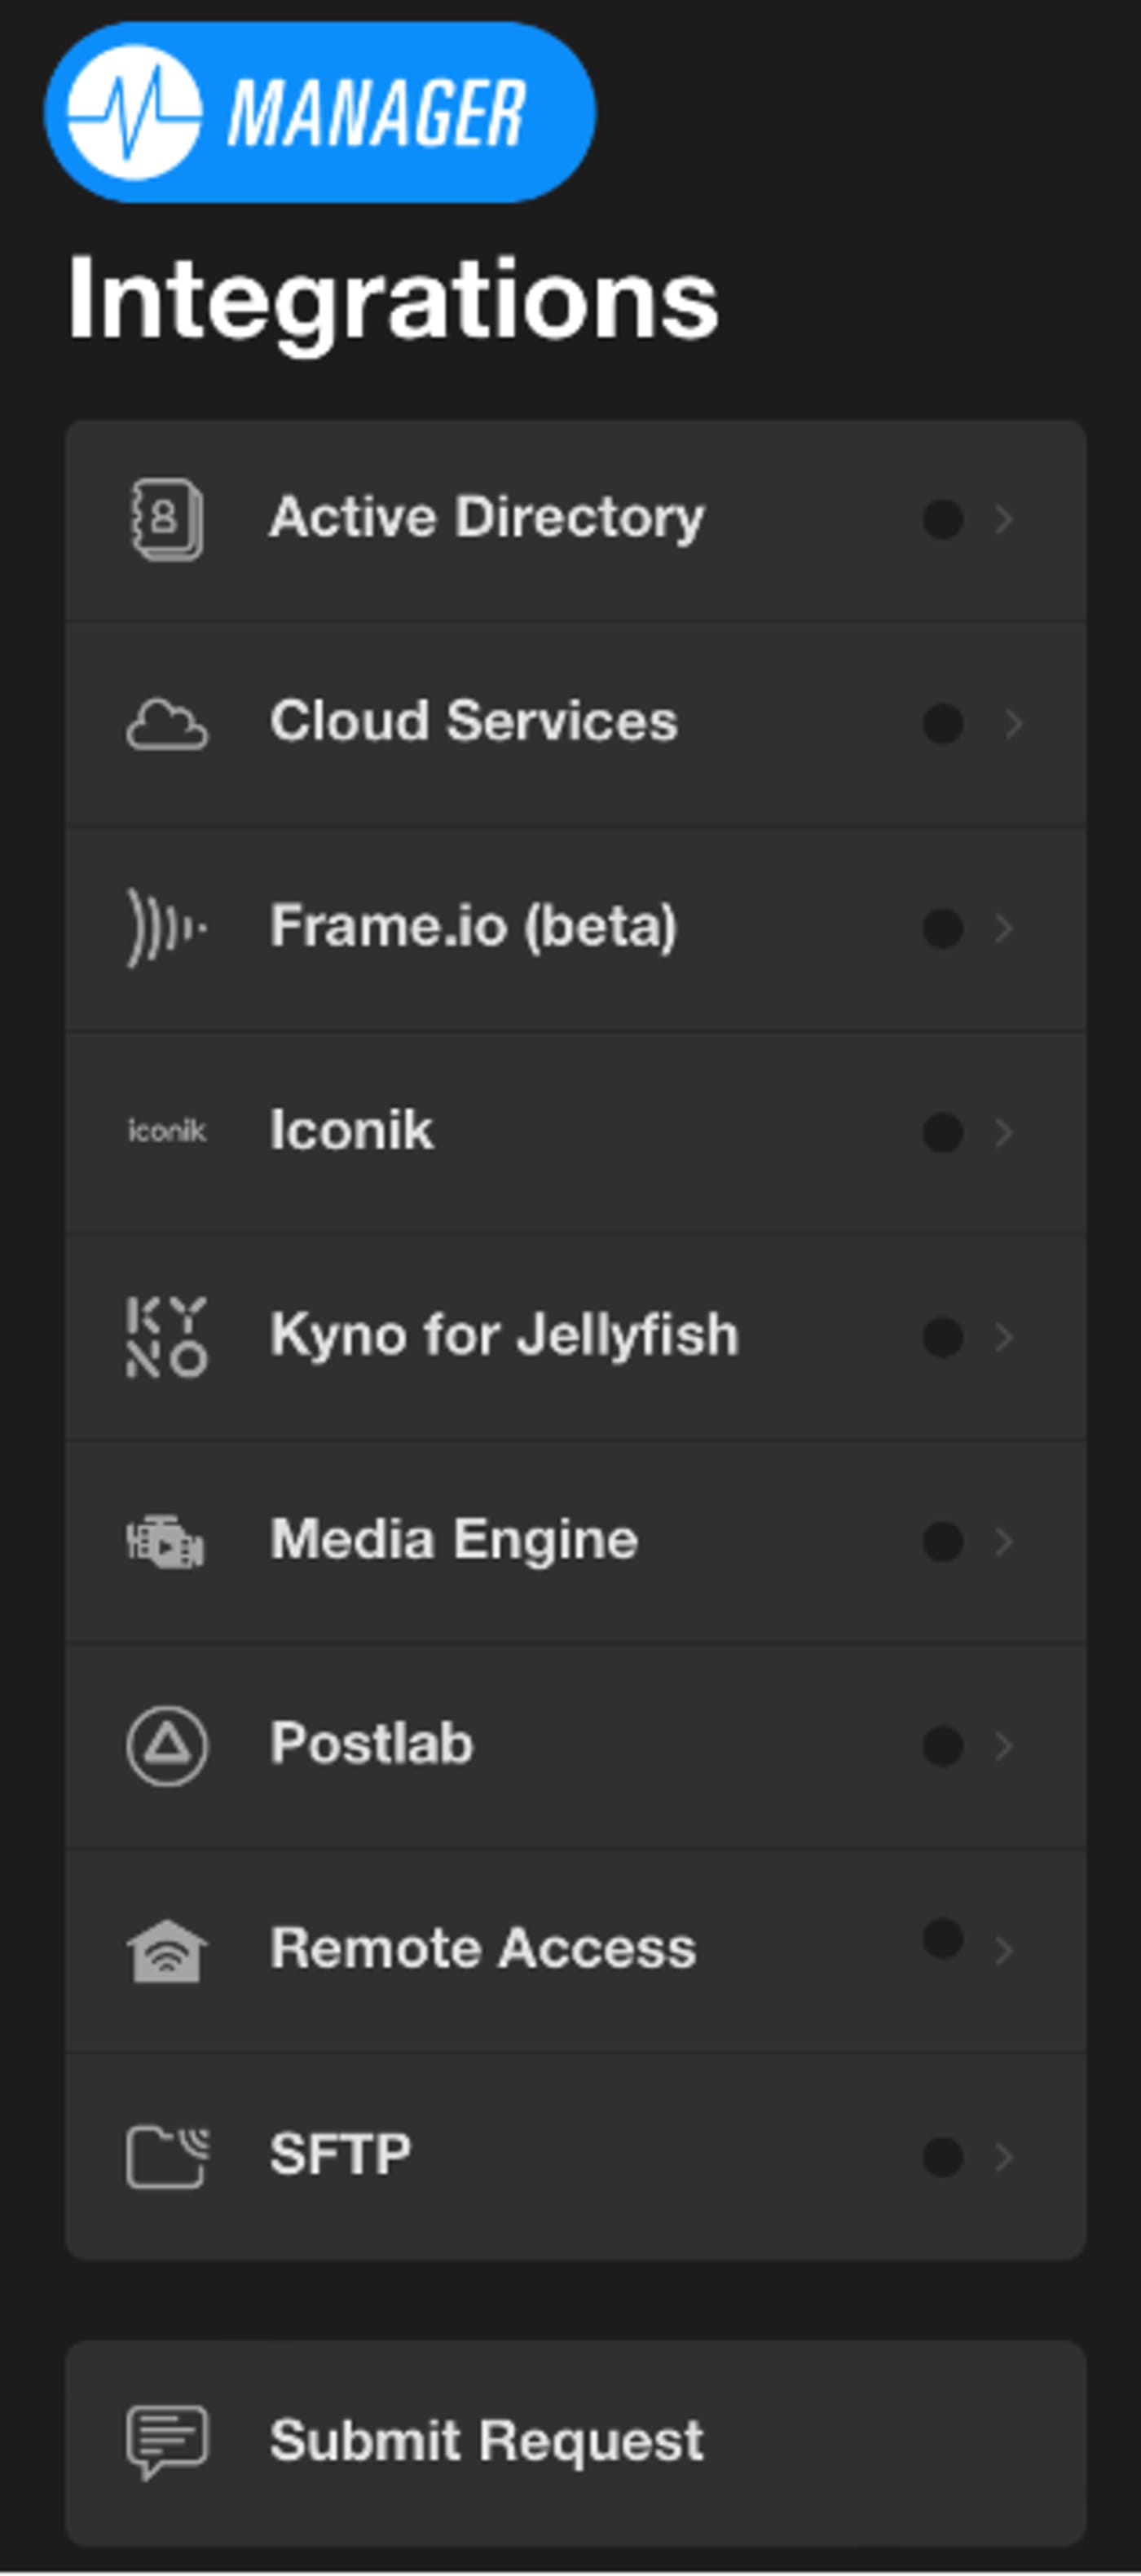
Activating Your Integrations
- There are many integrations you can use with the OWC Jellyfish. These can help maximize the efficiency of your workflow. You will need to input license keys and/or usernames and passwords for these integrations. To access them, open Manager for OWC Jellyfish and click on the Integrations tab in the upper right corner. Here you will find a list of services that work with your OWC Jellyfish.
Kyno for OWC Jellyfish
- A media management application for macOS and Windows. It provides five main functions: pro video file playback, verified transfers, transcoding, metadata tagging, and locating media by metadata. Many teams find it to be a very helpful tool.


1. Our support team will supply you with all the necessary information to get set up. You’ll need to enter your email you want to register with, along with the serial number, and client secret. If you haven’t been provided with this information, please reach out to our support team and we will happily provide the necessary credentials.
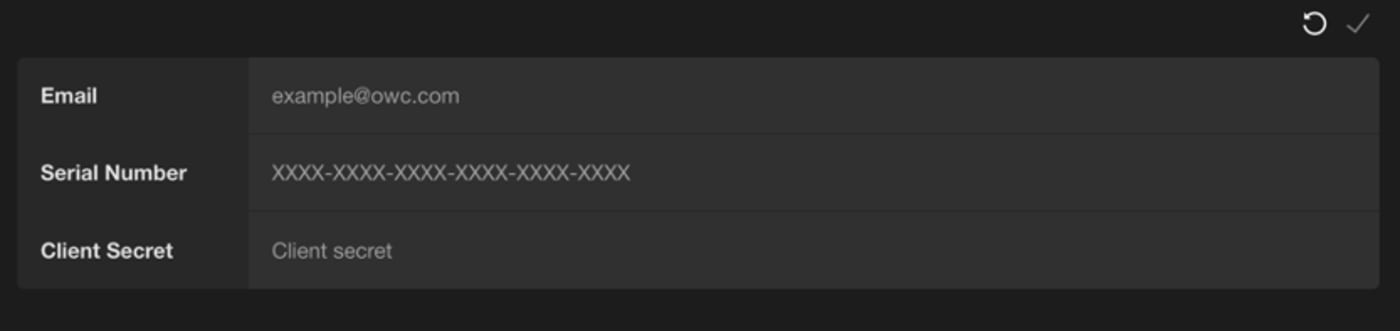
2. When you are finished, click the white checkmark in the top right corner to save your changes.

3. When your credentials are successfully entered and saved, the indicator next to the Kyno for OWC Jellyfish tab will turn blue.

4. Next, you’ll need to download the app. In OWC Jellyfish Connect, click on the Resources tab, and find the Download button next to Kyno for OWC Jellyfish.
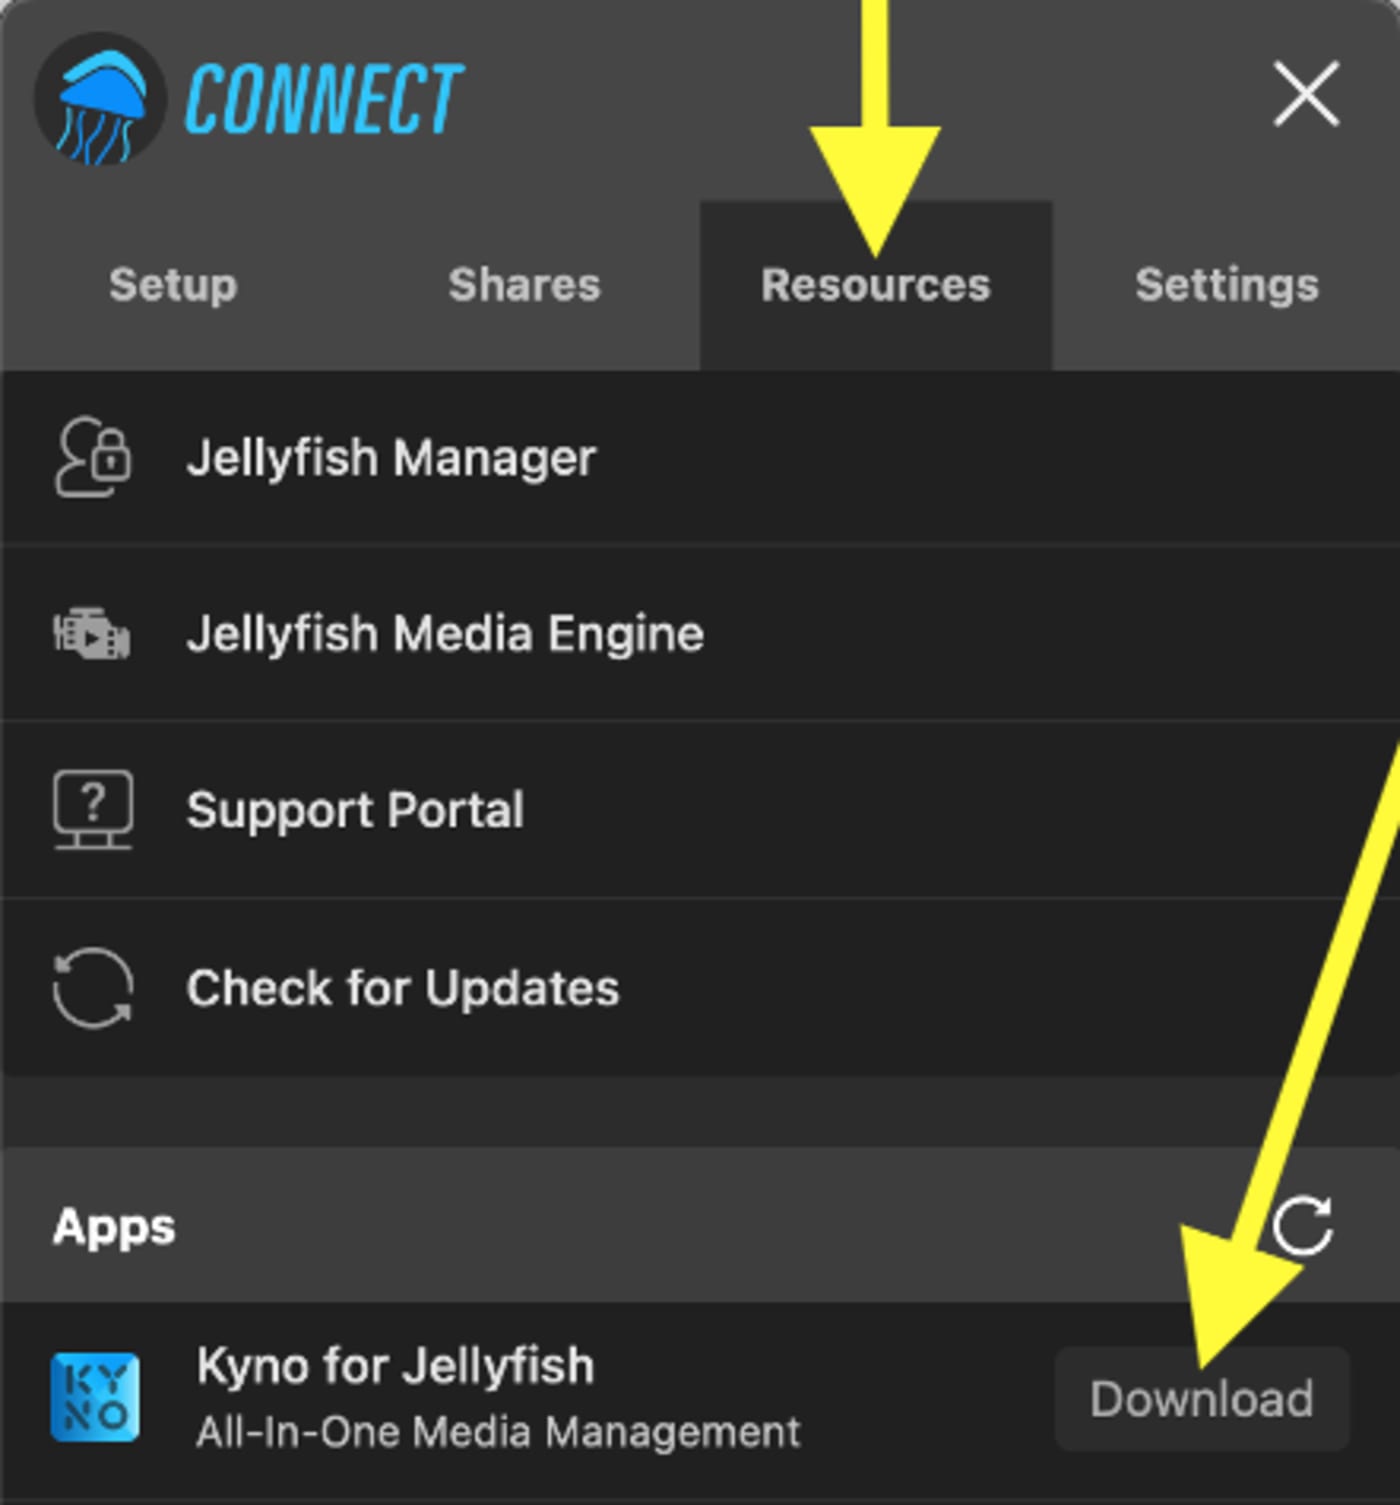
5. This will automatically download the Kyno for OWC Jellyfish app. You can find it in your Downloads folder. After the installation finishes, you are now ready to begin implementing Kyno’s many useful functions into your team’s workflow!
6. Once you have entered the license info in Manager for OWC Jellyfish, mount a OWC Jellyfish on your workstation, and then launch Kyno.
Media Engine
- Up next, we will set up Media Engine. It is a convenient tool for running transcoding jobs inside the OWC Jellyfish itself.


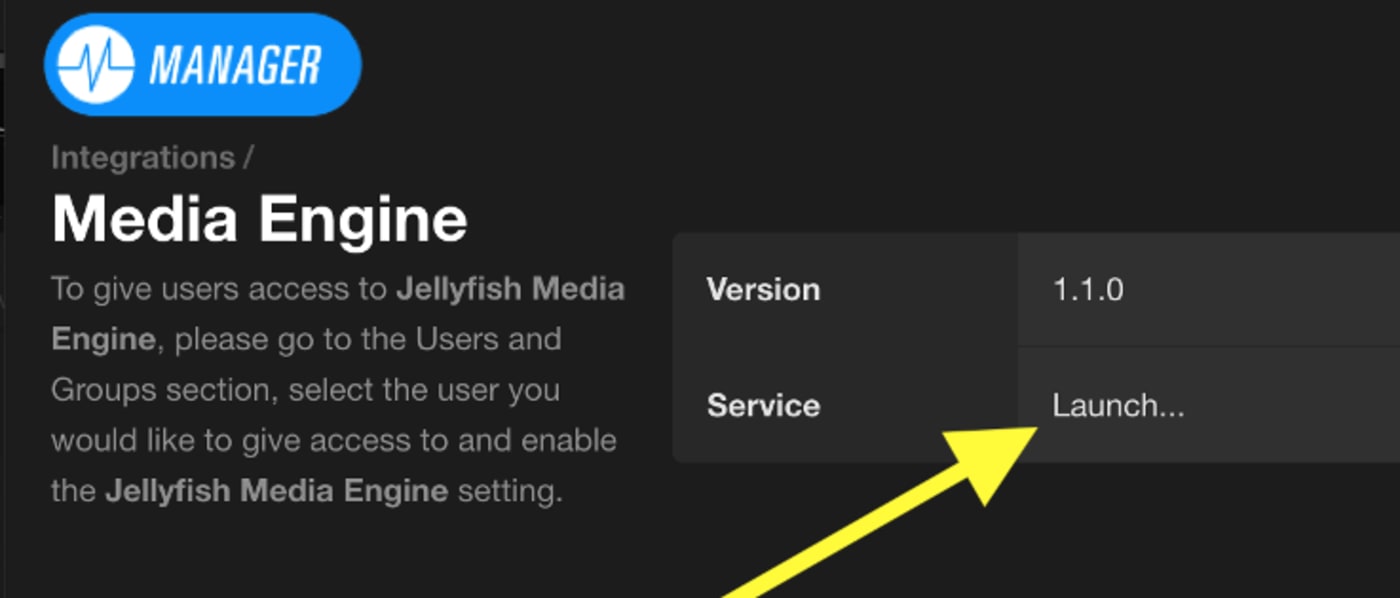
1. In order to enable Media Engine, Kyno for OWC Jellyfish must be activated on at least one workstation. After that, any user who’s been granted Media Engine access can click Launch to begin or navigate to jellyfish/media/.
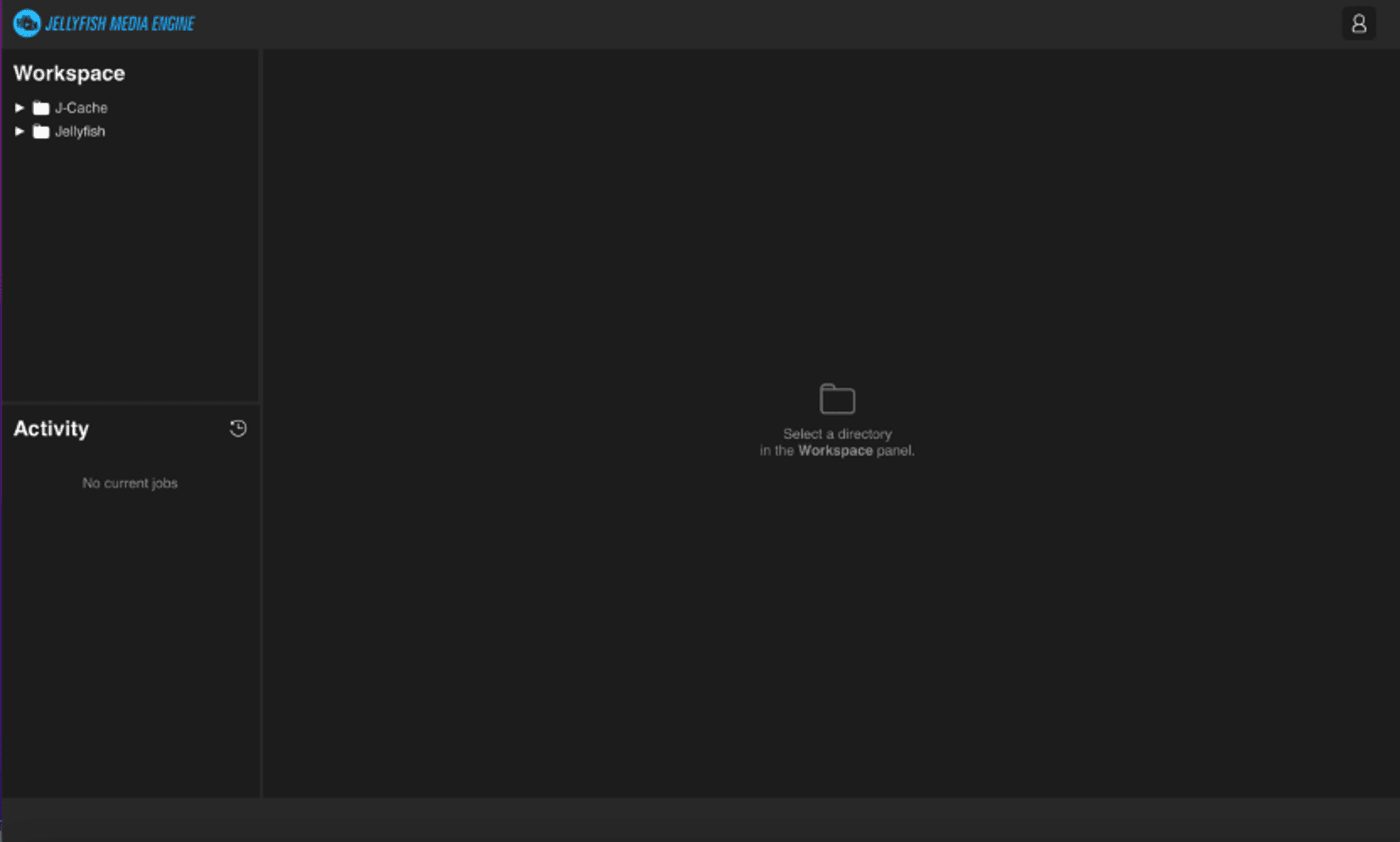
2. Media Engine will only show shares and folders for which a user has been granted permissions. From here, your team can utilize this simple tool to maximize efficiency in your workflow.
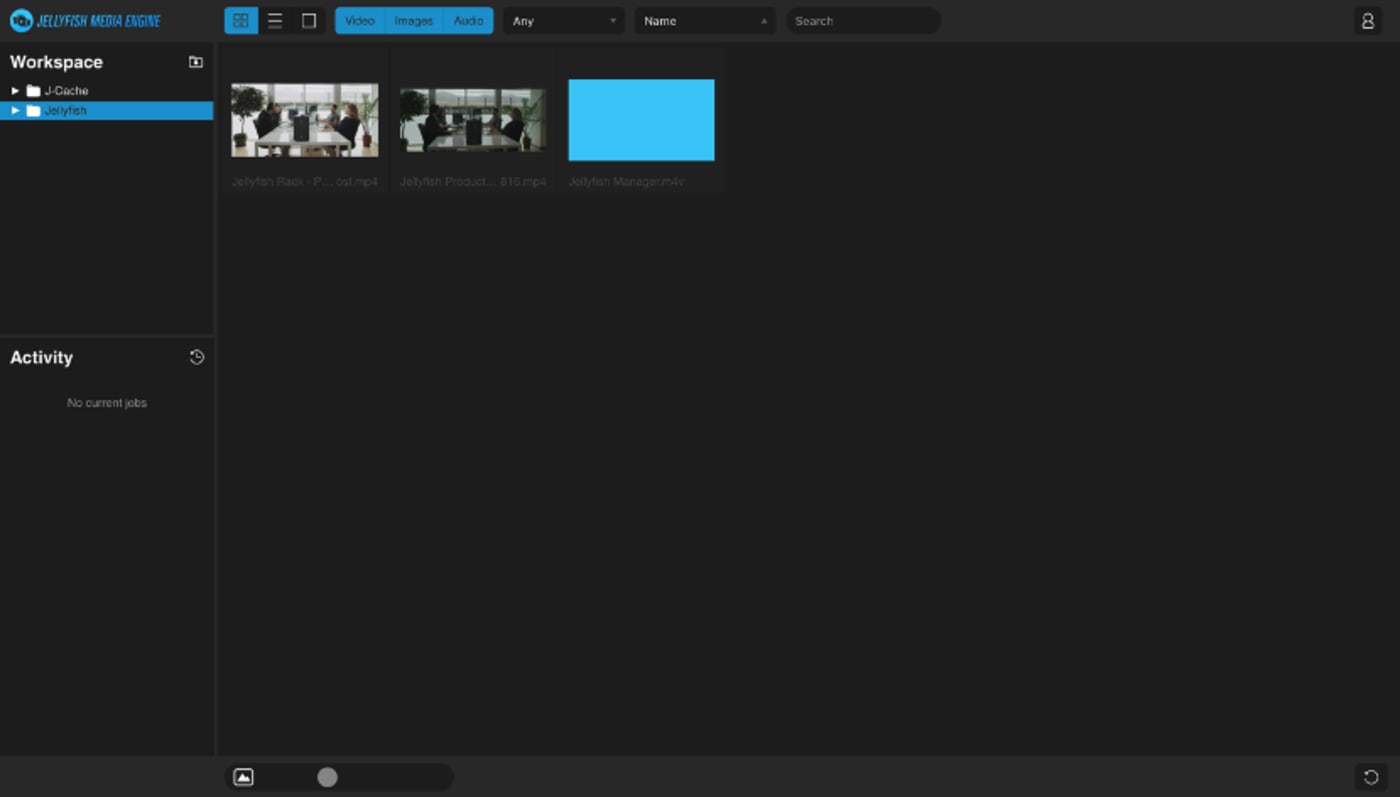
Transferring Media to Your OWC Jellyfish
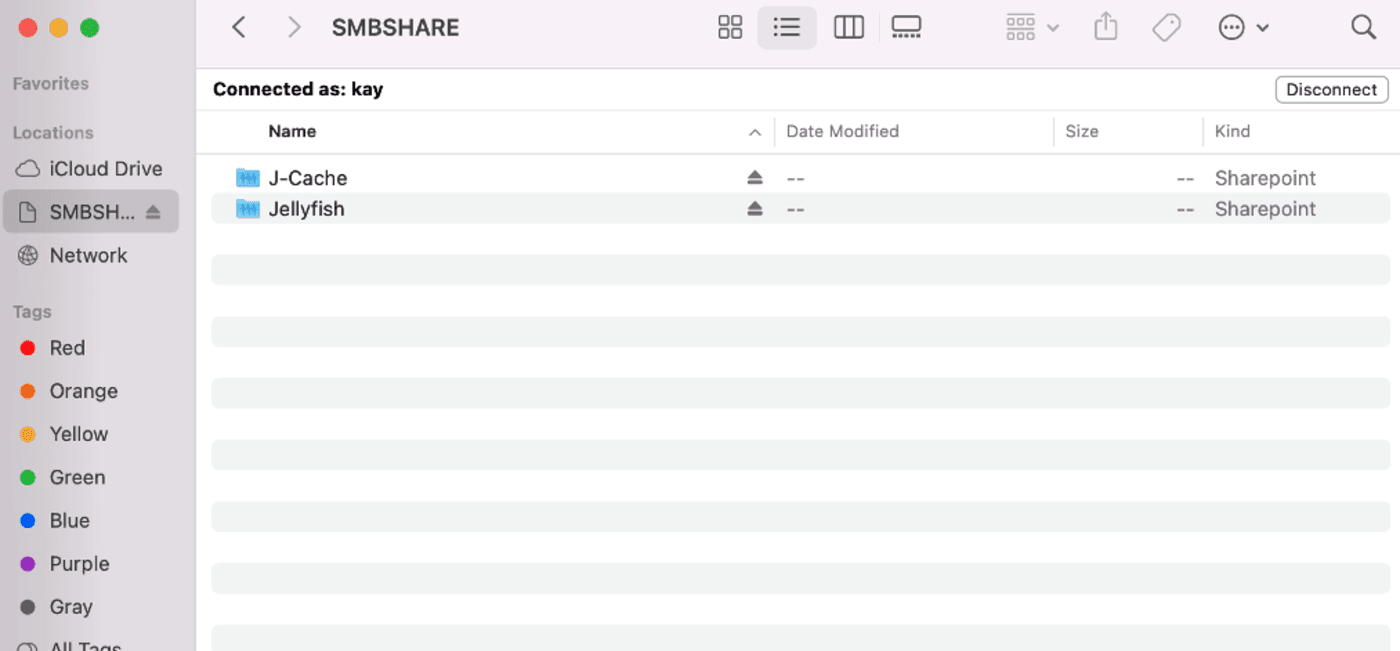
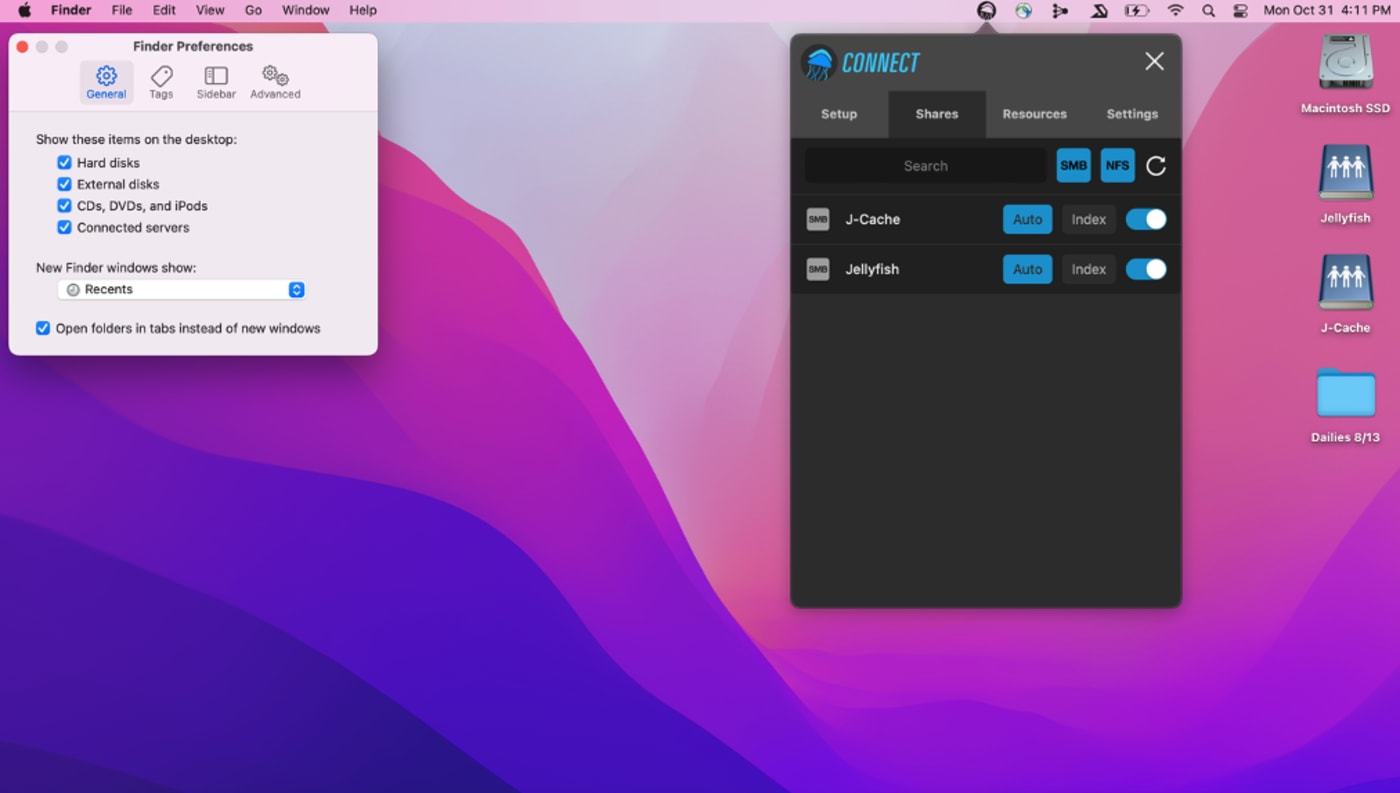
- In order to transfer media to your OWC Jellyfish, you need to mount your shares.
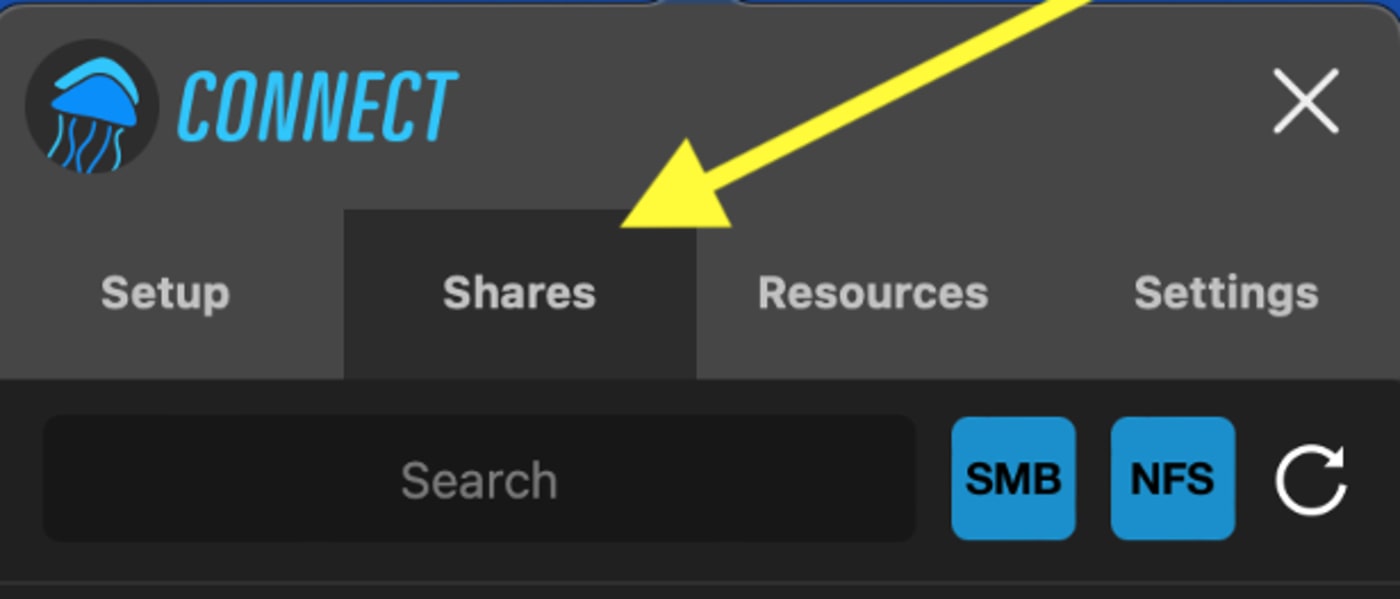
1. In OWC Jellyfish Connect, click on the Shares tab
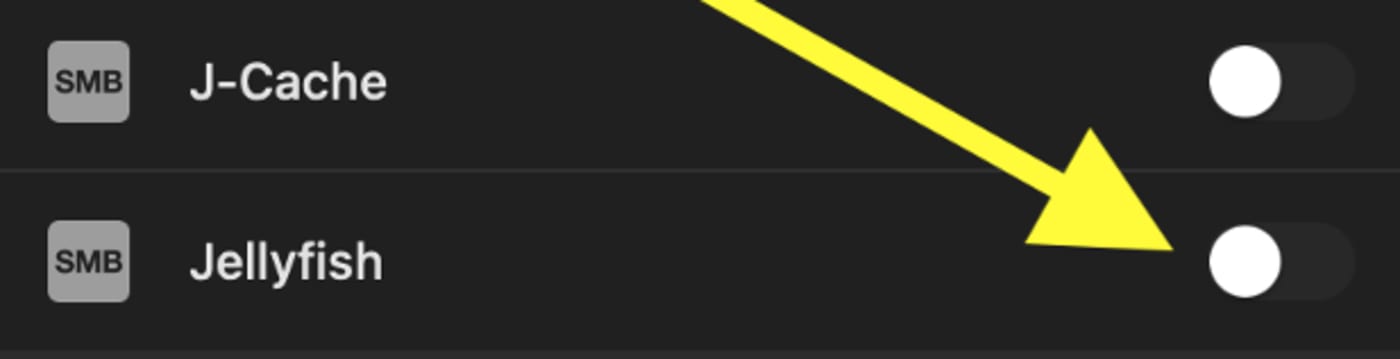
2. From there, find the OWC Jellyfish share and click on the toggle button on the right side of it.
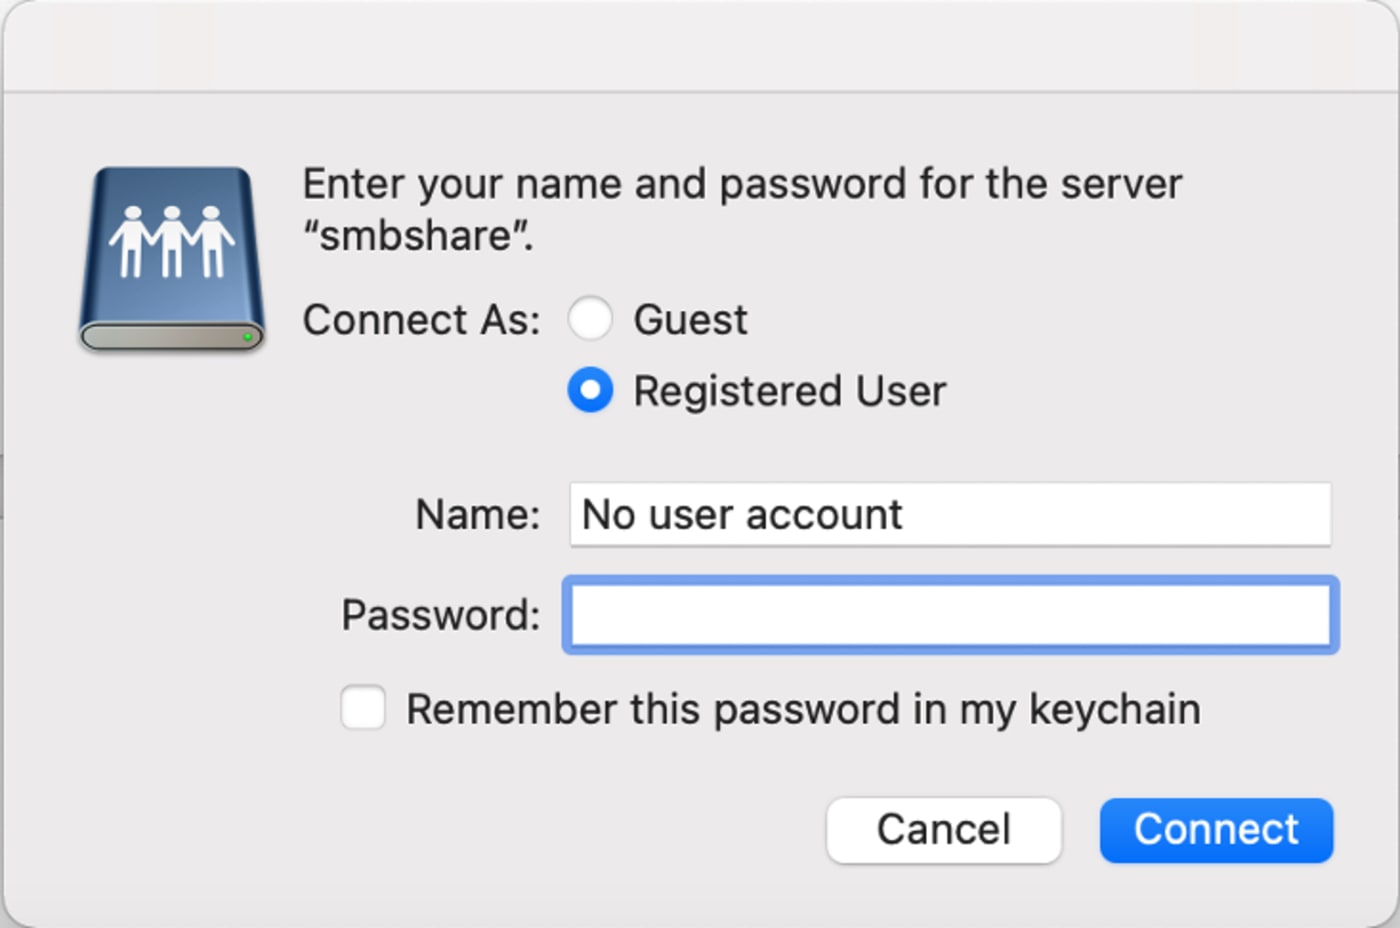
3. You will be prompted to enter your OWC Jellyfish username and password. After entering your credentials, click Connect.
4. The toggle button will now be blue, and you will see a notification that the OWC Jellyfish share has been mounted successfully. Now you are ready to drag and drop your media so your team can get to work!

5. Depending on your Finder preferences, the share may appear either on your Desktop or in a Finder window.
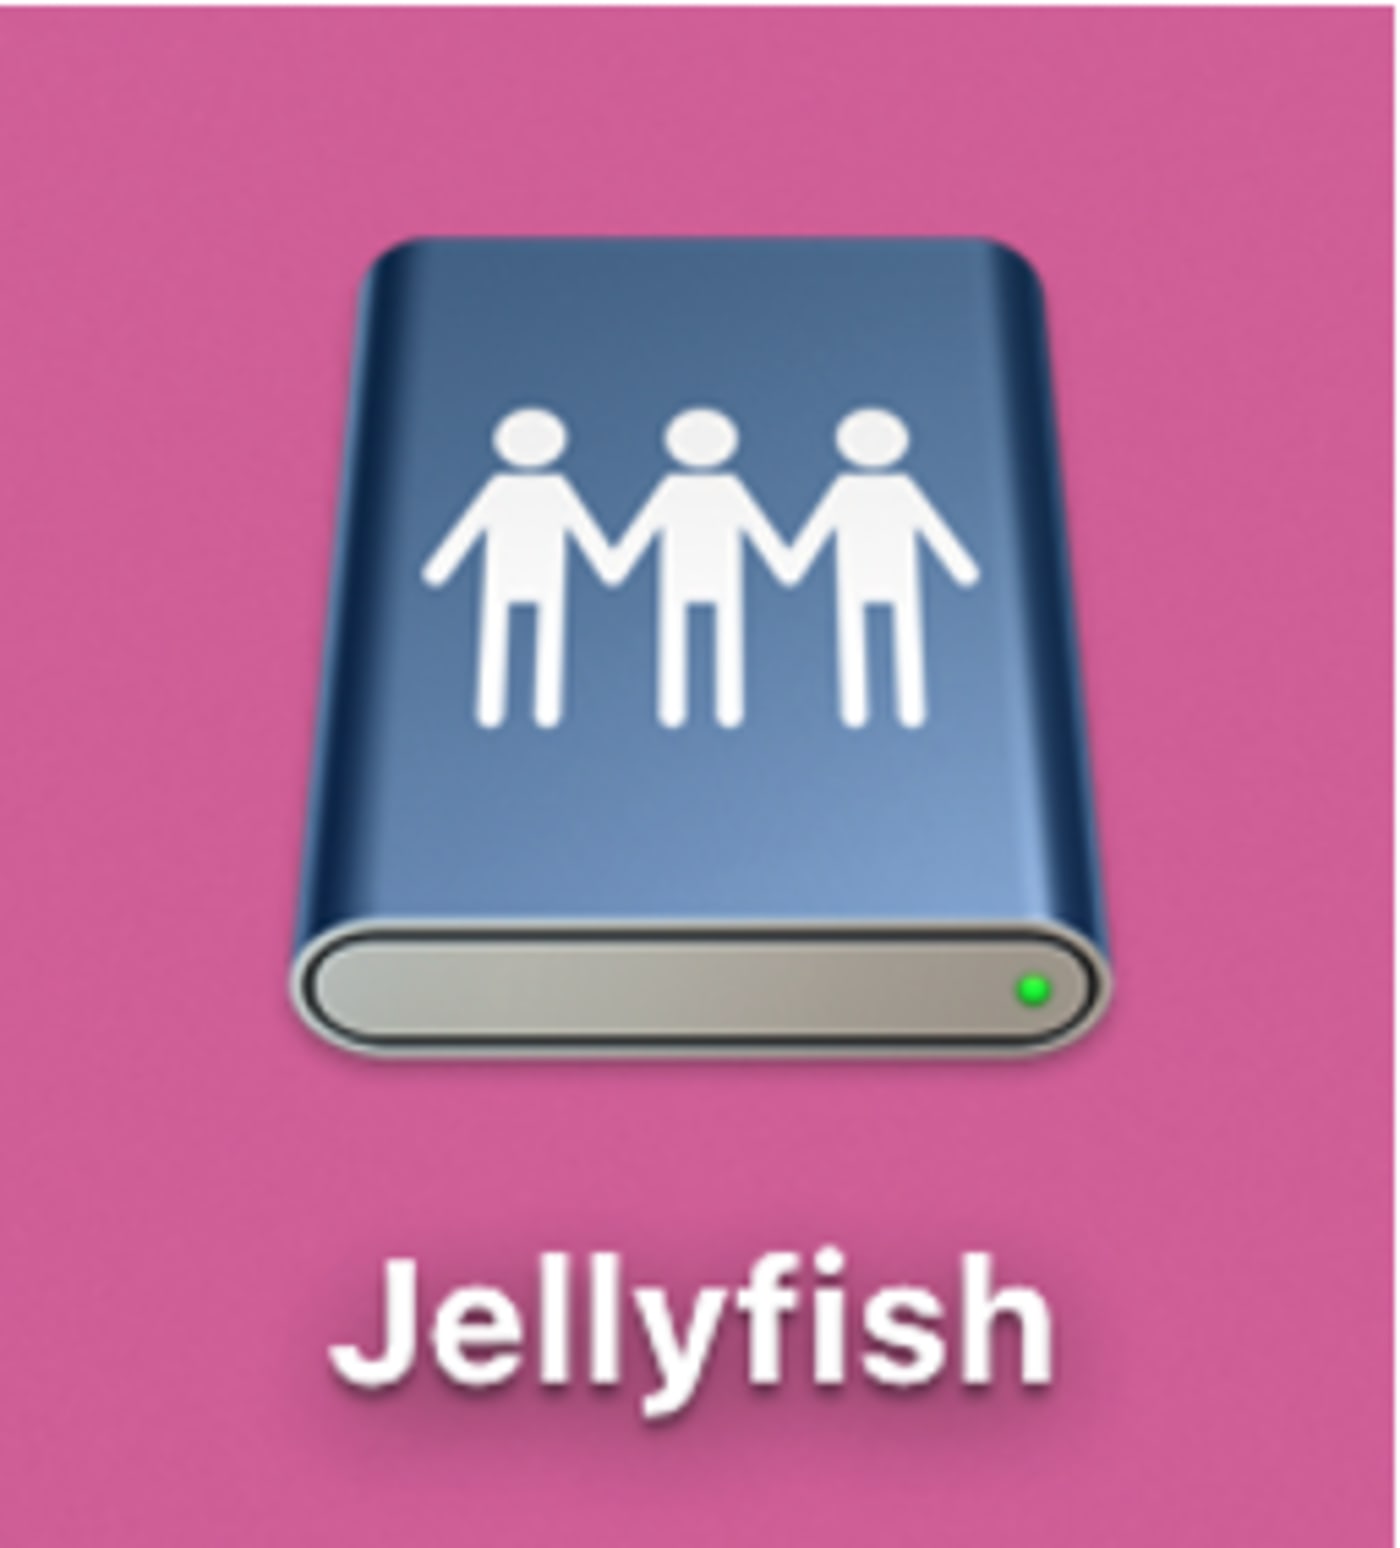
6. Double click the icon and it will be viewable to you just like any folder on your computer. From here, you can drag and drop media, create folders, delete files, and organize in any way you see fit.
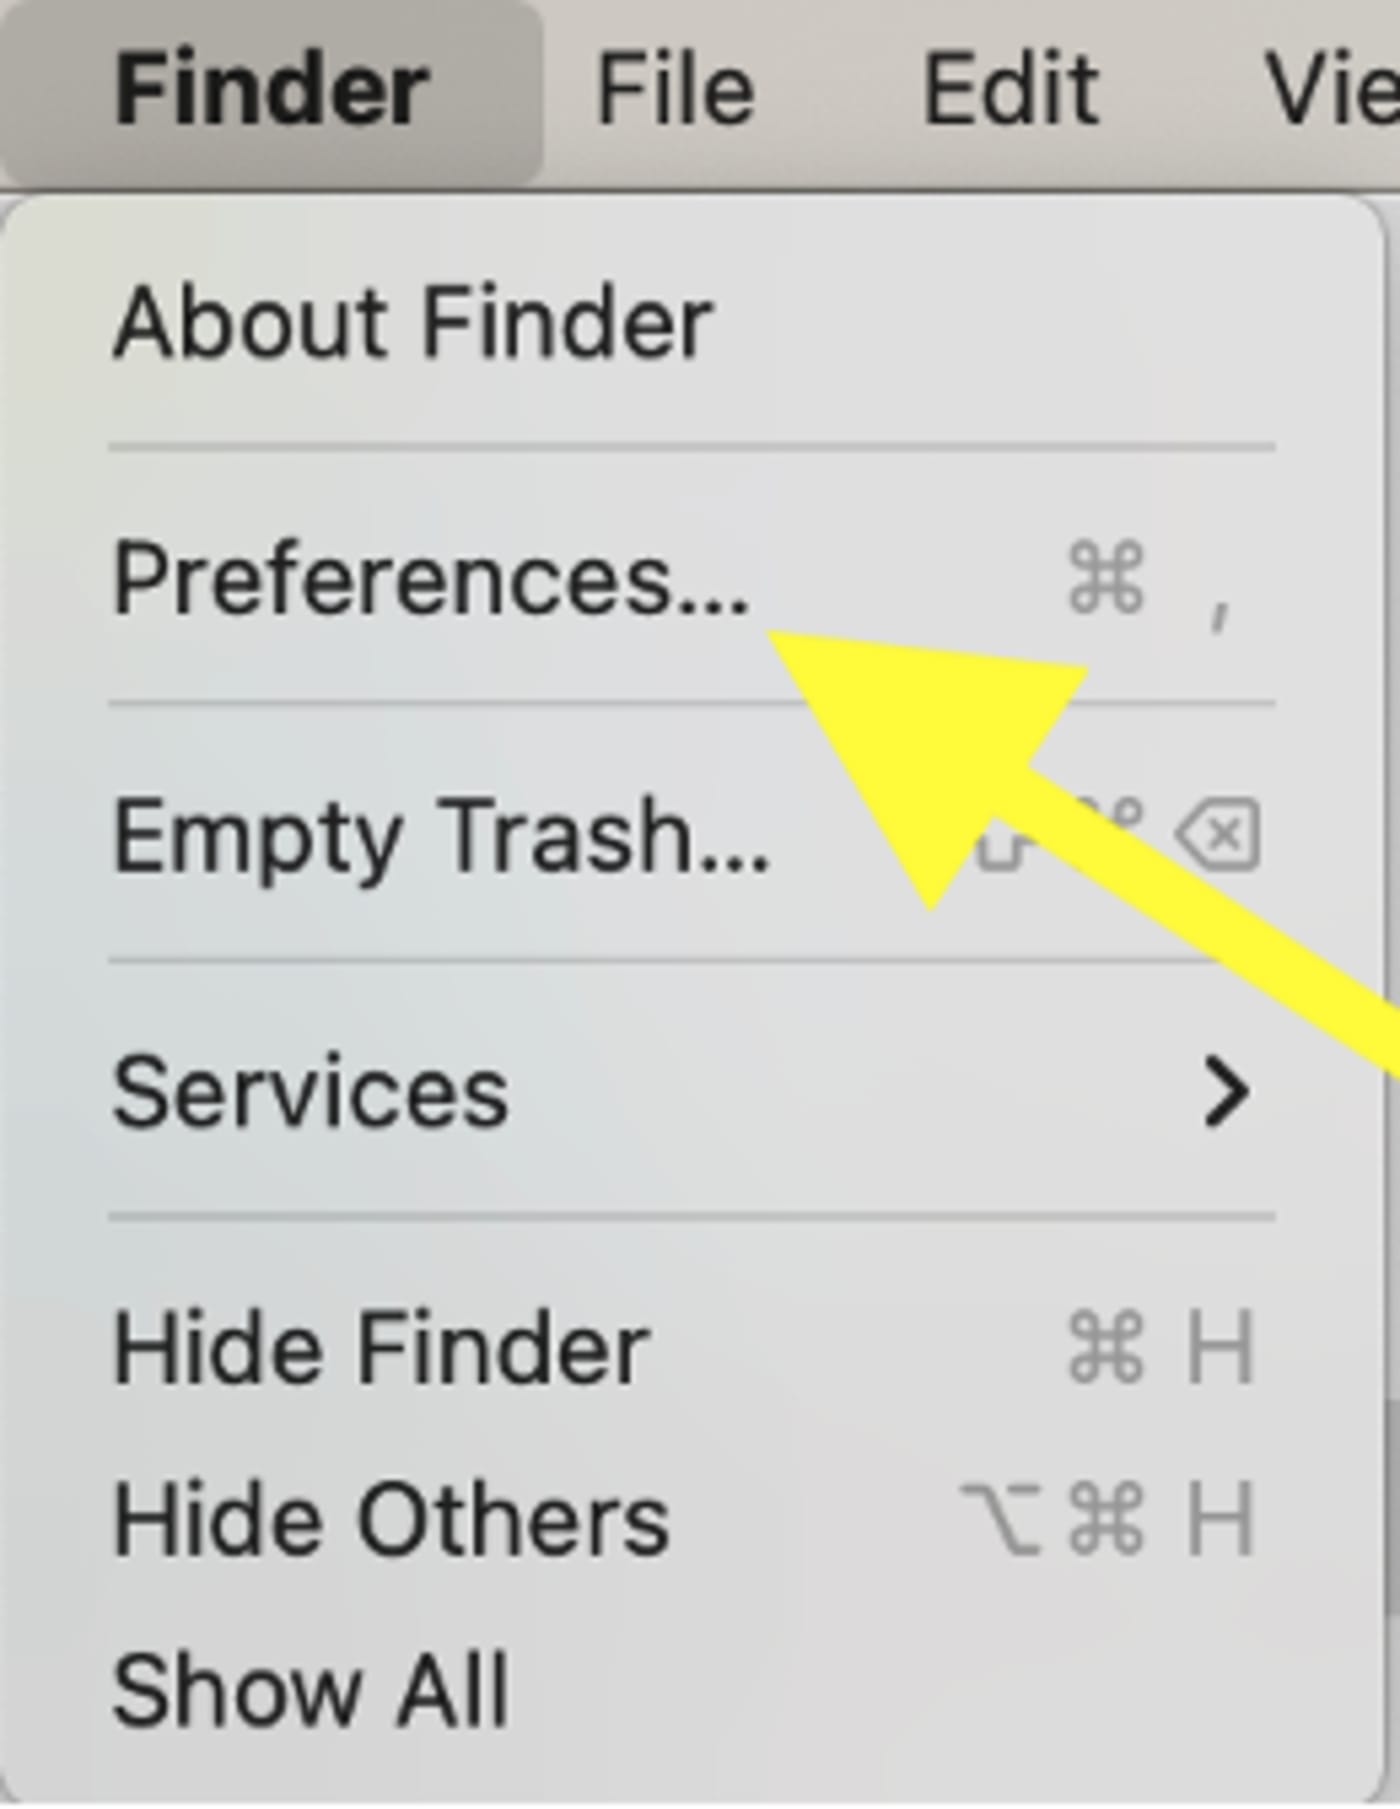
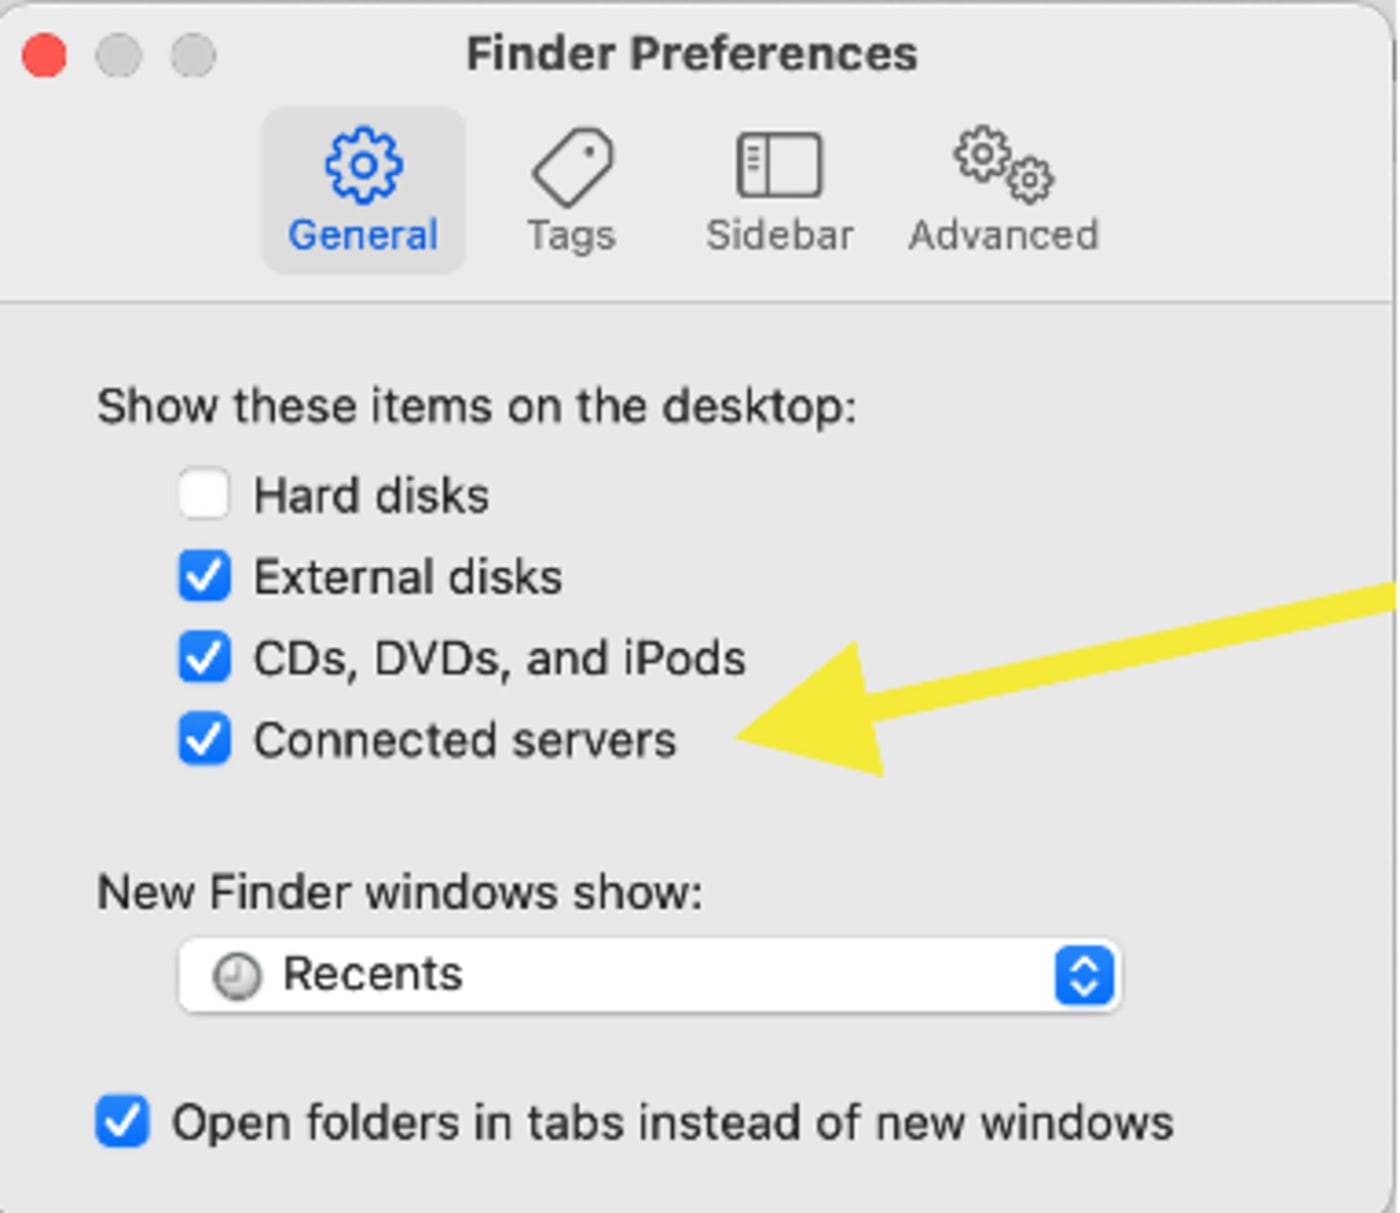
NOTE: If by chance this icon does not appear on your Desktop, you may need to adjust your preferences in Finder. Open Finder, and click on the Finder menu in the top left toolbar on your screen. Select “Preferences” and be sure “Connected servers” is selected. Click the red “X” in the corner to exit and save your changes.
OWC Jellyfish and Adapters
Do I Need an Adapter?
- If you have an iMac Pro, the most recent Mac Mini, or a PC with a 10GbE enabled port, you can plug directly into the OWC Jellyfish without having a network adapter and start editing 4K - 8K media without transcoding or going to a proxy workflow. Here are a few indicators that you may need an adapter:
- If there is not an ethernet connection to your workstation.
- If there is a 1GbE connection but you need 10GbE for 4k and up workflows.
- If more ethernet ports are needed on the workstation than what is provided.
Which Adapter Do I Purchase?
- That will be up to you, you can get a 1GbE adapter or a 10 GbE adapter based on your workflow. If you plan to work in 4k and up, you'll want a 10GbE connection from your workstation to the OWC Jellyfish. 10GbE Adapters we recommend:
Adapter Settings & Drivers
- The OWC Jellyfish connect app will configure the connection from your workstation to your OWC Jellyfish automatically without you having to configure your adapter, but should you have connection issues, please ensure that you've done the following:
- Download adapter drivers:
- Depending on where you've purchased your adapter, be sure to download the latest drivers for your adapter from the manufacturer's website.
- Ensure your adapter settings are properly set. You can review 10G settings in the links below:
- Download adapter drivers:
OWC Thunderbolt 3 10G Ethernet Adapter
- Connect your Thunderbolt 3 equipped Mac or PC to high-performance wired networks delivering up to 10x the performance of Gigabit Ethernet.
Additional Resources
- Want to know more? Check out our online resources at https://www.lumaforge.com/tutorials and https://jellyfish.support/.