

OWC Jellyfish Connect 3 Button Guide
Overview
OWC Jellyfish Connect 3 is the all-in-one application to get users connected to their shares and additional tools. When you launch the app, the OWC Jellyfish icon will appear in the upper right of the macOS menu bar (where you will find Wi-Fi, Bluetooth, battery status, etc).

You can open the app with a simple click of the Jellyfish icon.
Any time you want to quit the application, select Command + Q on your keyboard.
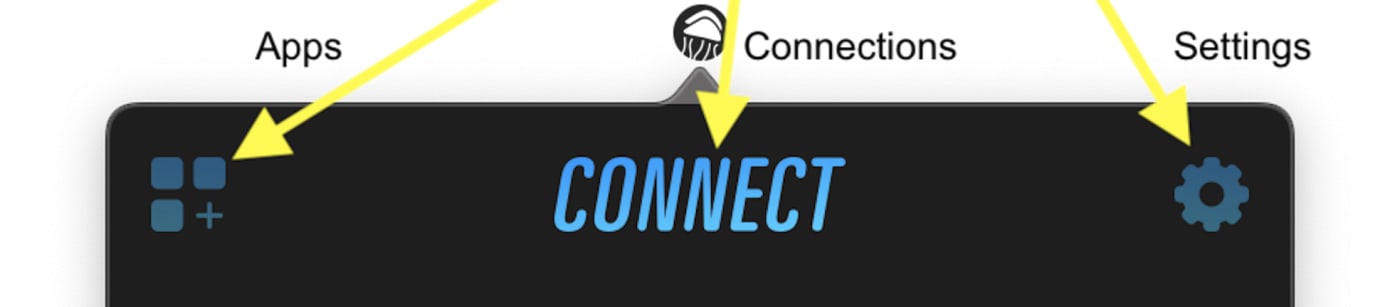
OWC Jellyfish Connect’s uses are divided into three sections, all clickable at the top of the app. From left to right, they are: Apps, Connections, and Settings.
Connections

Connections is where you set up your connection to your OWC Jellyfish.
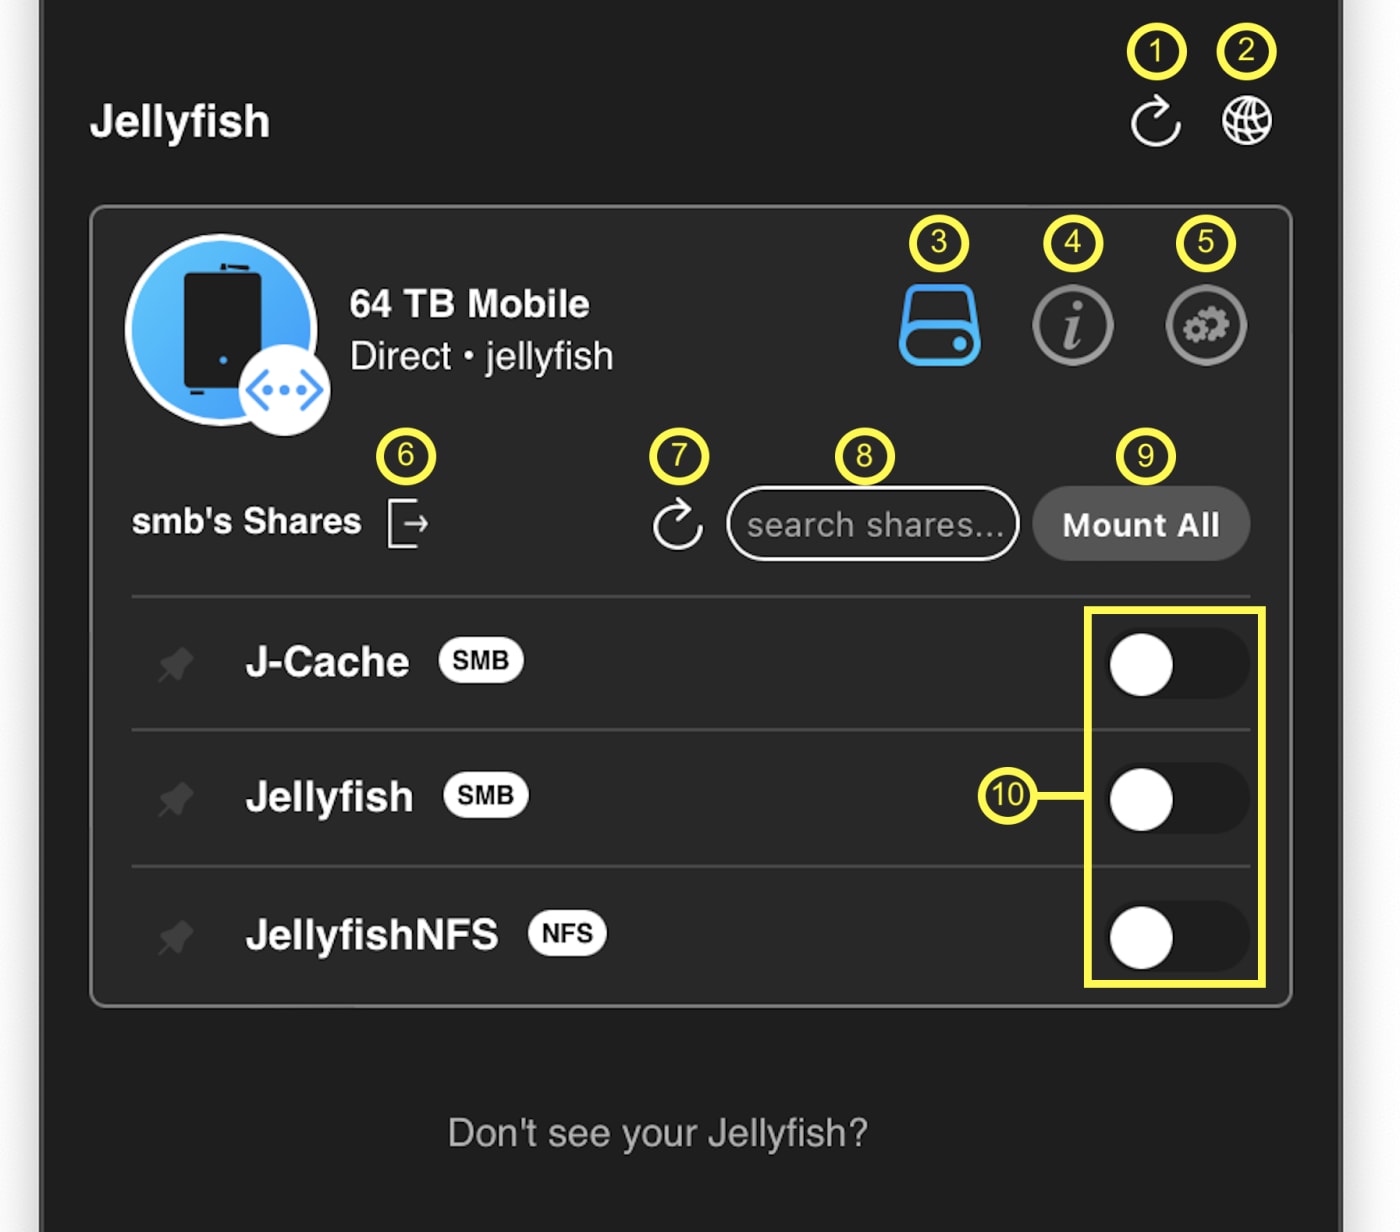
1. Refresh repopulates your list of any connected or available OWC Jellyfish, even if they have not yet been configured.
2. Network Preferences opens macOS network settings.
3. Shares shows (only) the list of shares to which you have access.
4. Info lists device info (i.e. model, serial, available and total storage capacities, and IP address) and also includes which version of Manager for Jellyfish is on that system. It also includes links to open Manager and Media Engine. See diagram and information marked “Manager for Jellyfish and Media Engine” at the end of this section for more information.
5. Configuration opens the connection details for your OWC Jellyfish (server & client IP addresses, subnet mask) and provides the option unconfigure your connection to your OWC Jellyfish.
6. Logout logs out of and unmounts all shares you are signed into. To regain access, you will need to log in with your Jellyfish username and password.
7. Refresh repopulates the list of available shares.
8. Search allows you to search the names of the shares.
9. Mount All mounts every available share. The initial login credentials to mount the OWC Jellyfish and J-Cache SMB shares are:
Username: smb
Password: smb
We strongly recommend changing the default password for the ‘smb’ user as soon as you are set up.
Your shares will appear on your desktop when this is completed. You can use this icon like you would any folder on your computer: drag and drop items into the share and organize it any way that suits your workflow.
If it does not appear, you may need to adjust a simple setting in Finder. Open Finder’s Preferences dialogue and be sure to select “Connected servers” under the General tab.
10. Mount Toggle Buttons allows to you mount or unmount shares individually.
Manager for OWC Jellyfish and Media Engine
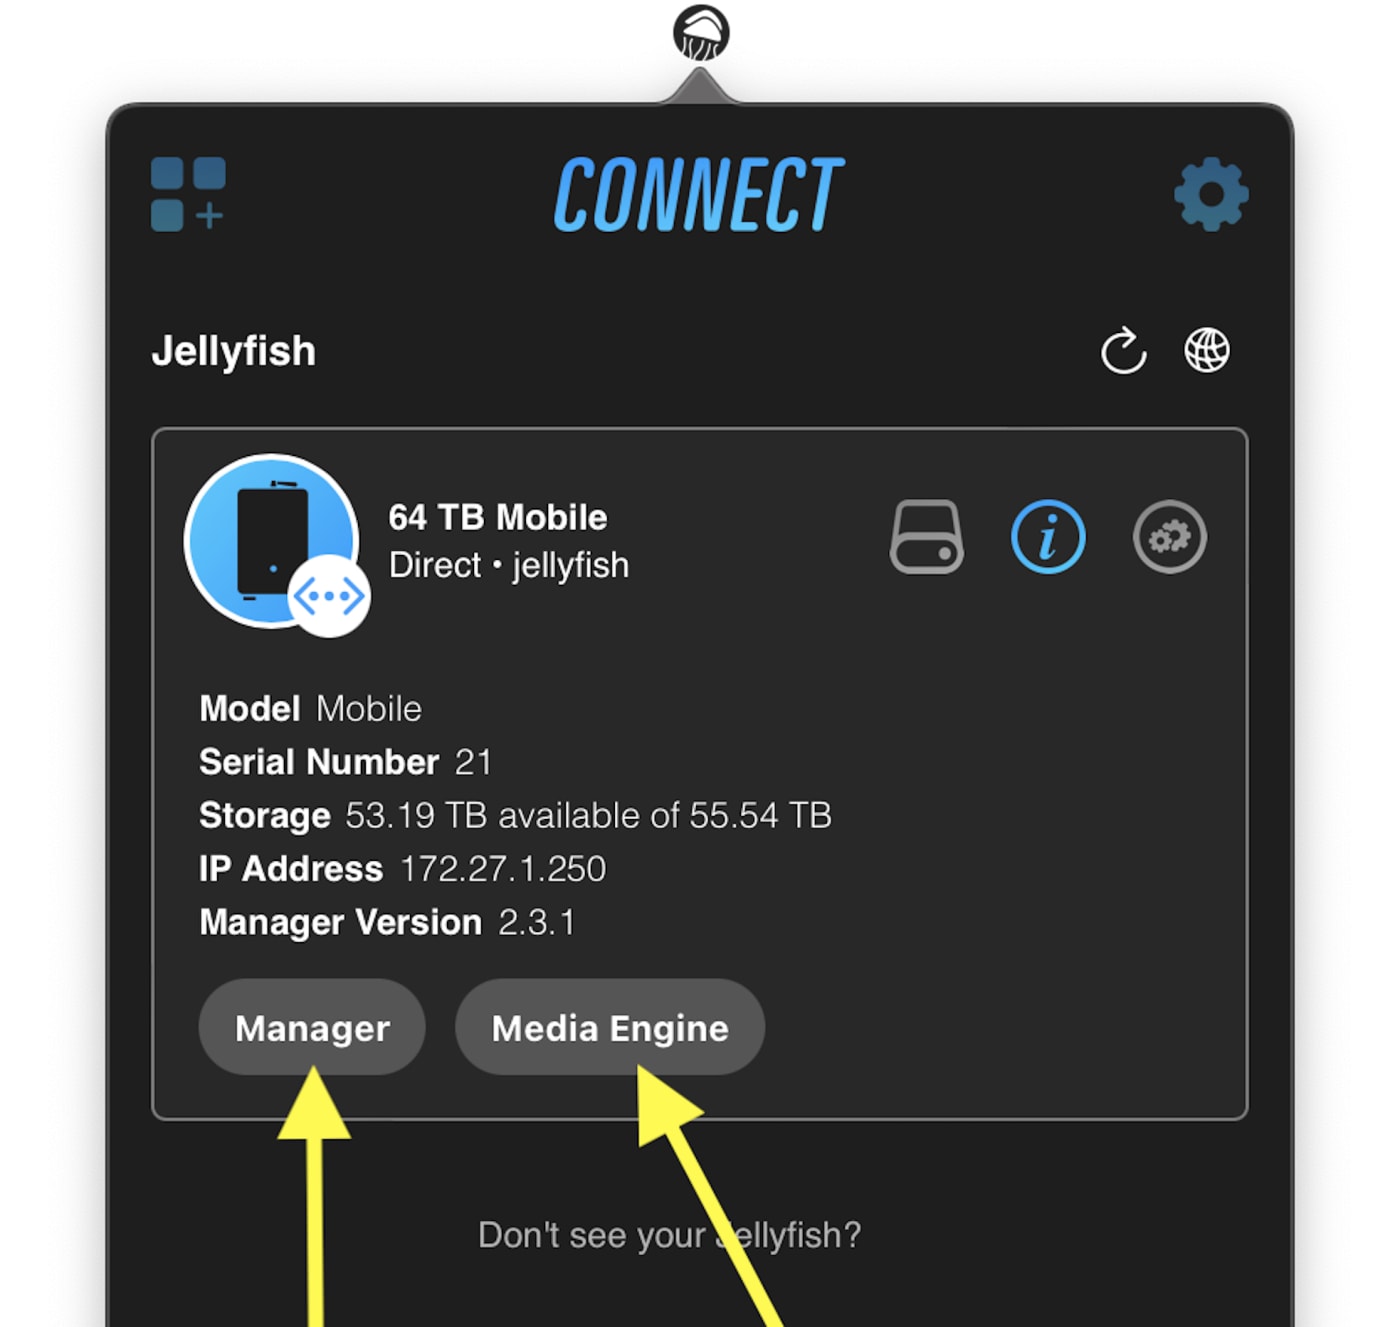
In the Info panel, you will find two other buttons. The first is Manager. Click this to launch OWC Jellyfish Manager in your browser, where you will use default credentials before creating your own unique username and password. OWC Jellyfish Manager is your tool for managing your OWC Jellyfish. You can create usernames, set passwords, change permissions and check on the health of your OWC Jellyfish. We will dive further into OWC Jellyfish Manager in its own article.
The second button is Media Engine. This will launch OWC Jellyfish Media Engine in your browser, which is a powerful proxy tool included with your OWC Jellyfish. Be sure to check out our video tutorials on how to use this.
Apps

The Apps page populates a list of apps that work with your OWC Jellyfish.
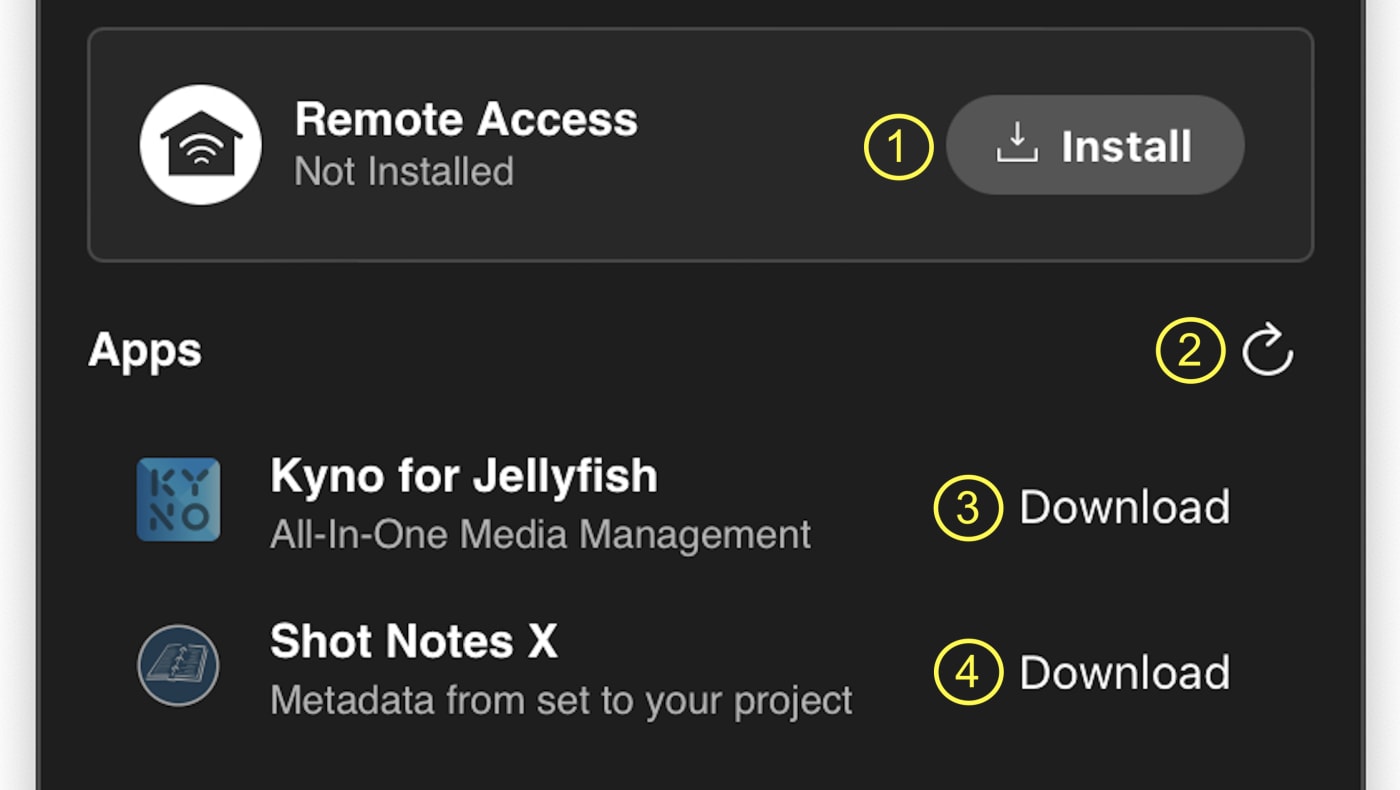
1. Remote Access provides remote connectivity to your OWC Jellyfish for users on the go (service fee applies.) If you are interested in learning more, please check out our FAQ. To install, simply click on the install button. Once it is installed, you will see basic details relating to your Remote Access configuration. If you click on it, you can get more info as well as make changes (or uninstall) to your service.
2. Refresh repopulates the list of available apps.
3. Kyno for Jellyfish is a light-weight media management tool that works seamlessly with your OWC Jellyfish. If it is not installed, you will see a Download button here that will launch the download page from OWC. Once installed, you will be able to click a button here to open Kyno for Jellyfish.
4. Shot Notes X is a metadata manager that is designed for FinalCut Pro users. If it is not installed, you will see a Download. Once and installed, you will see a button that opens the Shot Notes X.
Using a switch? Here is our step-by-step setup guide: Manually Set Up a Workstation Connection to OWC Jellyfish via a Switch.
Settings

The Settings tab populates a list of options: logs, support and updates.

1. Support Portal launches the OWC Jellyfish Support page in your browser. Here you can access support articles which are grouped by topic and are also searchable.
You can access helpful video tutorials, as well as click Contact to connect with us for assistance.
2. Launch On Startup toggles whether or not Jellyfish Connect will launch on startup of your computer.
3. Open Logs Folder launches the folder on your computer where your Jellyfish Connect logs are saved.
4. Current version shows what version of Jellyfish Connect you are running.
5. Check for Updates automatically checks for any software updates beyond your current Jellyfish Connect software. If one is available, a download button will appear to begin the download and installation dialogue. If no update is available, nothing will happen. You are up to date!